> ## Documentation Index
> Fetch the complete documentation index at: https://docs.elkapi.com/llms.txt
> Use this file to discover all available pages before exploring further.
# OpenClaw Manager — Feishu チャネル設定
> OpenClaw Manager で Feishu ボットを作成・設定する手順を詳しく解説。企業カスタムアプリの作成、権限設定、イベントサブスクリプション、ペアリングコード連携までの完全ガイド。
## はじめに
このチュートリアルでは、OpenClaw Manager で Feishu ボットを作成・設定する手順を説明します。設定完了後、Feishu Bot が ElkAPI の AI モデルを使用して、Feishu 内でユーザーとインテリジェントな会話を行えるようになります。
**前提条件:** [OpenClaw Manager のデプロイ](/ja/integrations/platform/openclaw-manager)が完了し、Manager が起動中で管理画面にアクセスできることをご確認ください。
## ステップ 1:Feishu 企業カスタムアプリを作成
1. [Feishu オープンプラットフォーム](https://open.feishu.cn/app)にアクセスし、ログイン後 **企業カスタムアプリを作成** をクリック
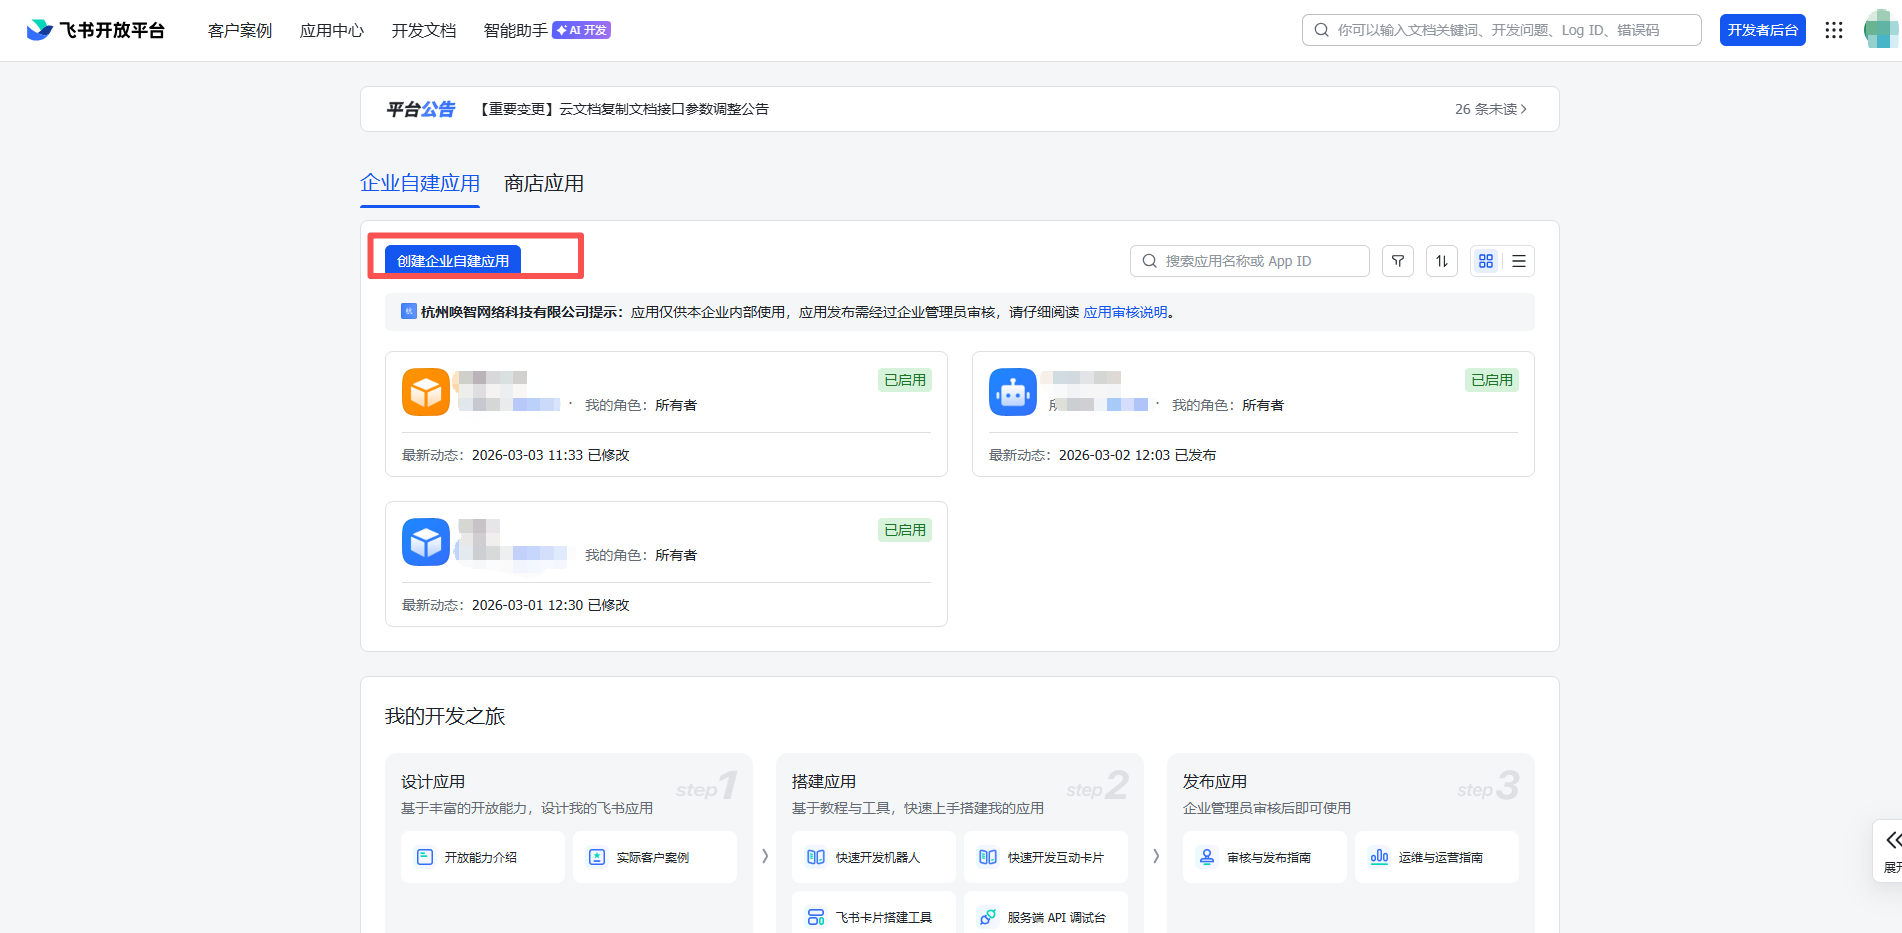 2. アプリ名と説明を入力し、アプリアイコンをアップロード
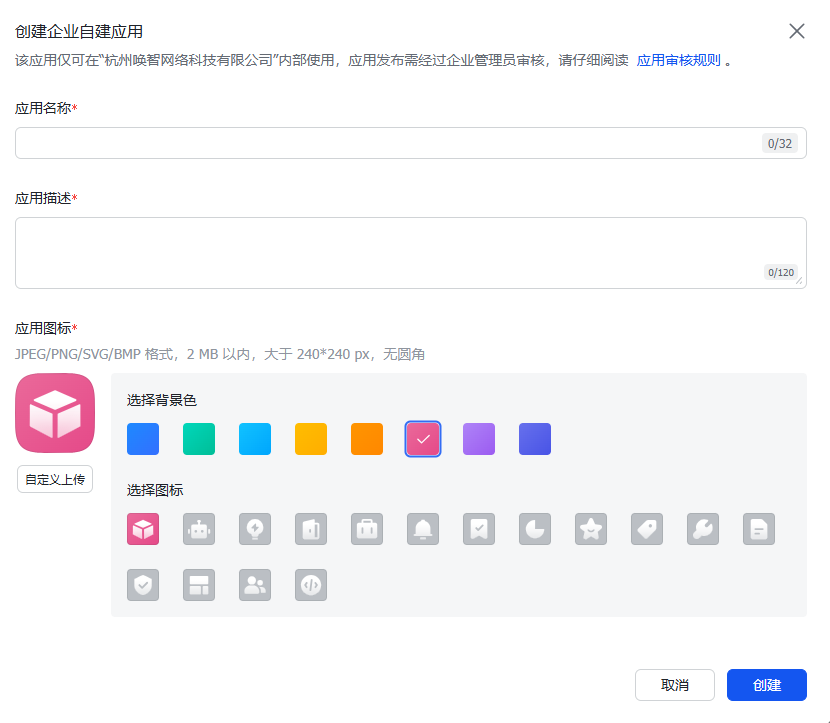 *アプリ名と説明を入力*
## ステップ 2:アプリ権限を設定
1. アプリ詳細ページに入り、左メニューの **権限管理** をクリック
2. **一括有効化** をクリックし、以下の JSON 設定を貼り付け:
```json theme={null} theme={null}
{
"scopes": {
"tenant": [
"contact:contact.base:readonly",
"contact:user.email:readonly",
"im:chat.members:bot_access",
"im:message",
"im:message.group_at_msg:readonly",
"im:message.p2p_msg:readonly",
"im:message:readonly",
"im:message:send_as_bot",
"cardkit:card:write"
]
}
}
```
*アプリ名と説明を入力*
## ステップ 2:アプリ権限を設定
1. アプリ詳細ページに入り、左メニューの **権限管理** をクリック
2. **一括有効化** をクリックし、以下の JSON 設定を貼り付け:
```json theme={null} theme={null}
{
"scopes": {
"tenant": [
"contact:contact.base:readonly",
"contact:user.email:readonly",
"im:chat.members:bot_access",
"im:message",
"im:message.group_at_msg:readonly",
"im:message.p2p_msg:readonly",
"im:message:readonly",
"im:message:send_as_bot",
"cardkit:card:write"
]
}
}
```
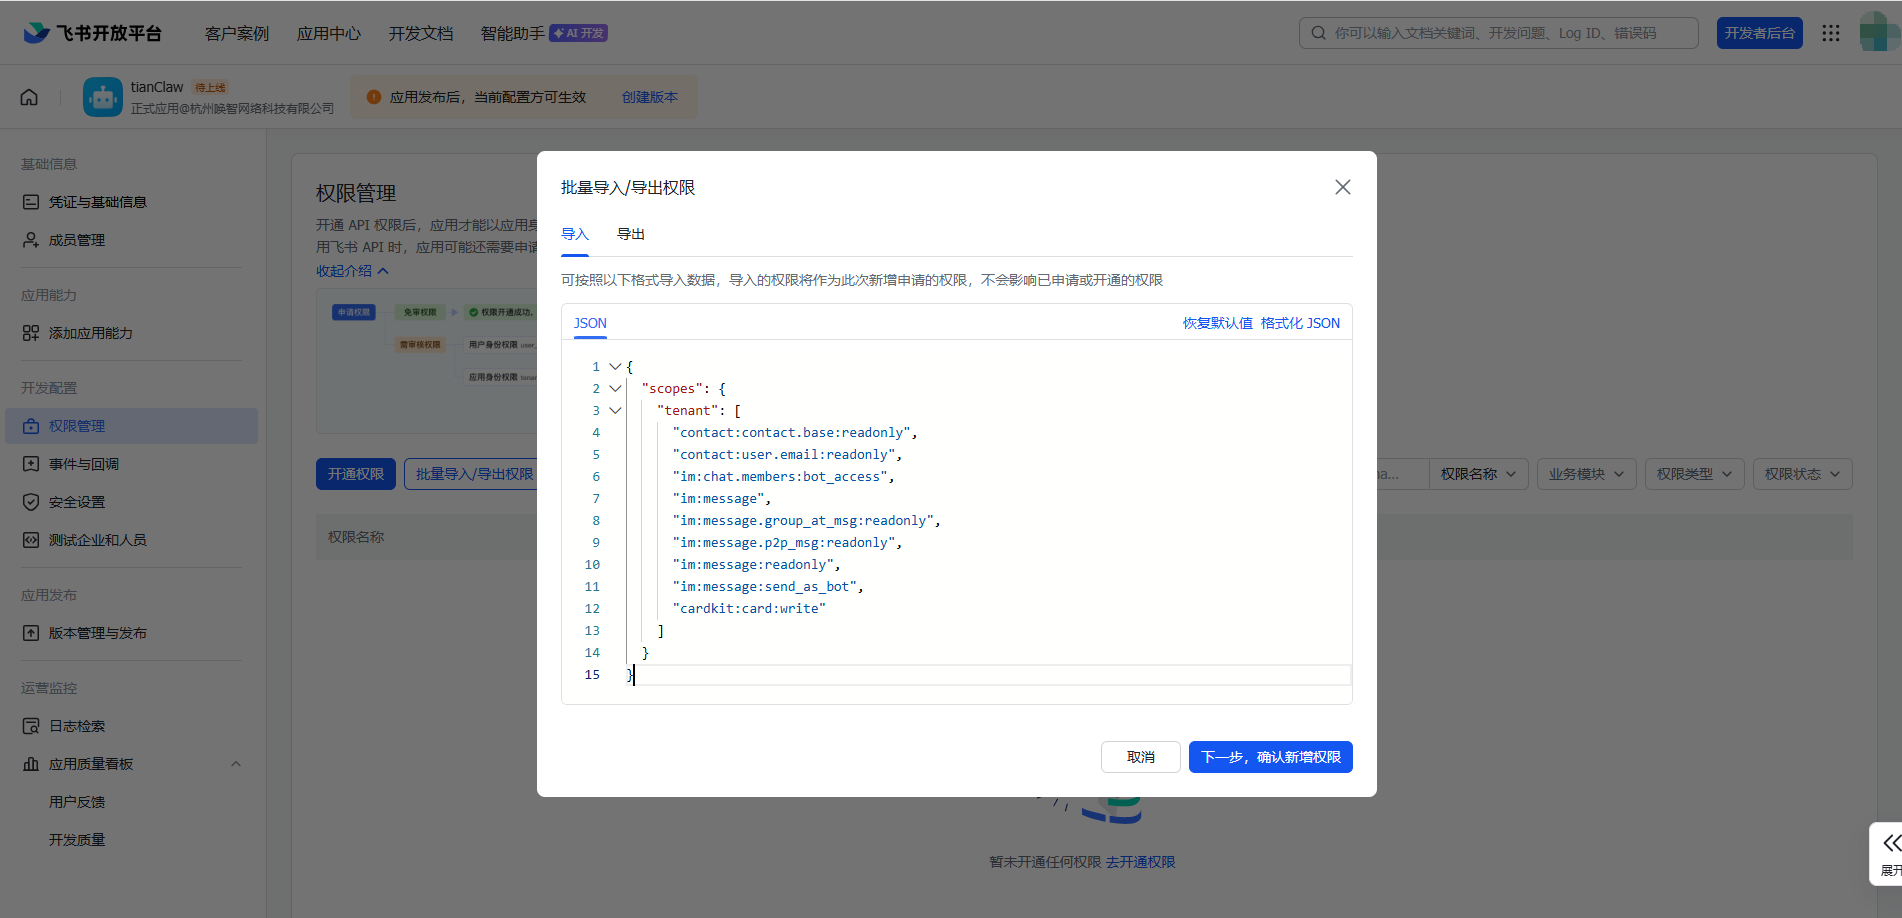 *必要な権限を一括有効化*
3. 確認をクリック
## ステップ 3:認証情報を取得
1. 左メニューの **認証情報と基本情報** をクリック
2. **App ID**(形式:`cli_xxxxxxxxxx`)と **App Secret** をコピー
*必要な権限を一括有効化*
3. 確認をクリック
## ステップ 3:認証情報を取得
1. 左メニューの **認証情報と基本情報** をクリック
2. **App ID**(形式:`cli_xxxxxxxxxx`)と **App Secret** をコピー
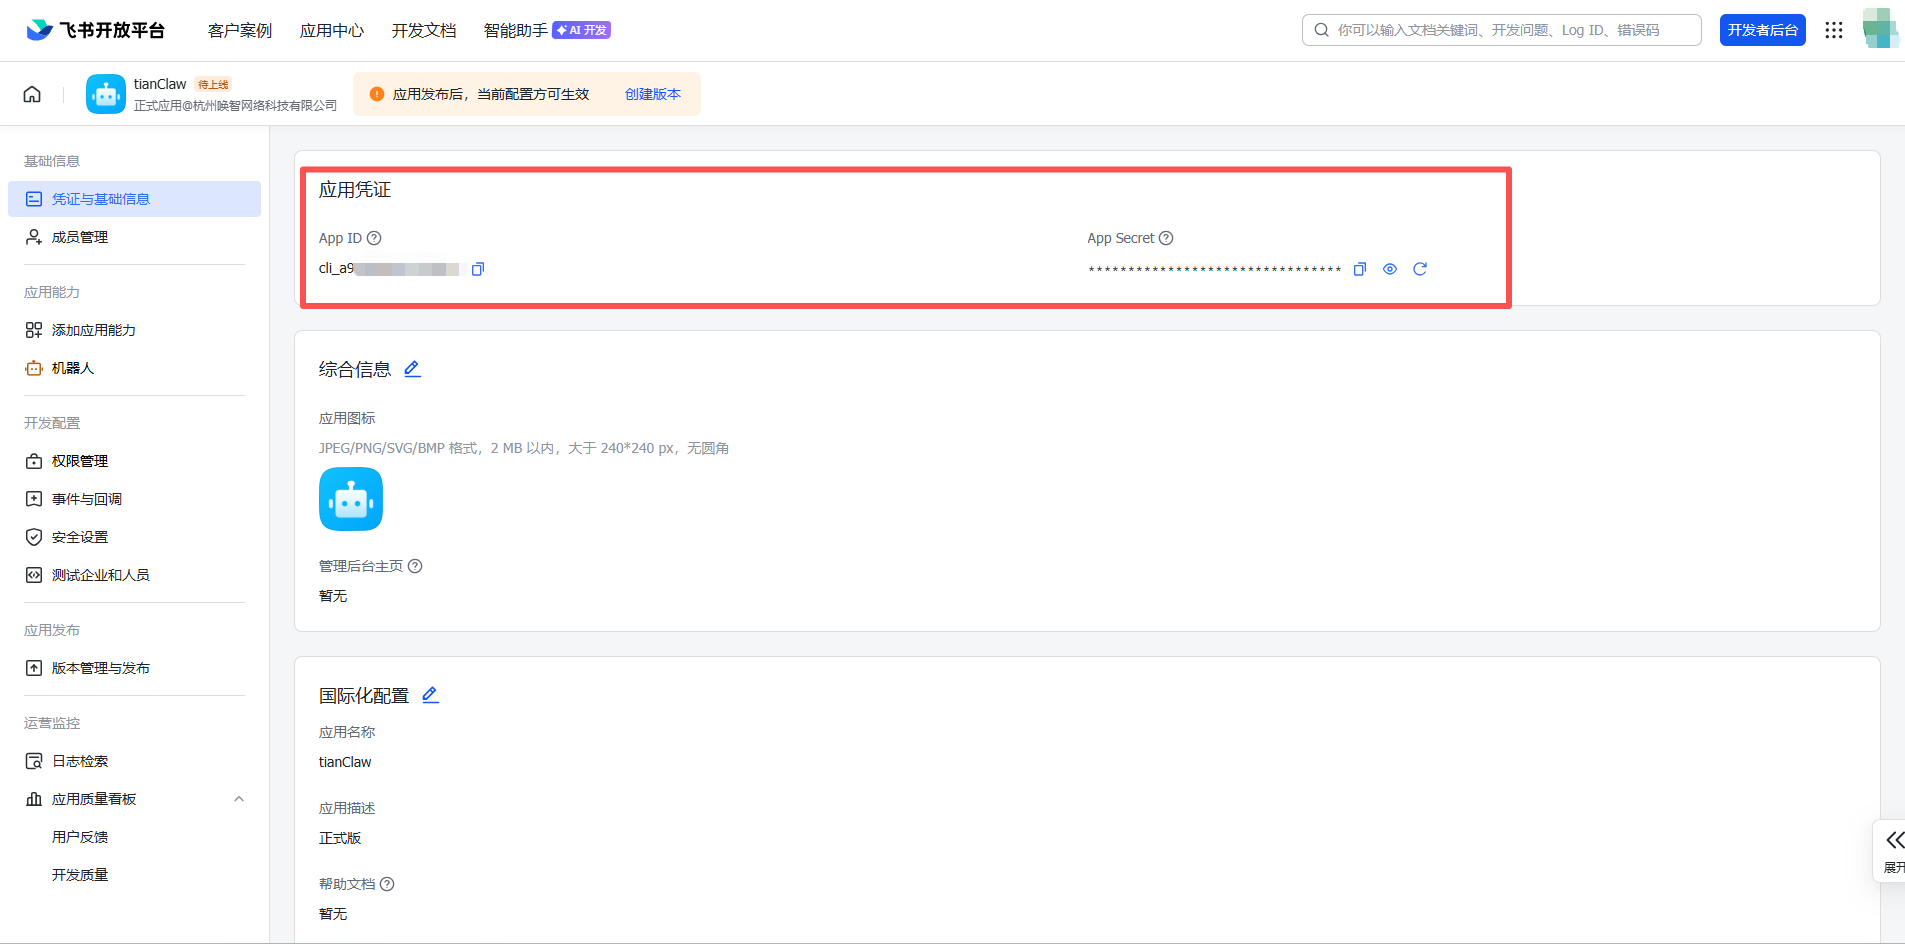 *App ID と App Secret をコピー*
**App Secret を安全に保管してください**。他人に漏らさないでください。
## ステップ 4:Manager でインスタンスを作成
1. OpenClaw Manager 管理画面を開く(`http://127.0.0.1:51942`)
2. **+ 新規インスタンス** をクリック
3. **インスタンス名を入力** — 例:`my-feishu-bot`
*App ID と App Secret をコピー*
**App Secret を安全に保管してください**。他人に漏らさないでください。
## ステップ 4:Manager でインスタンスを作成
1. OpenClaw Manager 管理画面を開く(`http://127.0.0.1:51942`)
2. **+ 新規インスタンス** をクリック
3. **インスタンス名を入力** — 例:`my-feishu-bot`
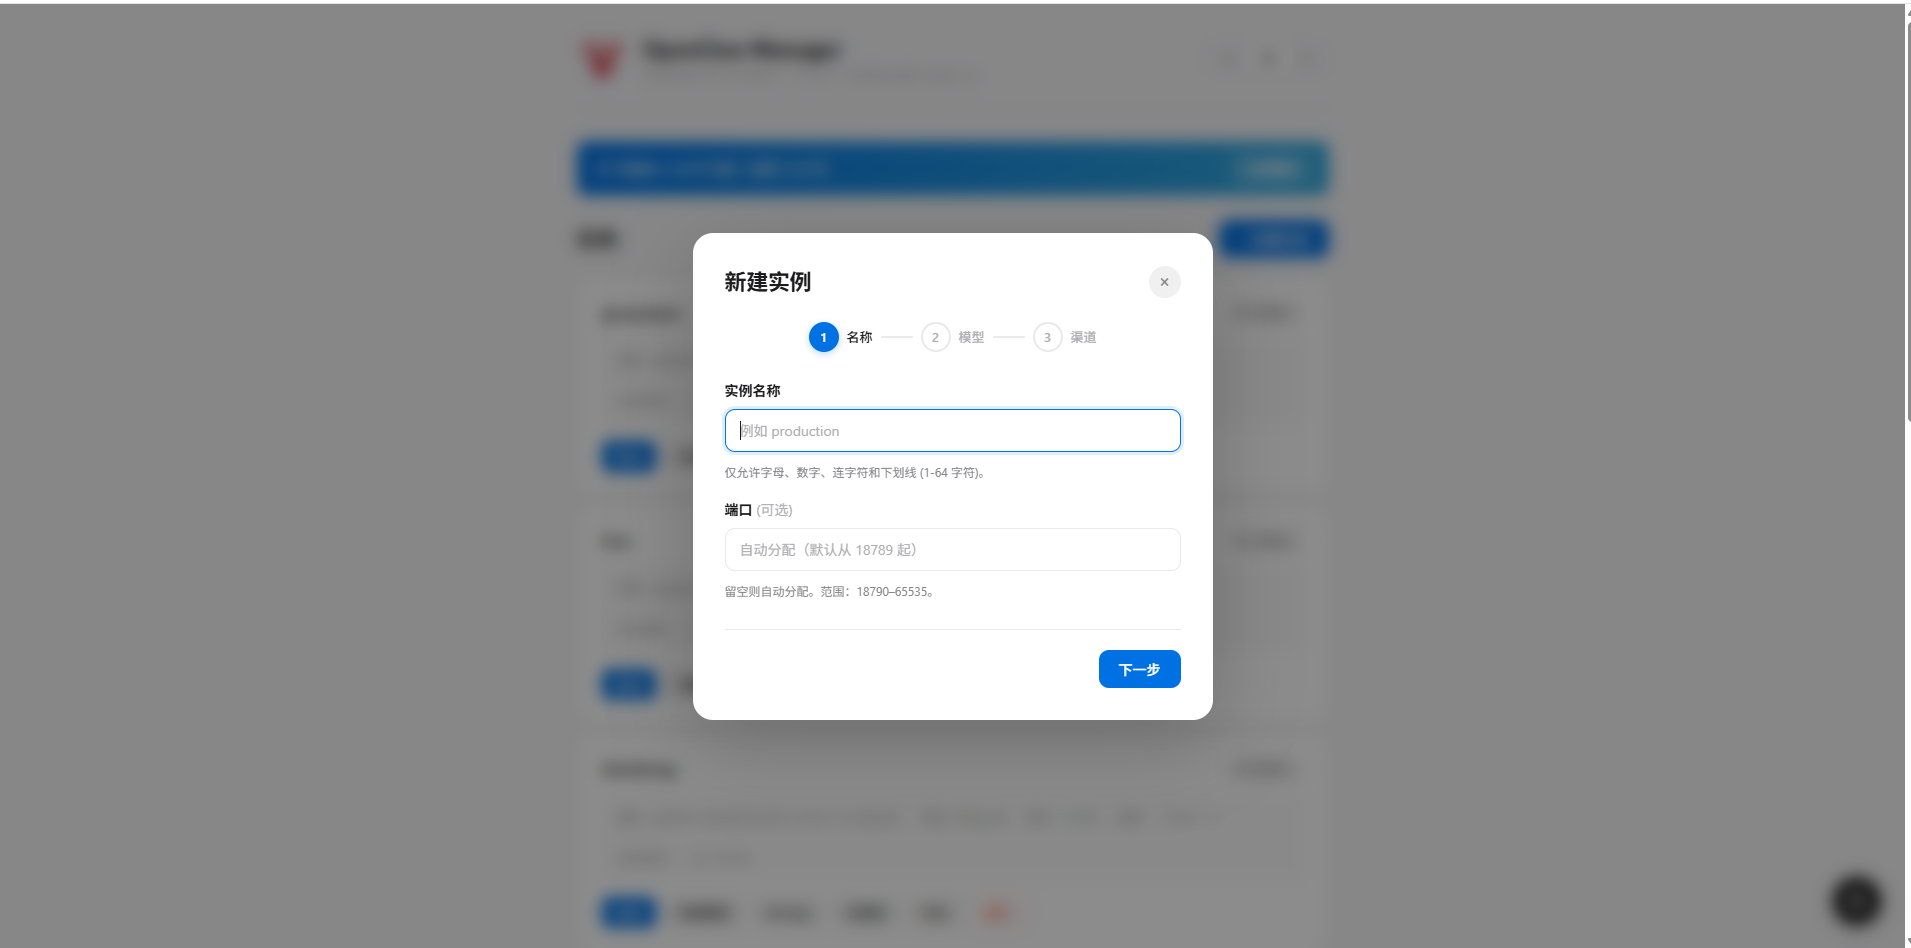 4. **AI モデルを選択** — 使用するモデルを選択
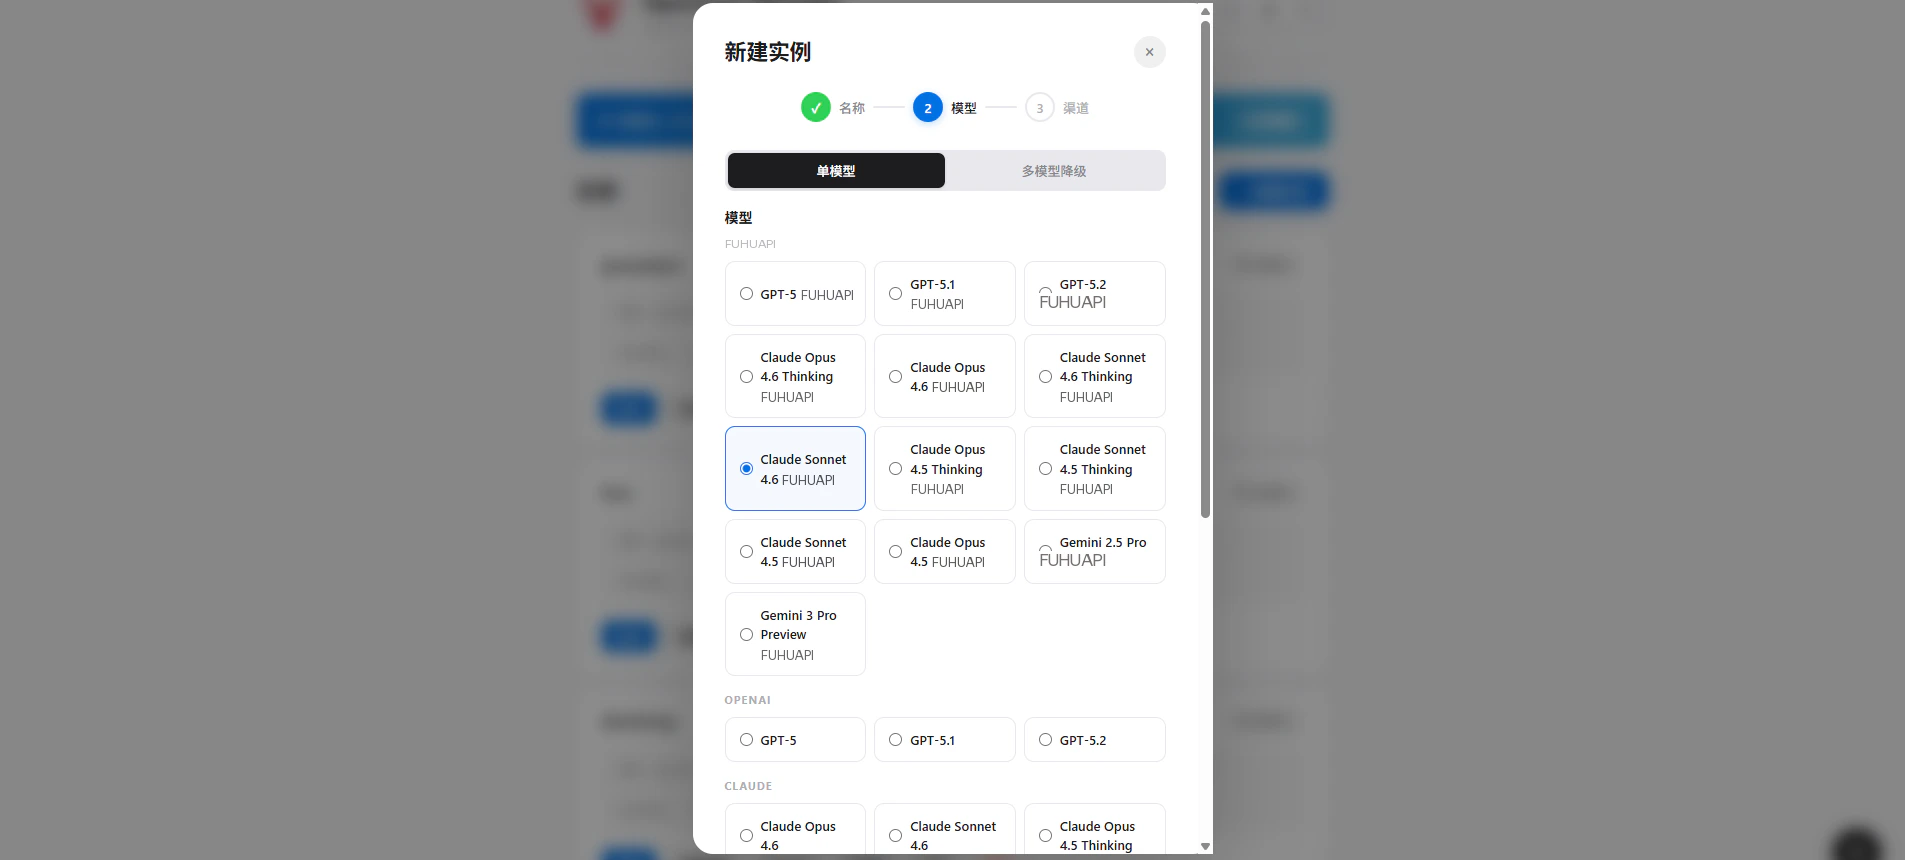 5. **ElkAPI API Key を入力** — `sk-` で始まる API キーを入力
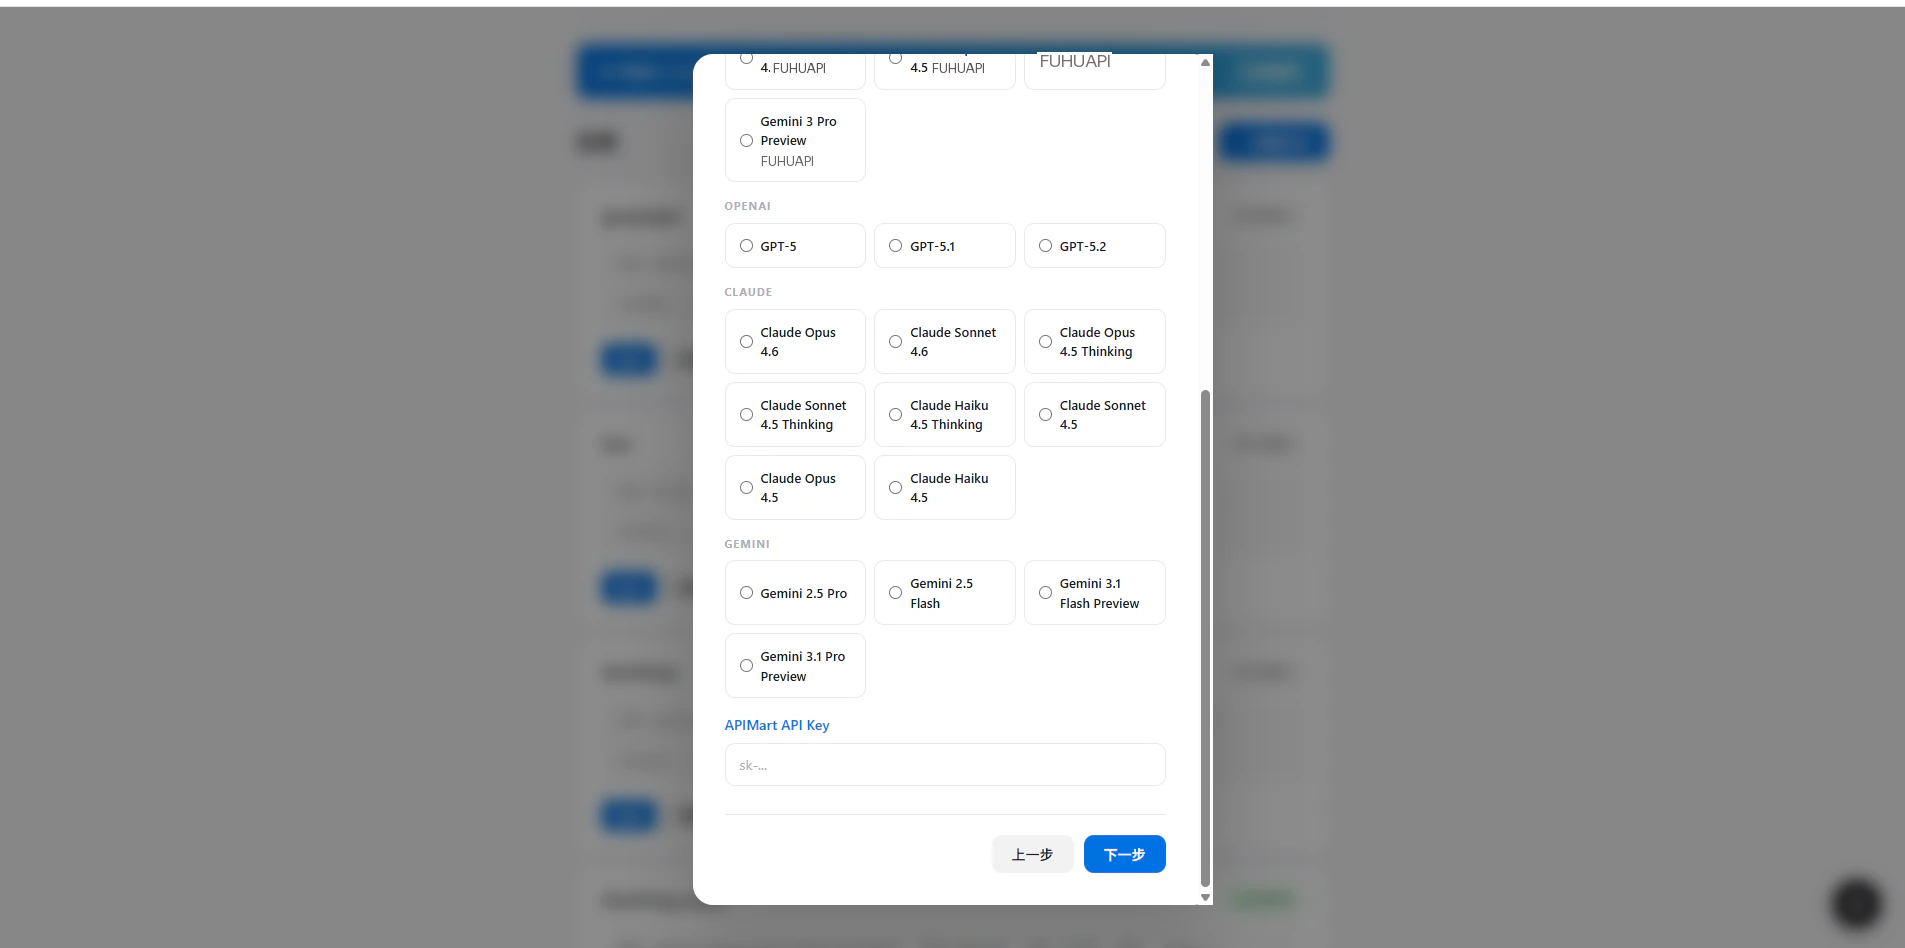 6. **チャネルを選択** — **Feishu** を選択
7. **認証情報を入力** — App ID と App Secret を対応するフィールドに貼り付け
6. **チャネルを選択** — **Feishu** を選択
7. **認証情報を入力** — App ID と App Secret を対応するフィールドに貼り付け
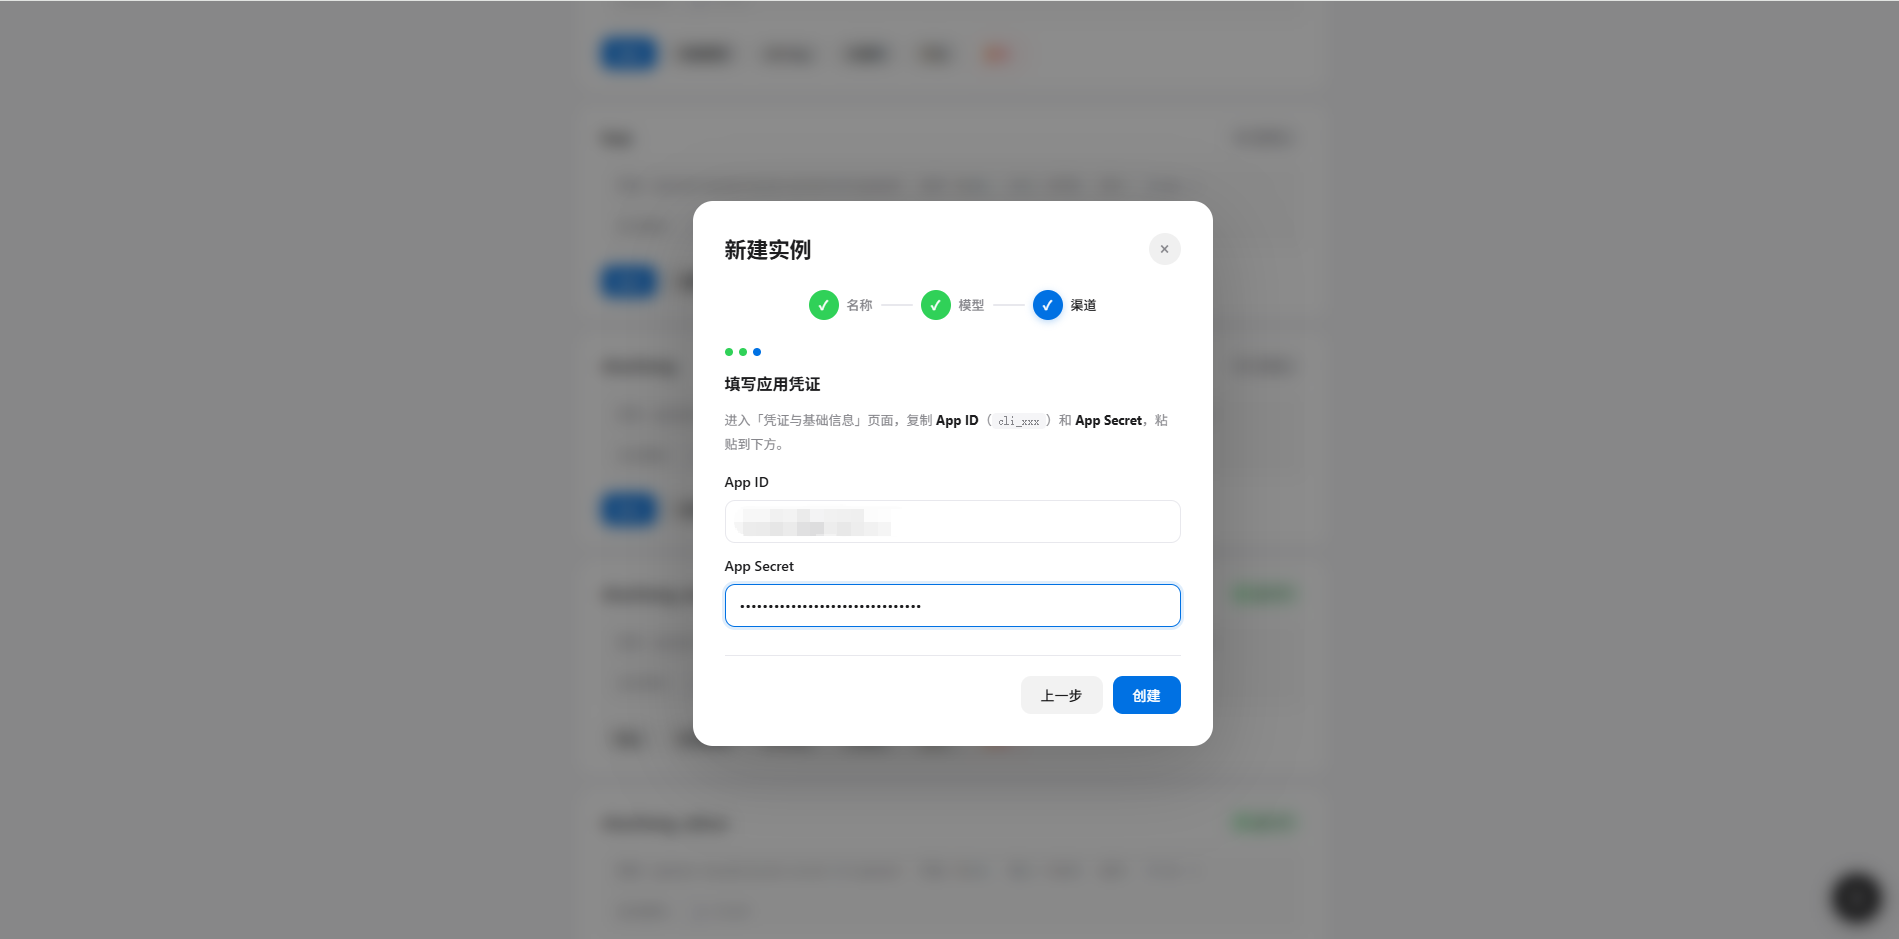 *Feishu App ID と App Secret を入力*
8. **作成** をクリックしてインスタンス作成を完了
## ステップ 5:イベントサブスクリプションを設定
インスタンス作成後、Feishu オープンプラットフォームでイベントサブスクリプションを設定する必要があります:
1. Feishu オープンプラットフォームに戻り、アプリ詳細に入る
2. 左メニューの **イベントとコールバック** をクリック
3. **サブスクリプション方式** を「**ロングコネクション**」に設定
*Feishu App ID と App Secret を入力*
8. **作成** をクリックしてインスタンス作成を完了
## ステップ 5:イベントサブスクリプションを設定
インスタンス作成後、Feishu オープンプラットフォームでイベントサブスクリプションを設定する必要があります:
1. Feishu オープンプラットフォームに戻り、アプリ詳細に入る
2. 左メニューの **イベントとコールバック** をクリック
3. **サブスクリプション方式** を「**ロングコネクション**」に設定
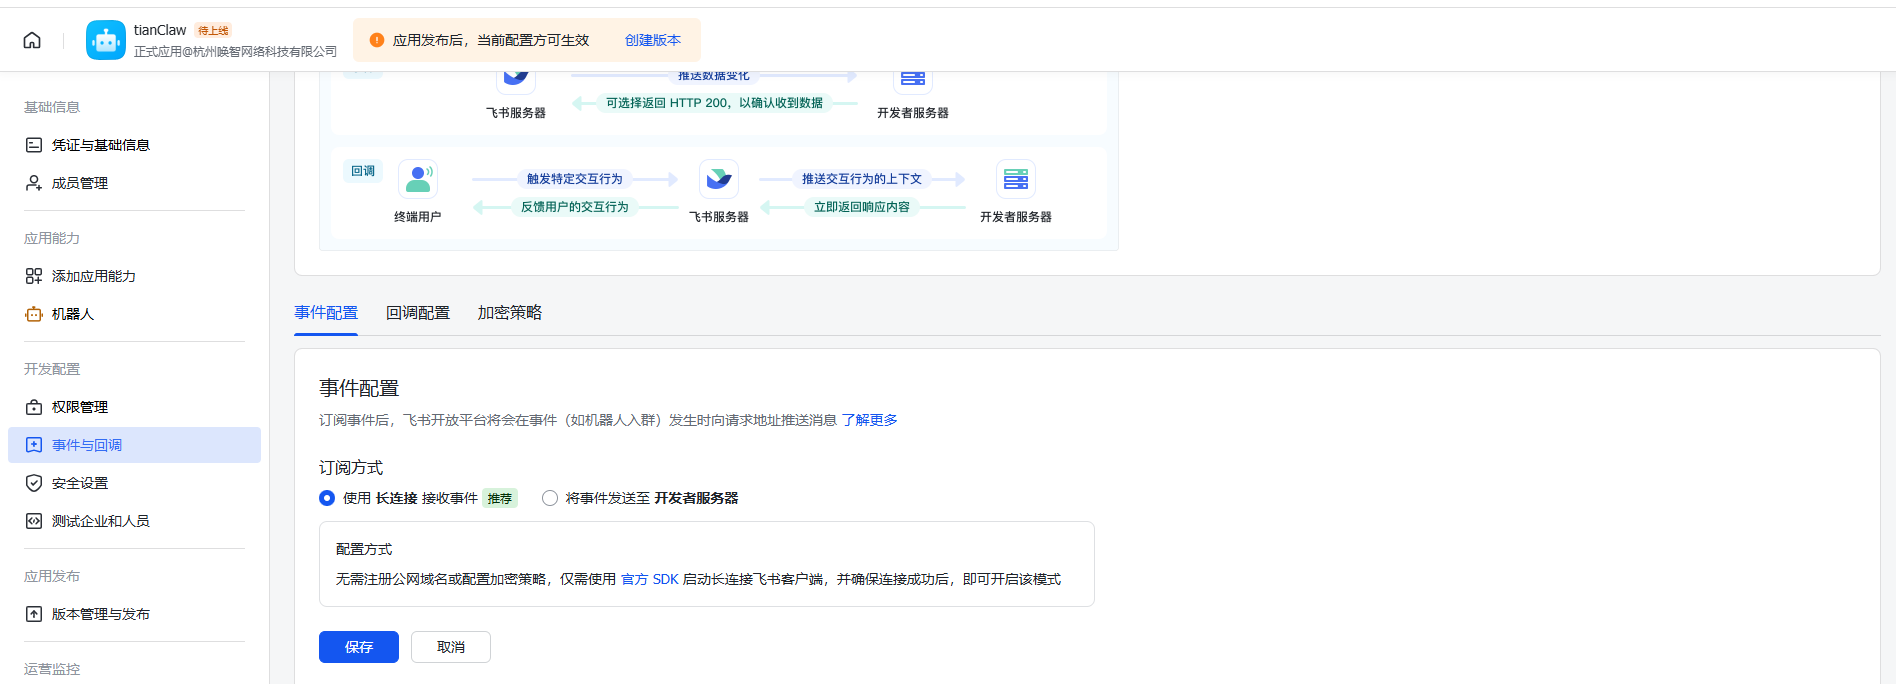 *ロングコネクションサブスクリプション方式を選択*
4. **イベントを追加** をクリックし、`im.message.receive_v1`(メッセージ受信)を検索して追加
*ロングコネクションサブスクリプション方式を選択*
4. **イベントを追加** をクリックし、`im.message.receive_v1`(メッセージ受信)を検索して追加
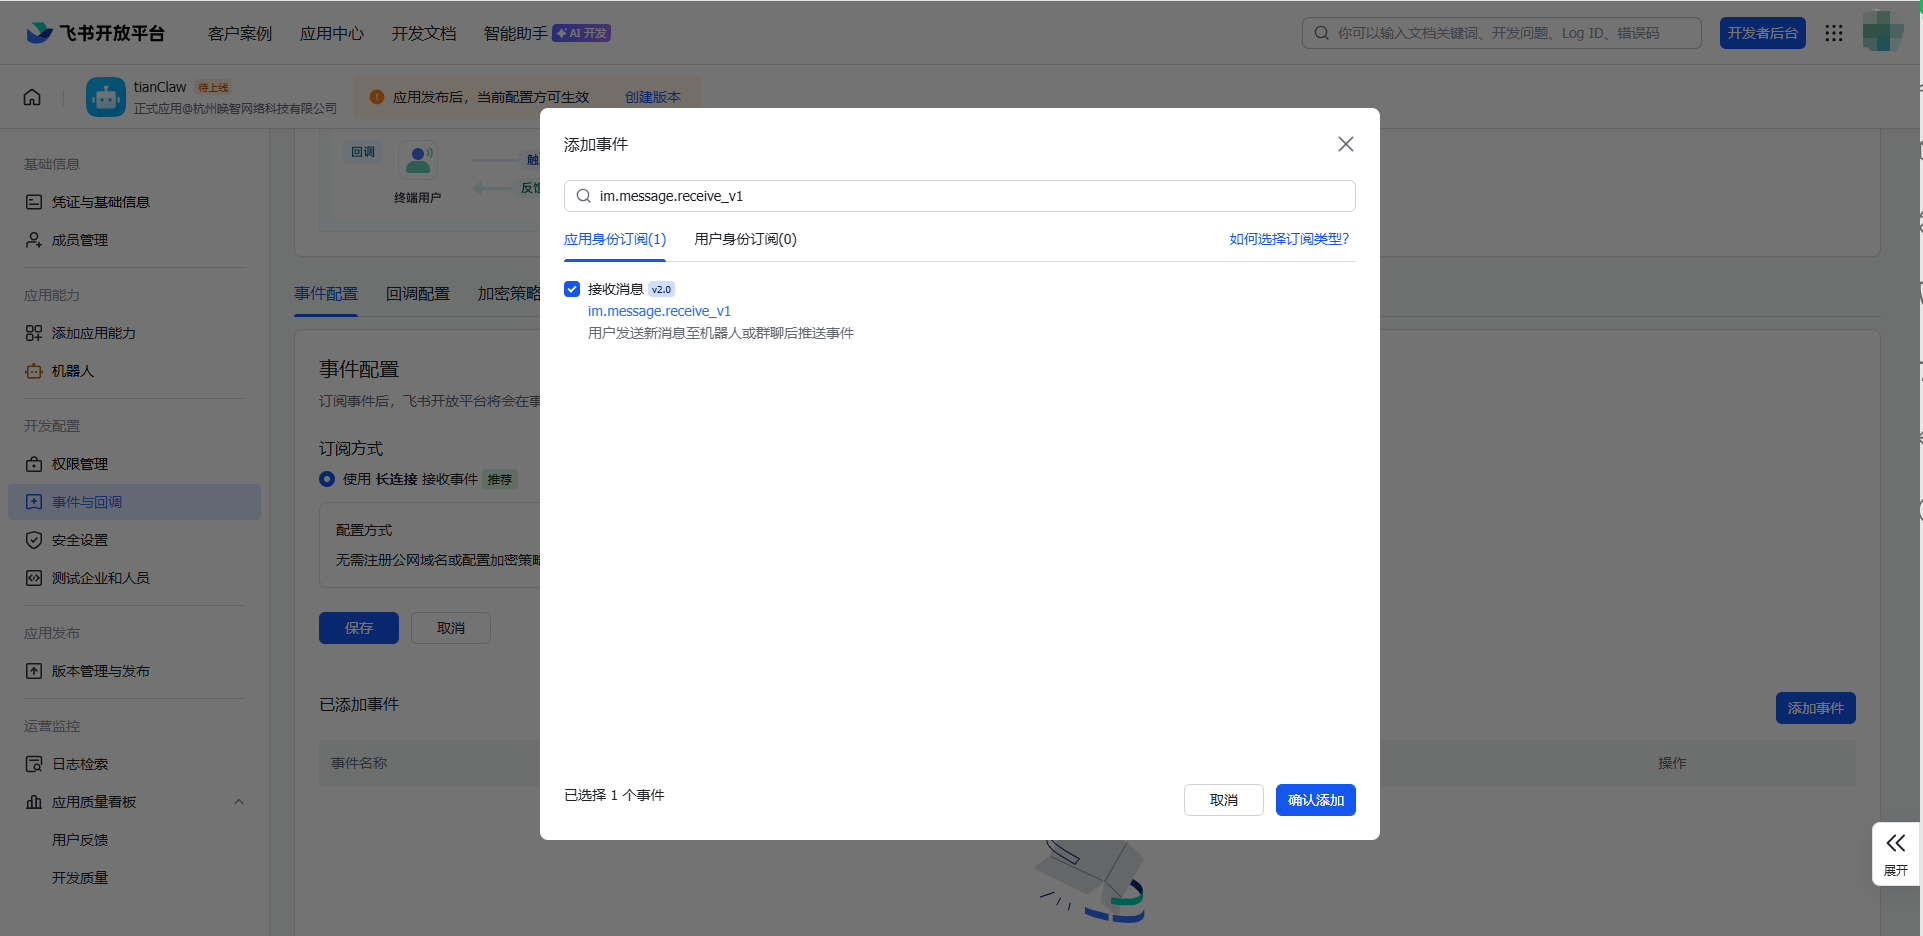 *メッセージ受信イベントを追加*
## ステップ 6:バージョン作成と公開
1. 左メニューの **バージョン管理とリリース** をクリック
2. **バージョンを作成** をクリック
3. バージョン番号と更新内容を入力
4. 審査に提出し、管理者の承認を待つ
*メッセージ受信イベントを追加*
## ステップ 6:バージョン作成と公開
1. 左メニューの **バージョン管理とリリース** をクリック
2. **バージョンを作成** をクリック
3. バージョン番号と更新内容を入力
4. 審査に提出し、管理者の承認を待つ
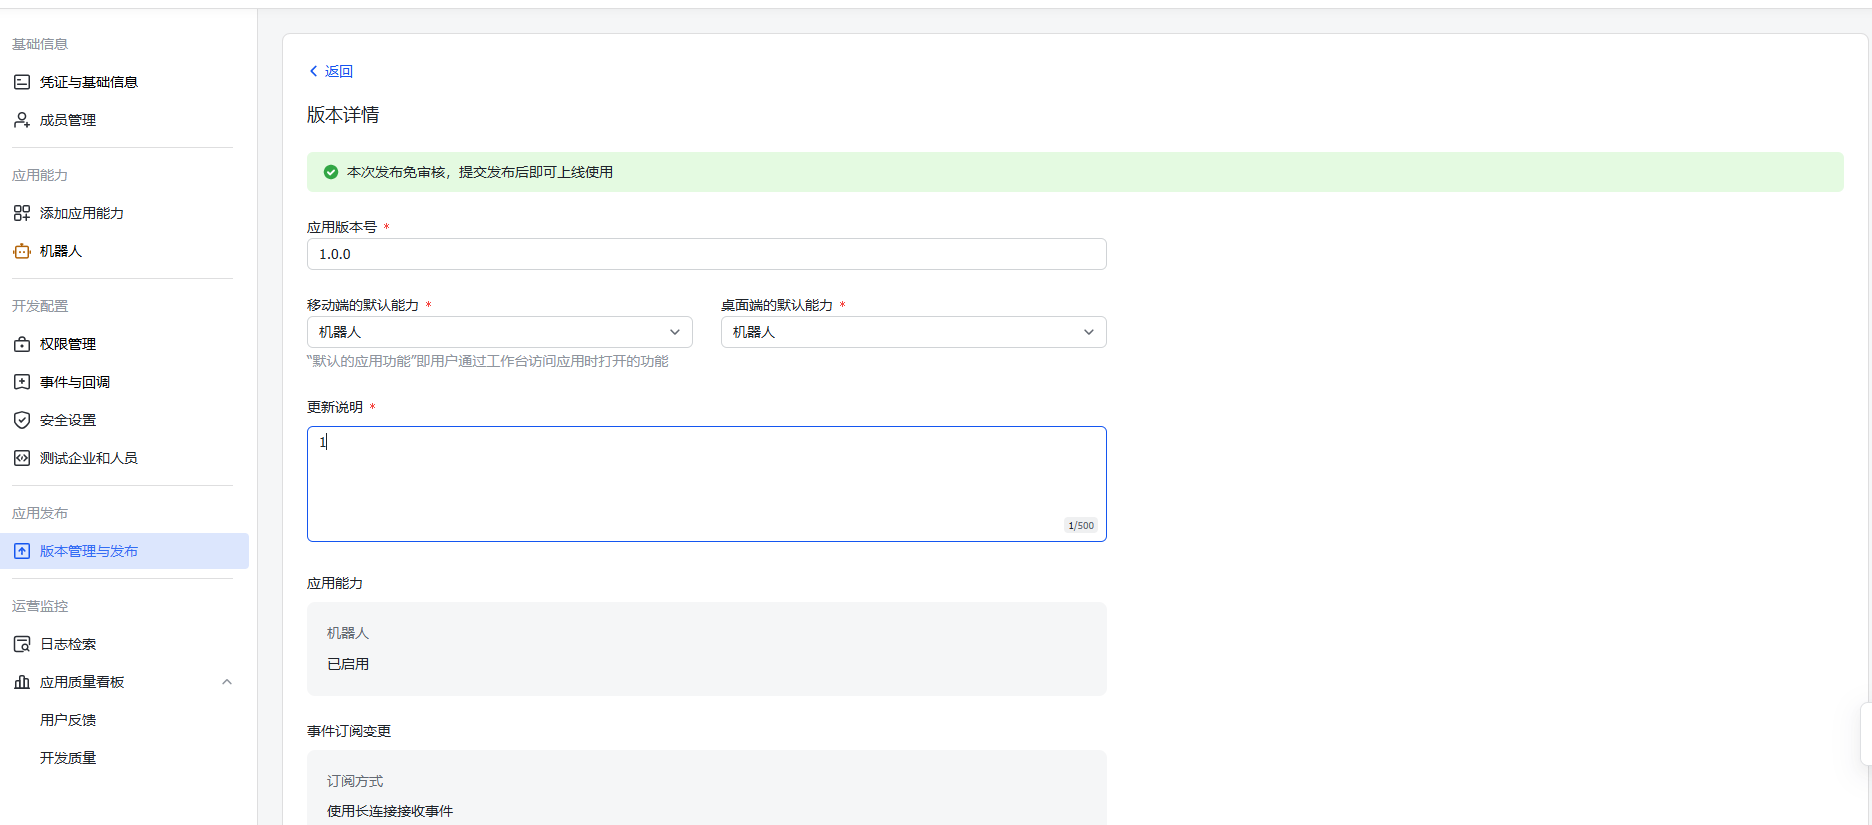 *バージョンを作成して公開を申請*
**重要:** 権限やイベントサブスクリプションを変更するたびに、新しいバージョンを作成して再公開する必要があります。
## ステップ 7:ペアリングコード連携
アプリが承認・公開された後:
1. Feishu でボット名を検索
2. 任意のメッセージを送信(例:「こんにちは」)
3. ボットが **8 桁のペアリングコード**(例:`DFE62DTD`)を返信
*バージョンを作成して公開を申請*
**重要:** 権限やイベントサブスクリプションを変更するたびに、新しいバージョンを作成して再公開する必要があります。
## ステップ 7:ペアリングコード連携
アプリが承認・公開された後:
1. Feishu でボット名を検索
2. 任意のメッセージを送信(例:「こんにちは」)
3. ボットが **8 桁のペアリングコード**(例:`DFE62DTD`)を返信
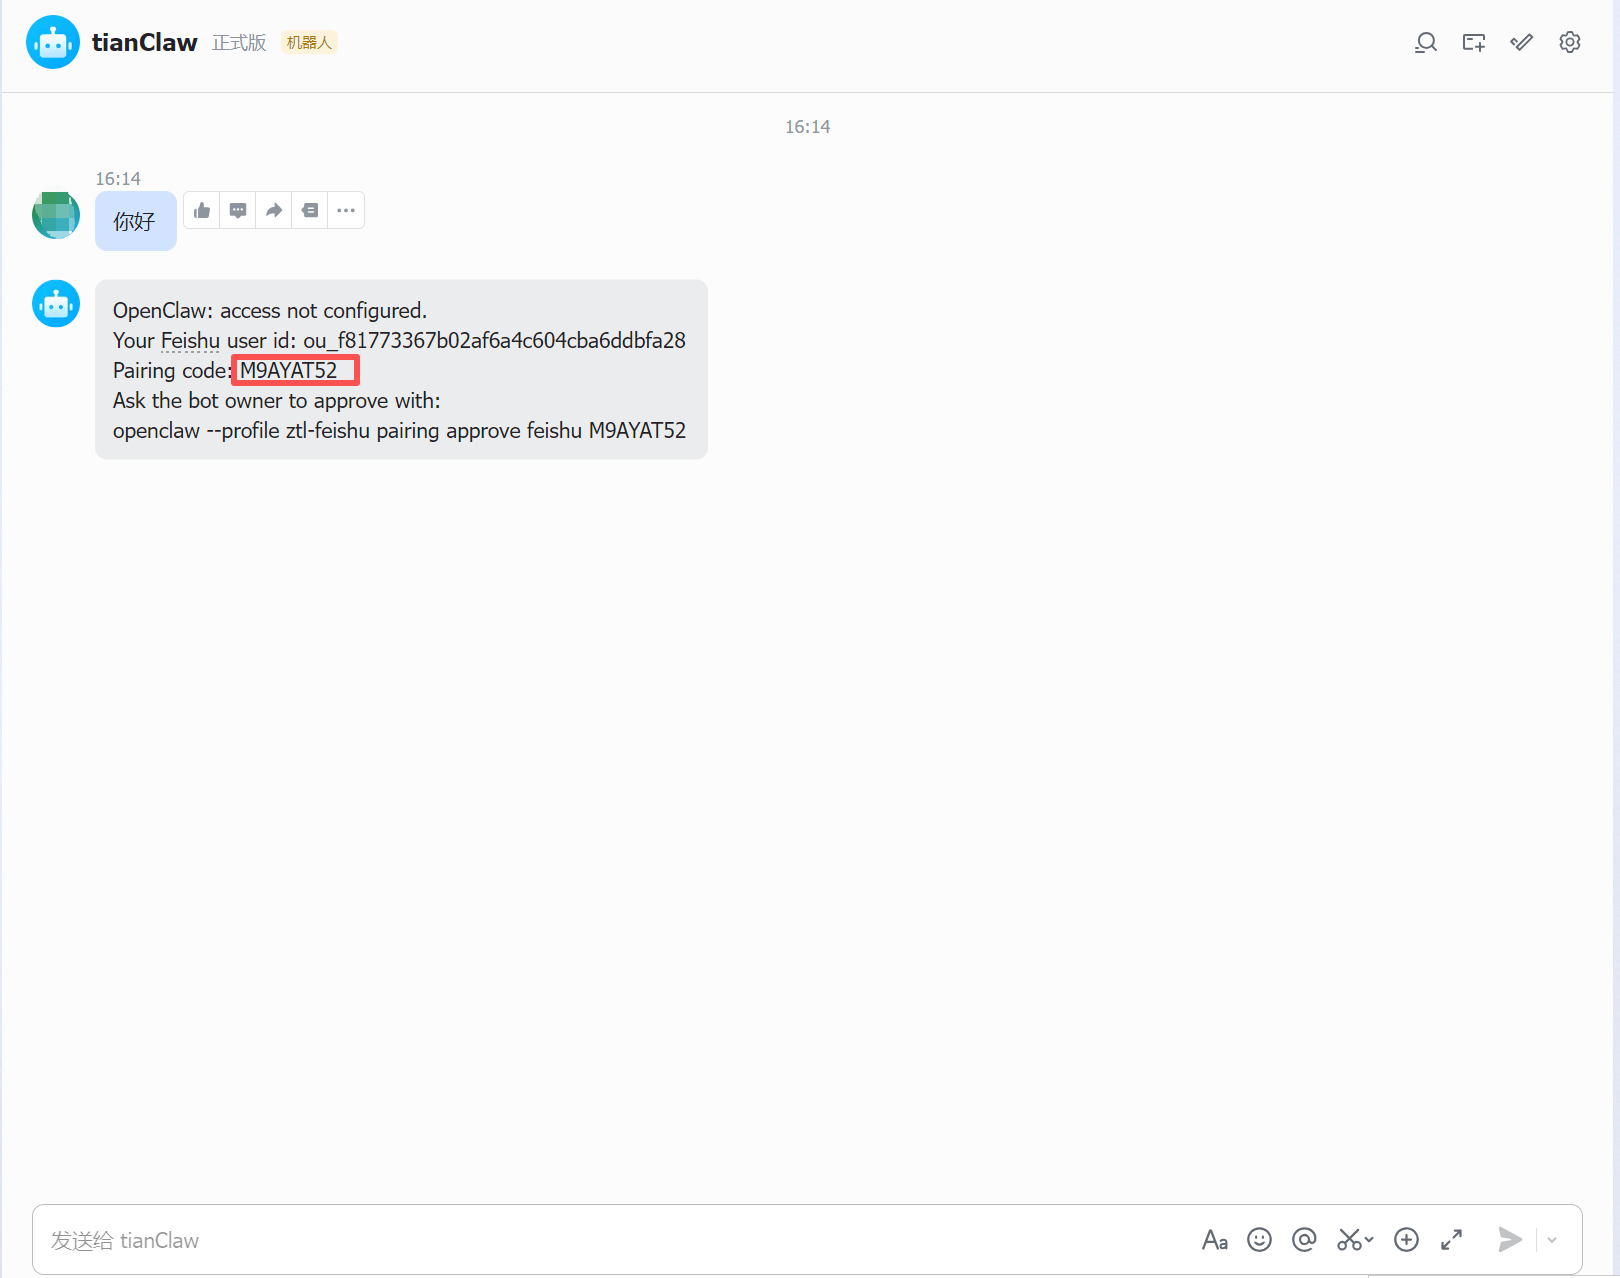 *ボットが返信したペアリングコード*
4. Manager の新規インスタンスウィザードに戻り、「**ペアリングコードを入力**」ステップでコードを入力し、「**承認**」をクリック
*ボットが返信したペアリングコード*
4. Manager の新規インスタンスウィザードに戻り、「**ペアリングコードを入力**」ステップでコードを入力し、「**承認**」をクリック
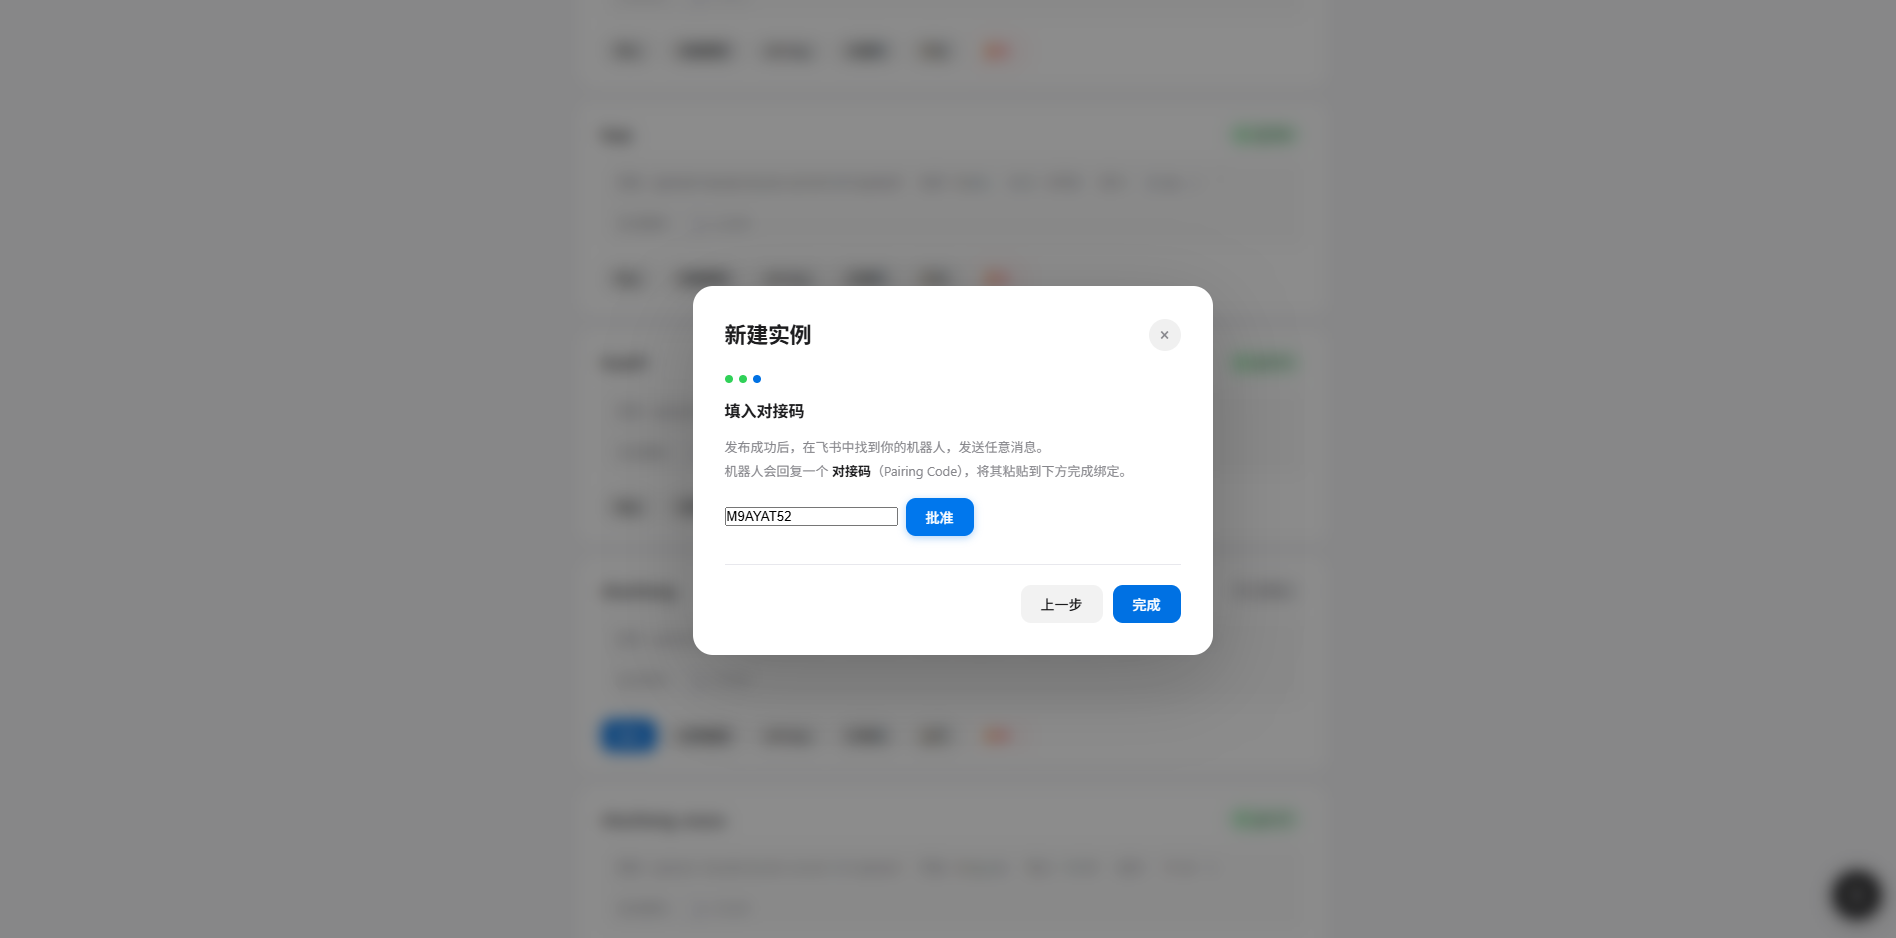 *ウィザードでペアリングコードを入力して承認*
5. コードが承認されたら、「**完了**」をクリック
*ウィザードでペアリングコードを入力して承認*
5. コードが承認されたら、「**完了**」をクリック
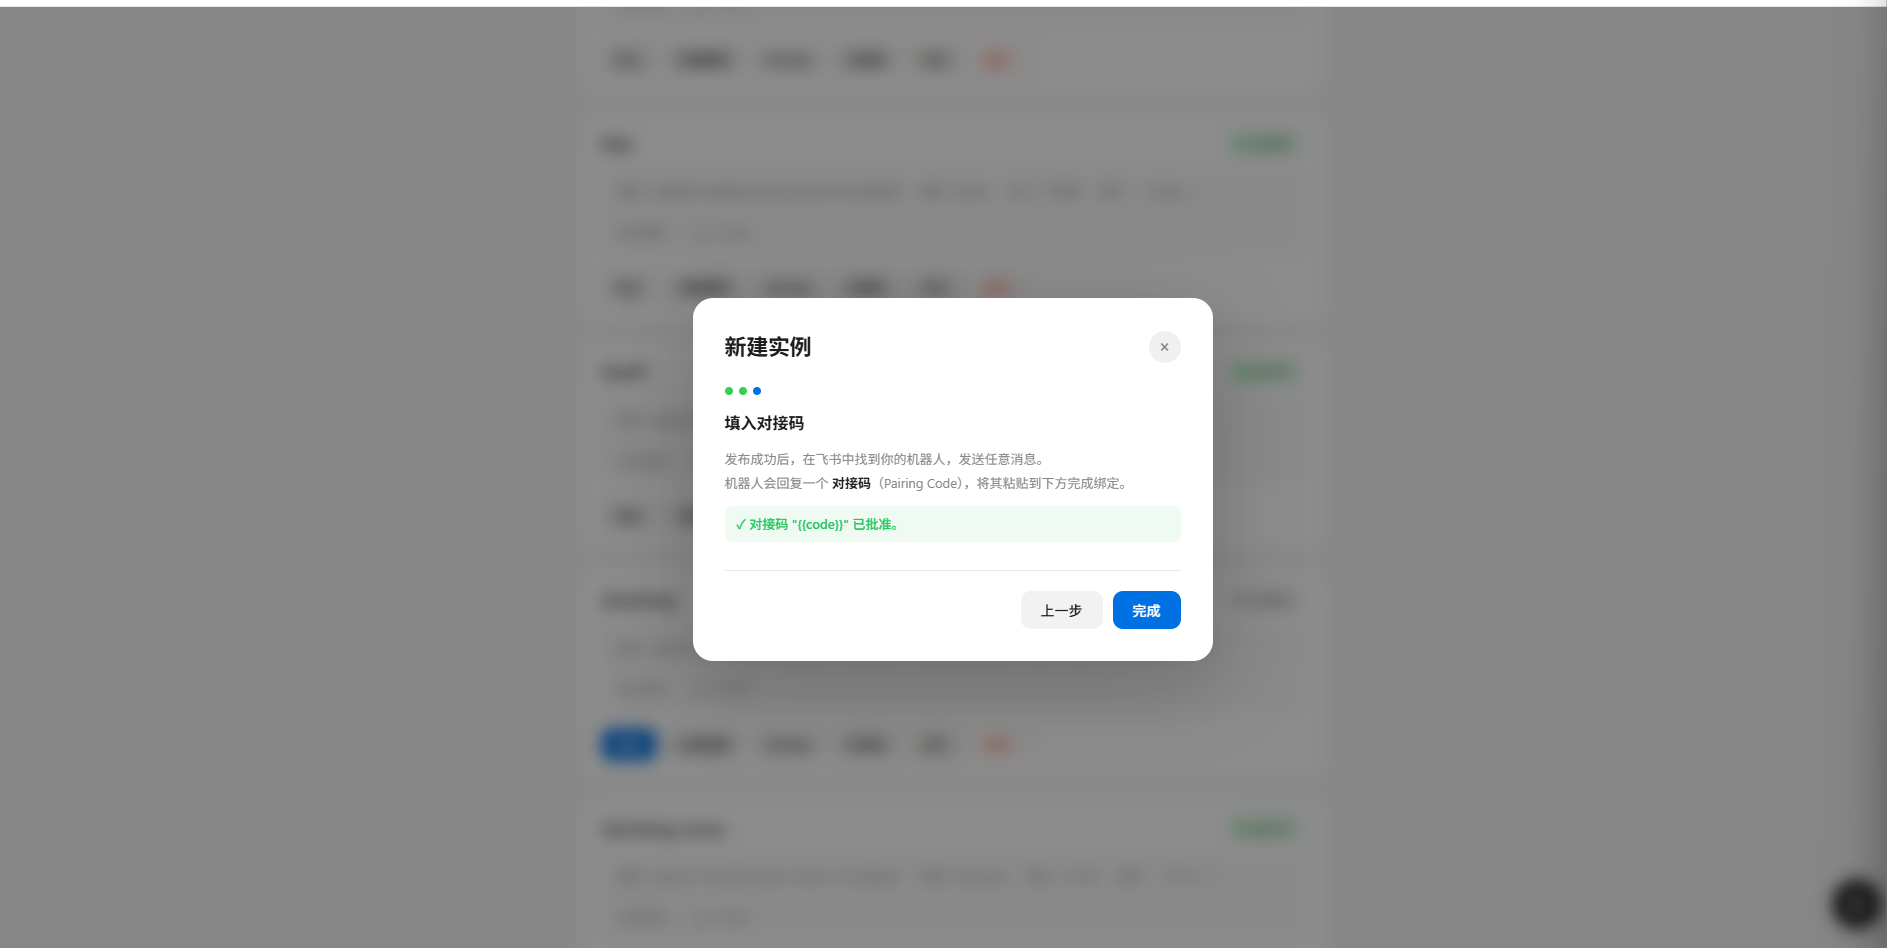 *ペアリングコード承認成功、完了をクリック*
6. Feishu に戻り、再度メッセージを送信すると、ボットが AI 生成のコンテンツで応答
*ペアリングコード承認成功、完了をクリック*
6. Feishu に戻り、再度メッセージを送信すると、ボットが AI 生成のコンテンツで応答
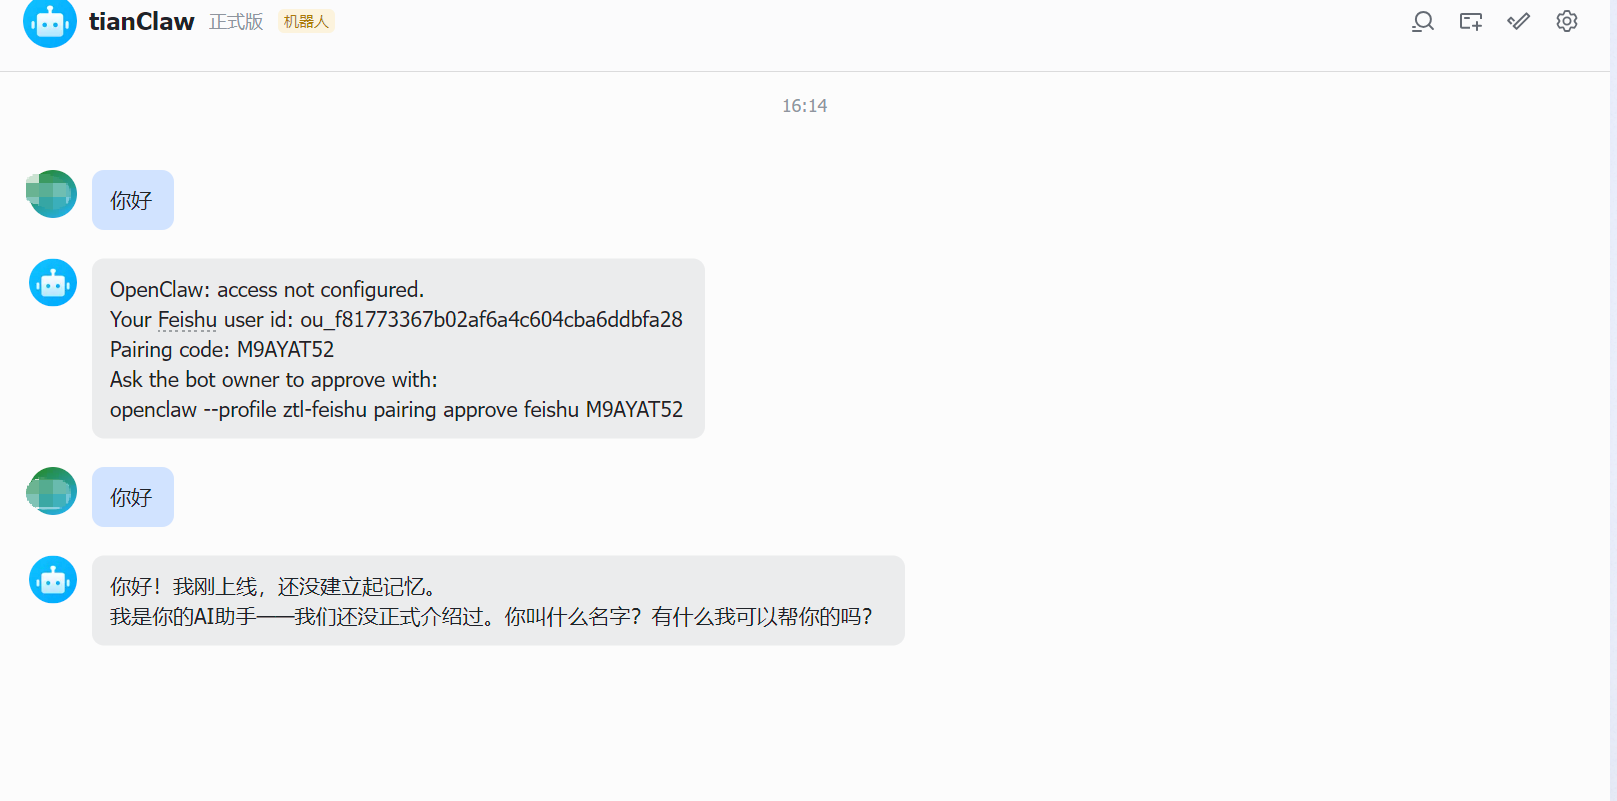 *連携成功後、AI ボットとの通常の会話*
## よくある質問
### Q1: ボットがメッセージに応答しない?
**解決方法:**
1. イベントサブスクリプションに `im.message.receive_v1` が追加されているか確認
2. サブスクリプション方式が「**ロングコネクション**」(Webhook ではなく)になっているか確認
3. 新しいバージョンを作成して公開済みで、承認が通っているか確認
4. Manager でインスタンスのステータスが「**実行中**」であることを確認
### Q2: 権限不足エラー?
**解決方法:**
1. すべての権限が有効になっているか確認(ステップ 2 を参照)
2. 権限変更後は、新しいバージョンを作成して再公開する必要があります
3. 管理者の承認を待つ
### Q3: ペアリングコードの承認に失敗?
**解決方法:**
* Gateway が実行中であることを確認
* ペアリングコードは大文字小文字を区別します、慎重に確認してください
* コードは Gateway 再起動後に無効になります、ユーザーに新しいメッセージを送信してもらってください
***
Manager のインストール、デプロイ、インスタンス管理の完全ガイドを確認
*連携成功後、AI ボットとの通常の会話*
## よくある質問
### Q1: ボットがメッセージに応答しない?
**解決方法:**
1. イベントサブスクリプションに `im.message.receive_v1` が追加されているか確認
2. サブスクリプション方式が「**ロングコネクション**」(Webhook ではなく)になっているか確認
3. 新しいバージョンを作成して公開済みで、承認が通っているか確認
4. Manager でインスタンスのステータスが「**実行中**」であることを確認
### Q2: 権限不足エラー?
**解決方法:**
1. すべての権限が有効になっているか確認(ステップ 2 を参照)
2. 権限変更後は、新しいバージョンを作成して再公開する必要があります
3. 管理者の承認を待つ
### Q3: ペアリングコードの承認に失敗?
**解決方法:**
* Gateway が実行中であることを確認
* ペアリングコードは大文字小文字を区別します、慎重に確認してください
* コードは Gateway 再起動後に無効になります、ユーザーに新しいメッセージを送信してもらってください
***
Manager のインストール、デプロイ、インスタンス管理の完全ガイドを確認