> ## Documentation Index
> Fetch the complete documentation index at: https://docs.elkapi.com/llms.txt
> Use this file to discover all available pages before exploring further.
# OpenClaw Manager — Feishu Channel Setup
> Step-by-step guide on creating and configuring a Feishu bot in OpenClaw Manager, including enterprise app creation, permission setup, event subscription, and pairing code binding.
## Introduction
This tutorial guides you through creating and configuring a Feishu bot in OpenClaw Manager. Once complete, your Feishu Bot will be powered by ElkAPI's AI models for intelligent conversations within Feishu.
**Prerequisites:** Please ensure you have completed the [OpenClaw Manager deployment](/en/integrations/platform/openclaw-manager) and the Manager is running with the management UI accessible.
## Step 1: Create a Feishu Enterprise App
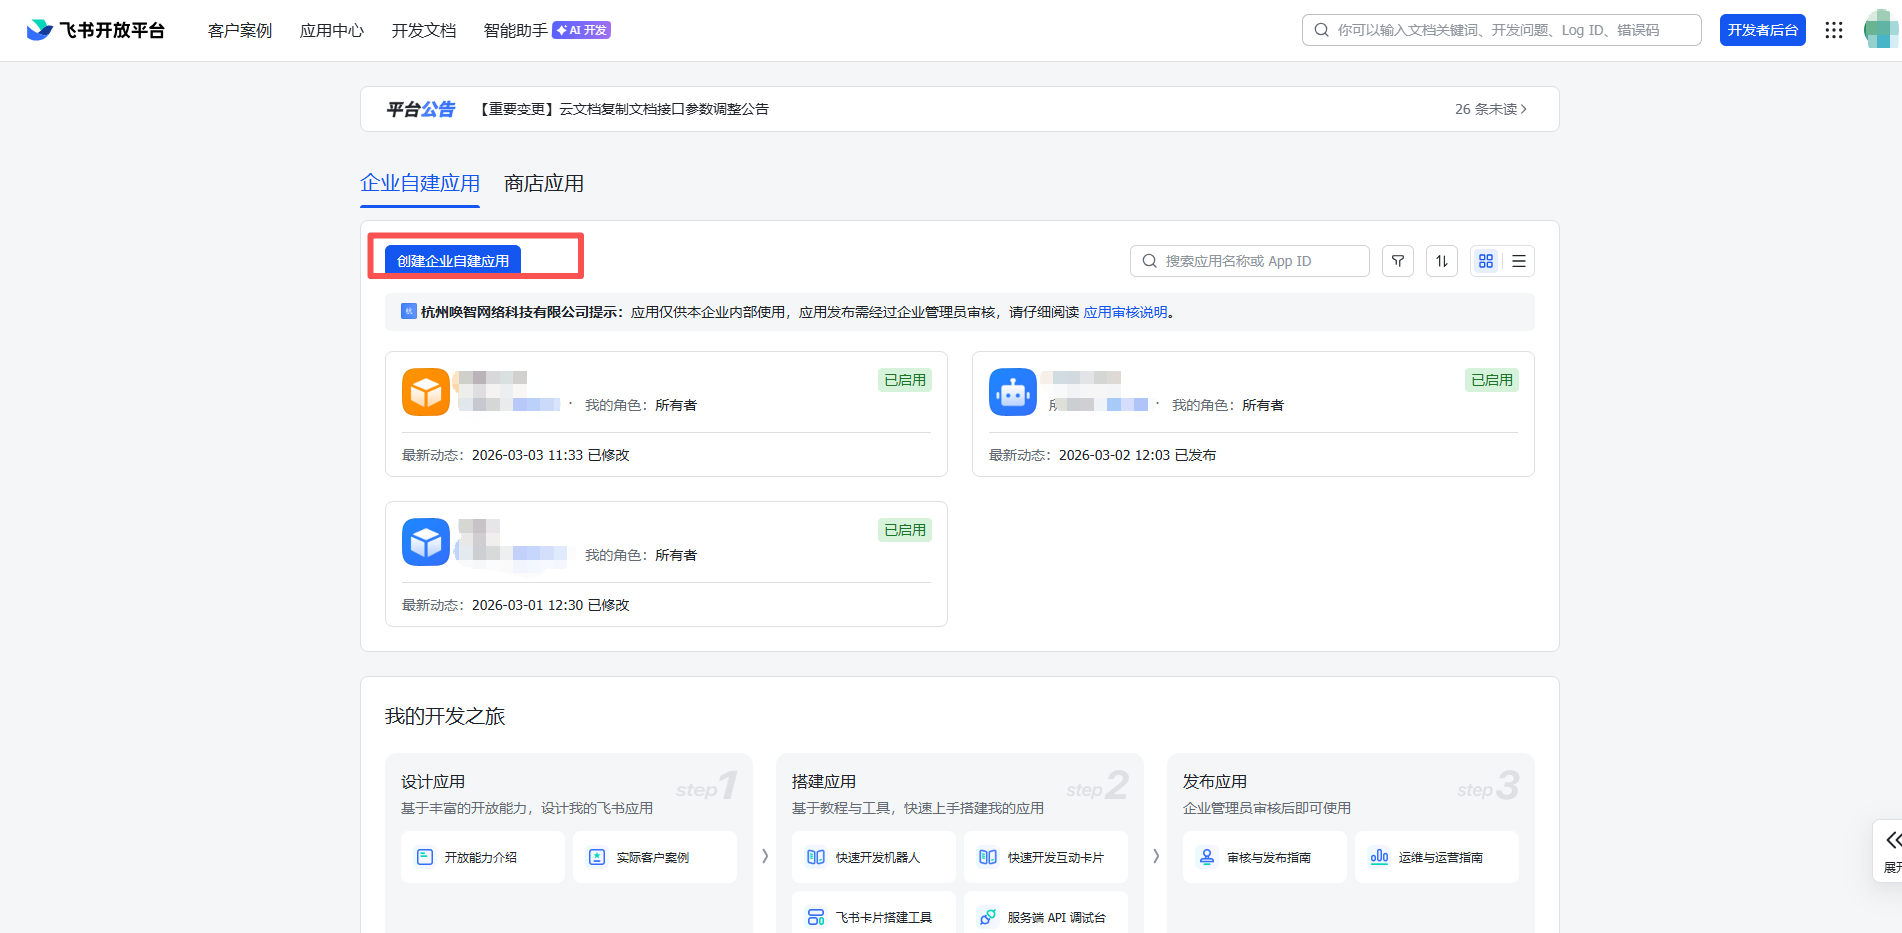
1. Go to [Feishu Open Platform](https://open.feishu.cn/app), log in and click **Create Custom App**
 2. Fill in the app name and description, upload an app icon
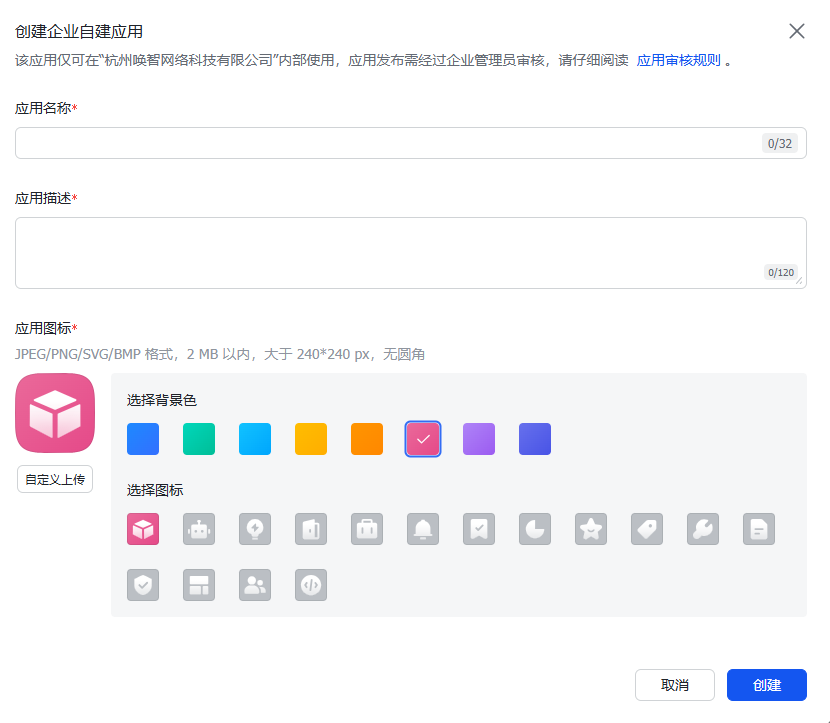 *Fill in app name and description*
## Step 2: Configure App Permissions
1. Enter the app details page, click **Permission Management** in the left menu
2. Click **Batch Enable**, paste the following JSON configuration:
```json theme={null} theme={null}
{
"scopes": {
"tenant": [
"contact:contact.base:readonly",
"contact:user.email:readonly",
"im:chat.members:bot_access",
"im:message",
"im:message.group_at_msg:readonly",
"im:message.p2p_msg:readonly",
"im:message:readonly",
"im:message:send_as_bot",
"cardkit:card:write"
]
}
}
```
*Fill in app name and description*
## Step 2: Configure App Permissions
1. Enter the app details page, click **Permission Management** in the left menu
2. Click **Batch Enable**, paste the following JSON configuration:
```json theme={null} theme={null}
{
"scopes": {
"tenant": [
"contact:contact.base:readonly",
"contact:user.email:readonly",
"im:chat.members:bot_access",
"im:message",
"im:message.group_at_msg:readonly",
"im:message.p2p_msg:readonly",
"im:message:readonly",
"im:message:send_as_bot",
"cardkit:card:write"
]
}
}
```
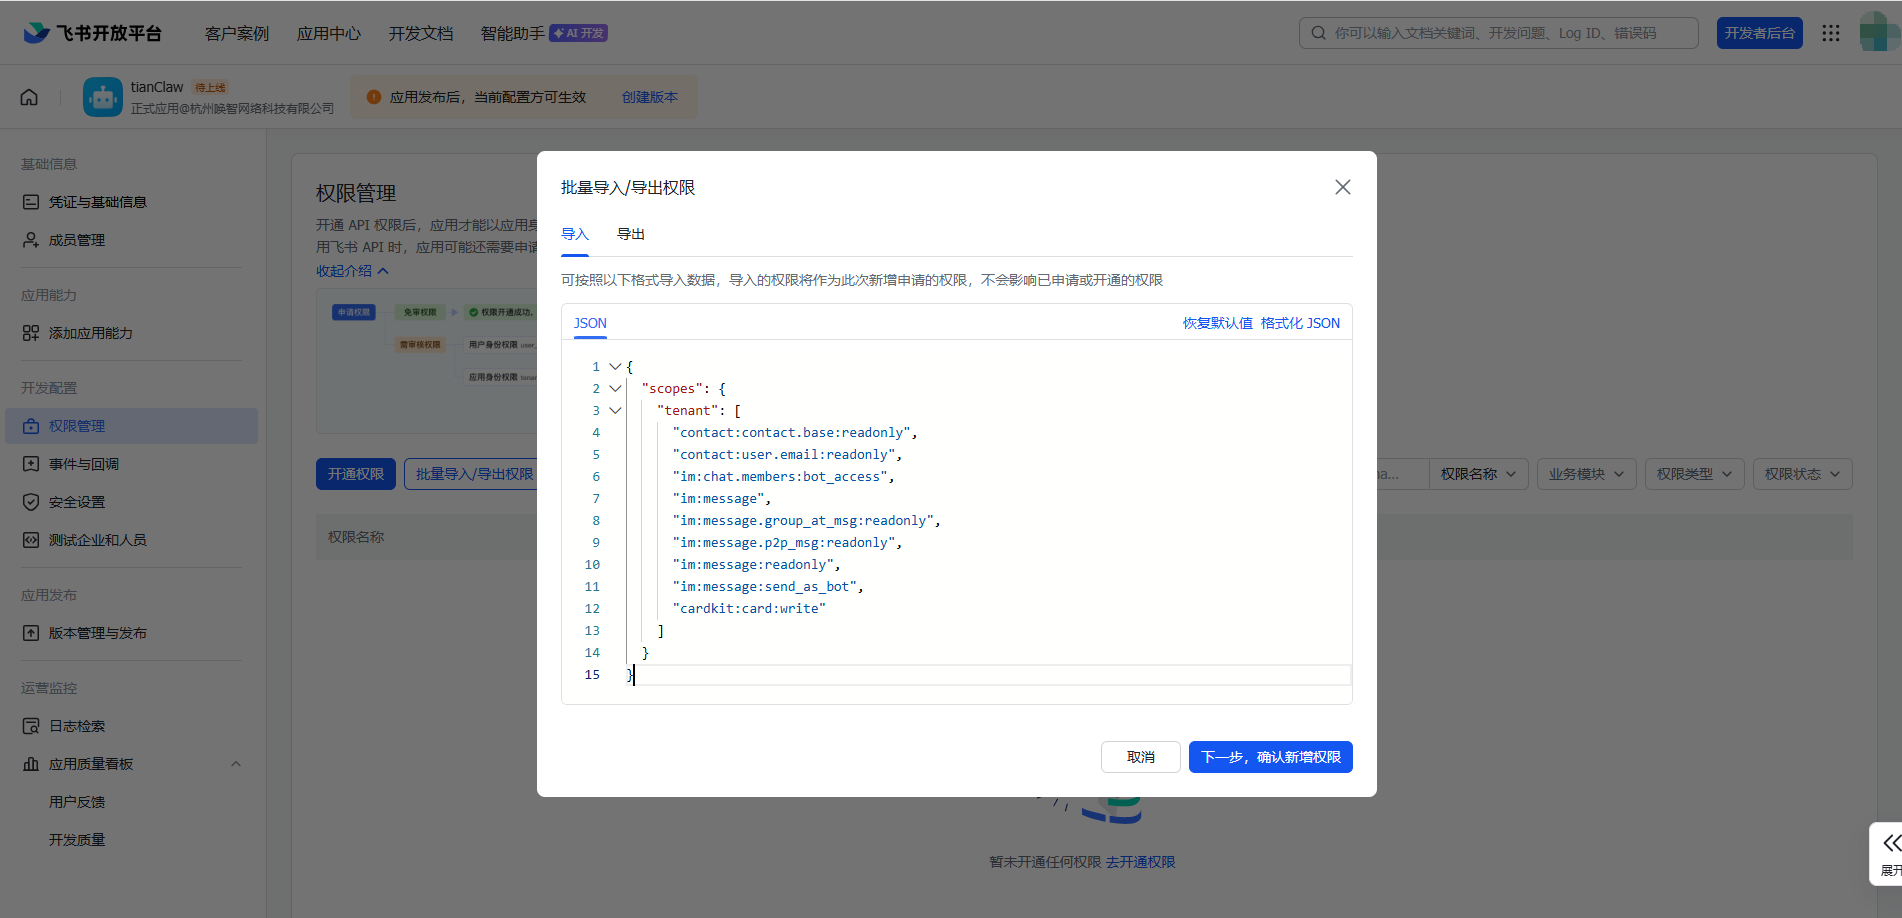 *Batch enable required permissions*
3. Click to confirm
## Step 3: Get Credentials
1. Click **Credentials & Basic Info** in the left menu
2. Copy the **App ID** (format: `cli_xxxxxxxxxx`) and **App Secret**
*Batch enable required permissions*
3. Click to confirm
## Step 3: Get Credentials
1. Click **Credentials & Basic Info** in the left menu
2. Copy the **App ID** (format: `cli_xxxxxxxxxx`) and **App Secret**
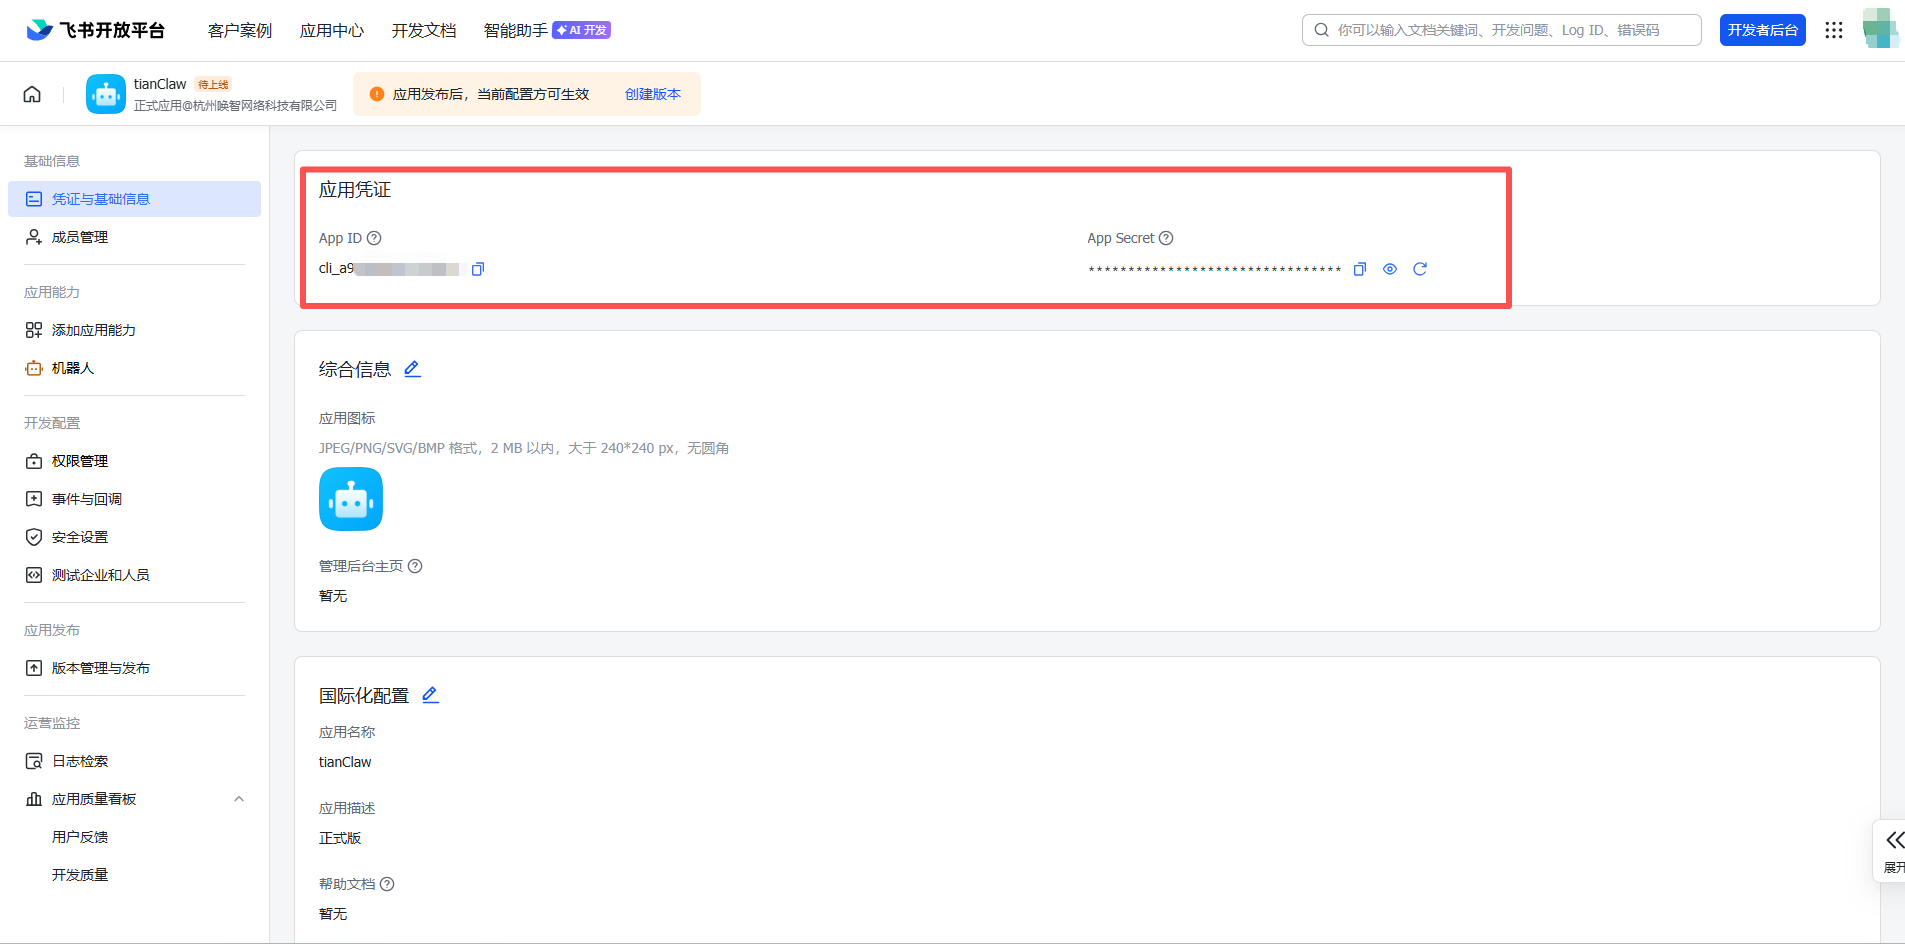 *Copy App ID and App Secret*
**Keep your App Secret secure** and do not share it.
## Step 4: Create Instance in Manager
1. Open the OpenClaw Manager UI (`http://127.0.0.1:51942`)
2. Click **+ New Instance**
3. **Enter instance name** — e.g. `my-feishu-bot`
*Copy App ID and App Secret*
**Keep your App Secret secure** and do not share it.
## Step 4: Create Instance in Manager
1. Open the OpenClaw Manager UI (`http://127.0.0.1:51942`)
2. Click **+ New Instance**
3. **Enter instance name** — e.g. `my-feishu-bot`
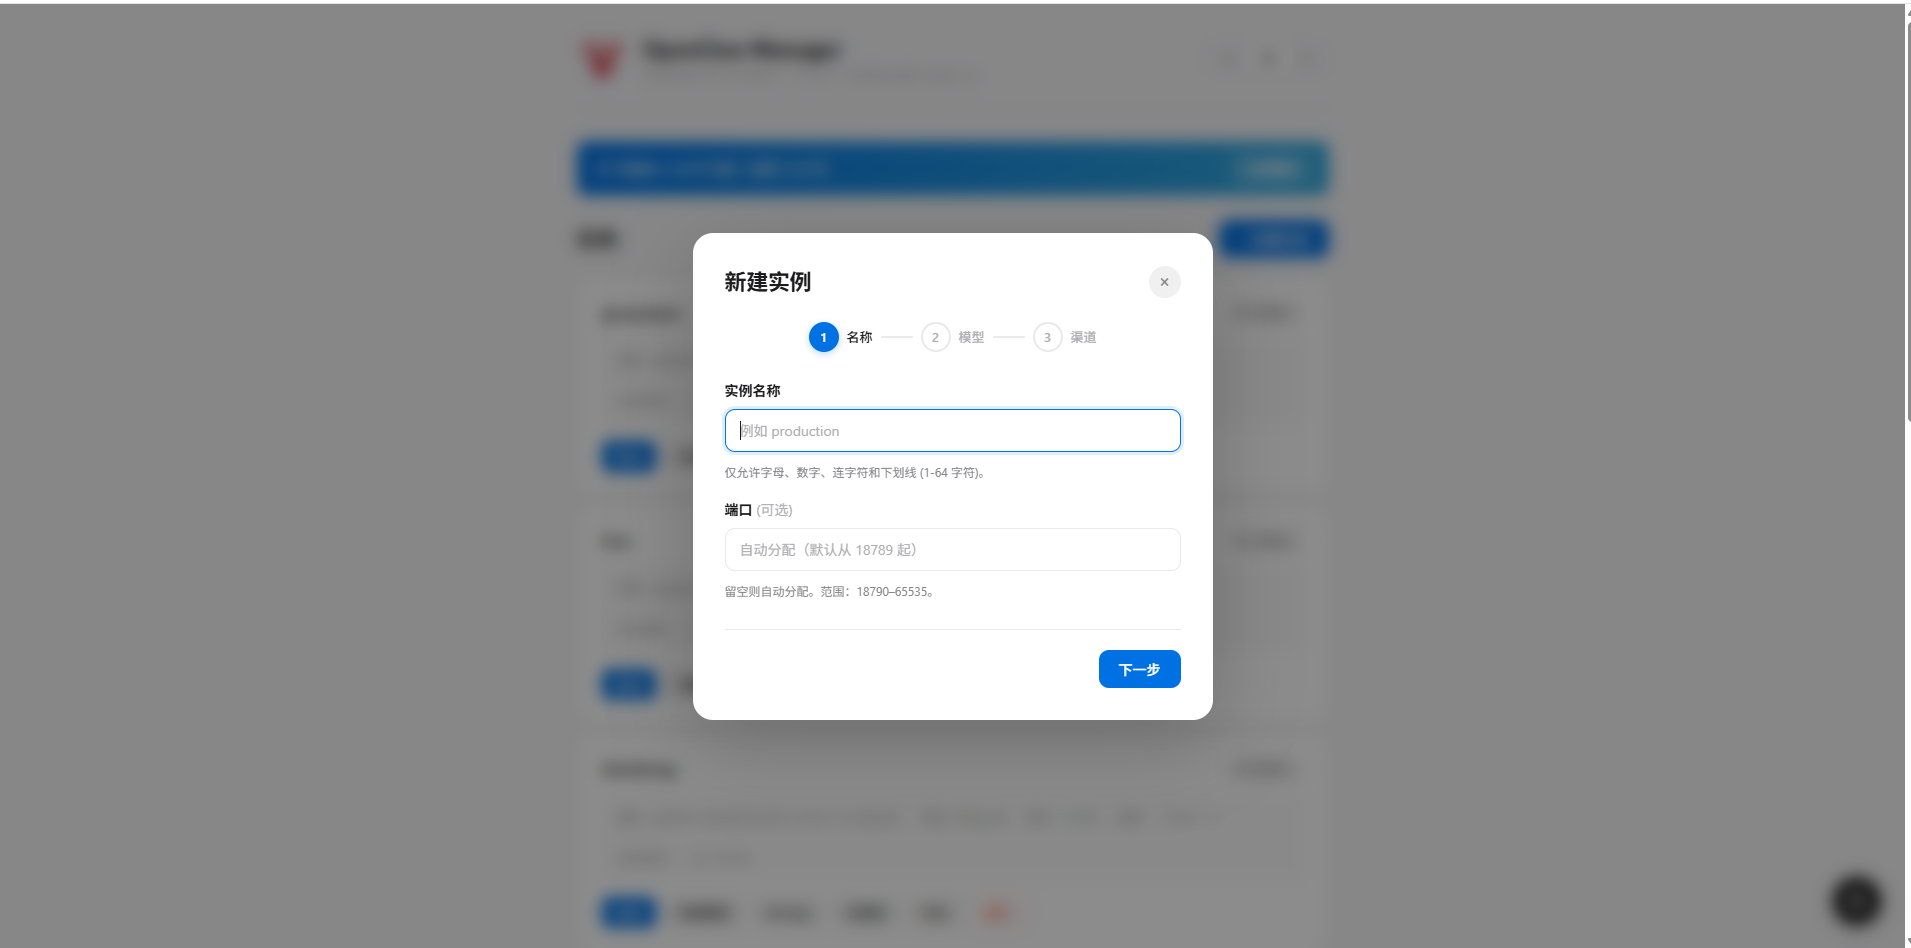 4. **Select AI model** — Choose the model you want to use
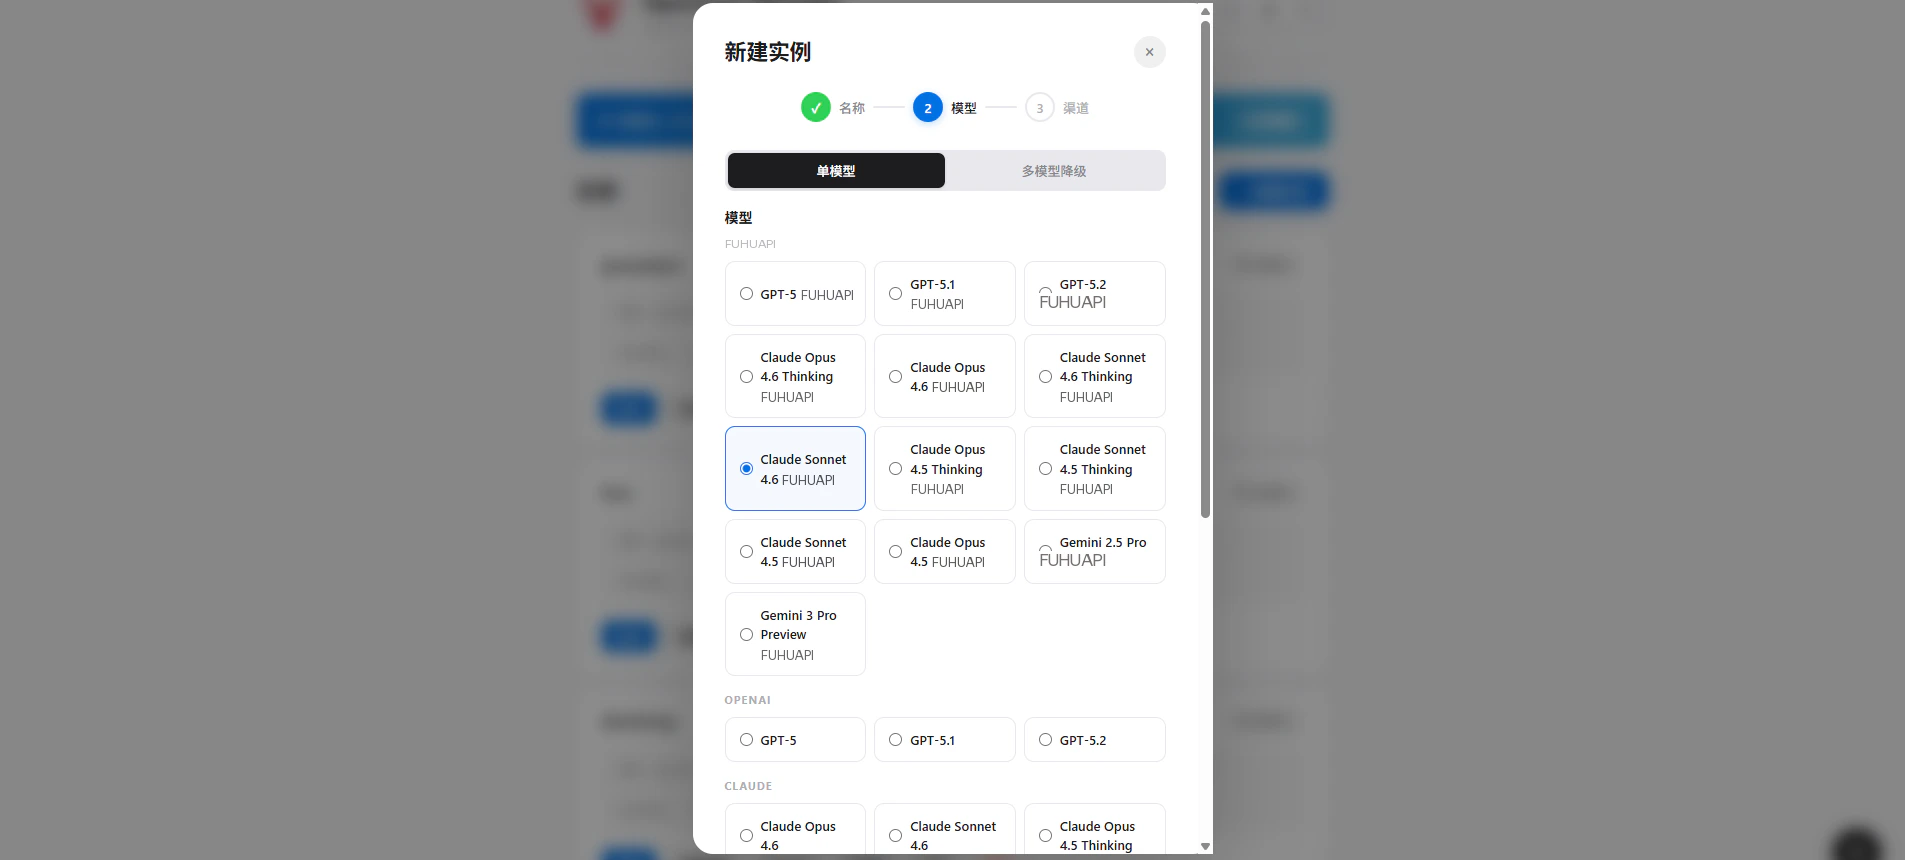 5. **Enter ElkAPI API Key** — Enter your API key starting with `sk-`
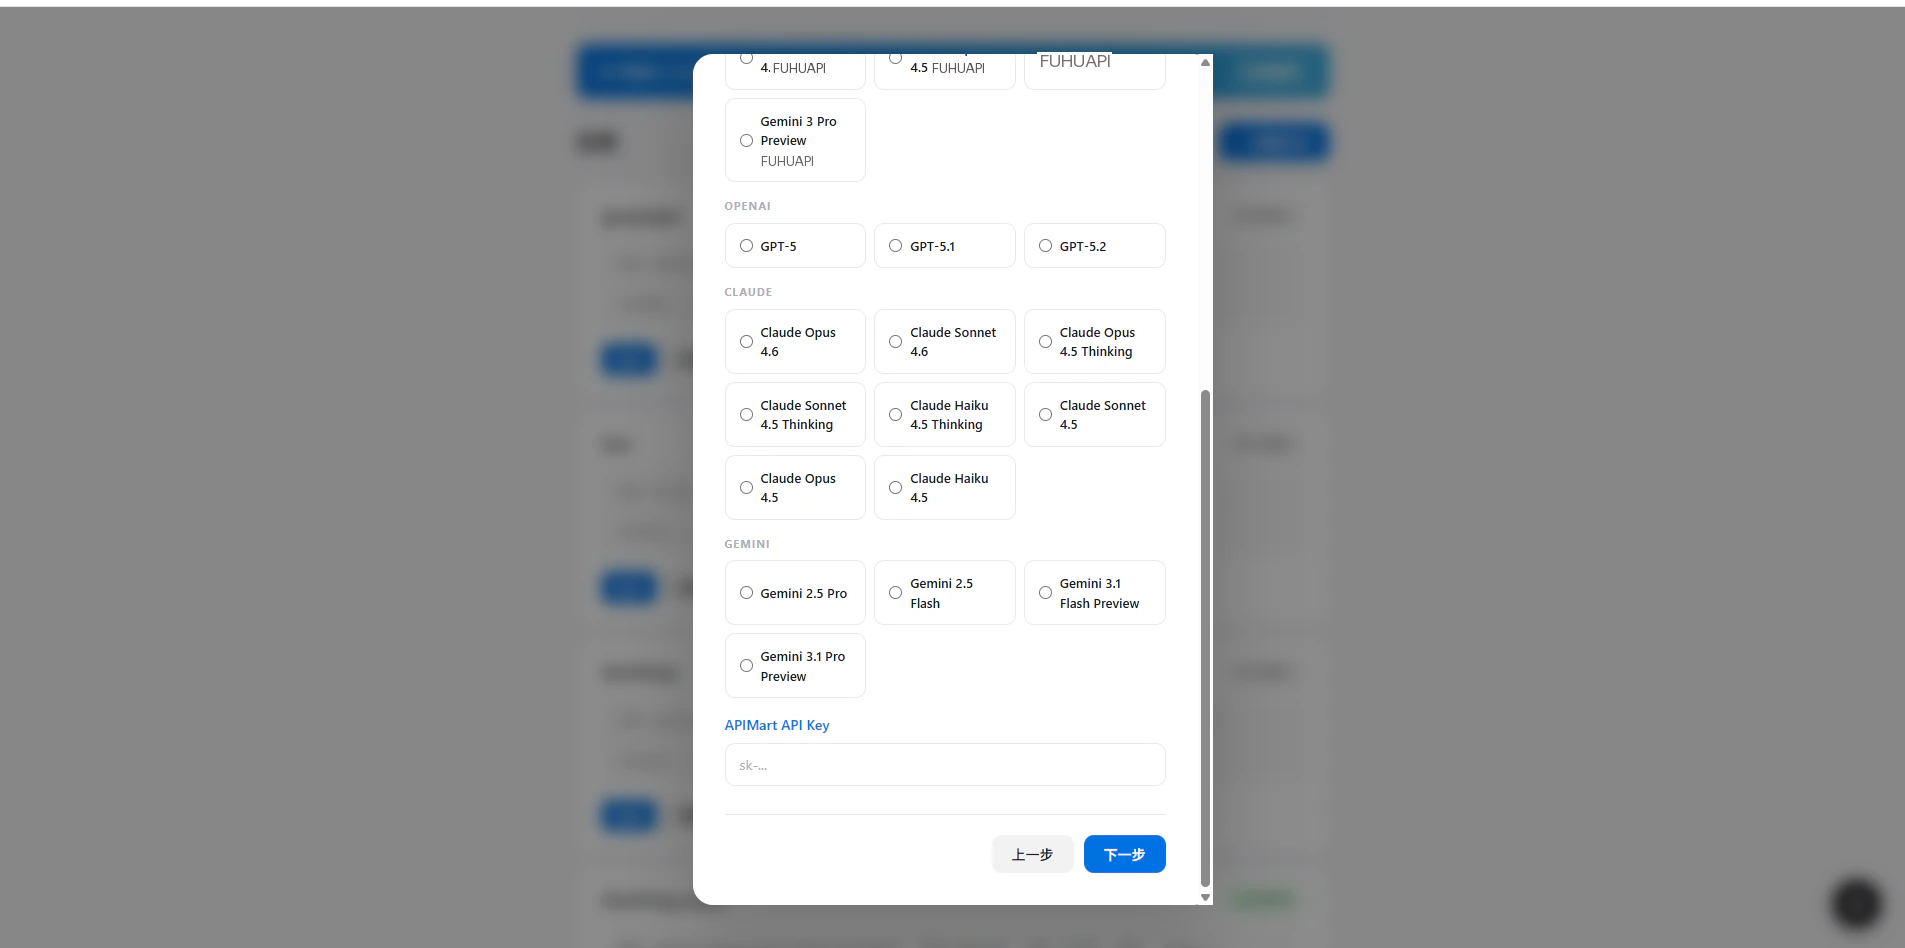 6. **Select channel** — Choose **Feishu**
7. **Fill in credentials** — Paste the App ID and App Secret into the corresponding fields
6. **Select channel** — Choose **Feishu**
7. **Fill in credentials** — Paste the App ID and App Secret into the corresponding fields
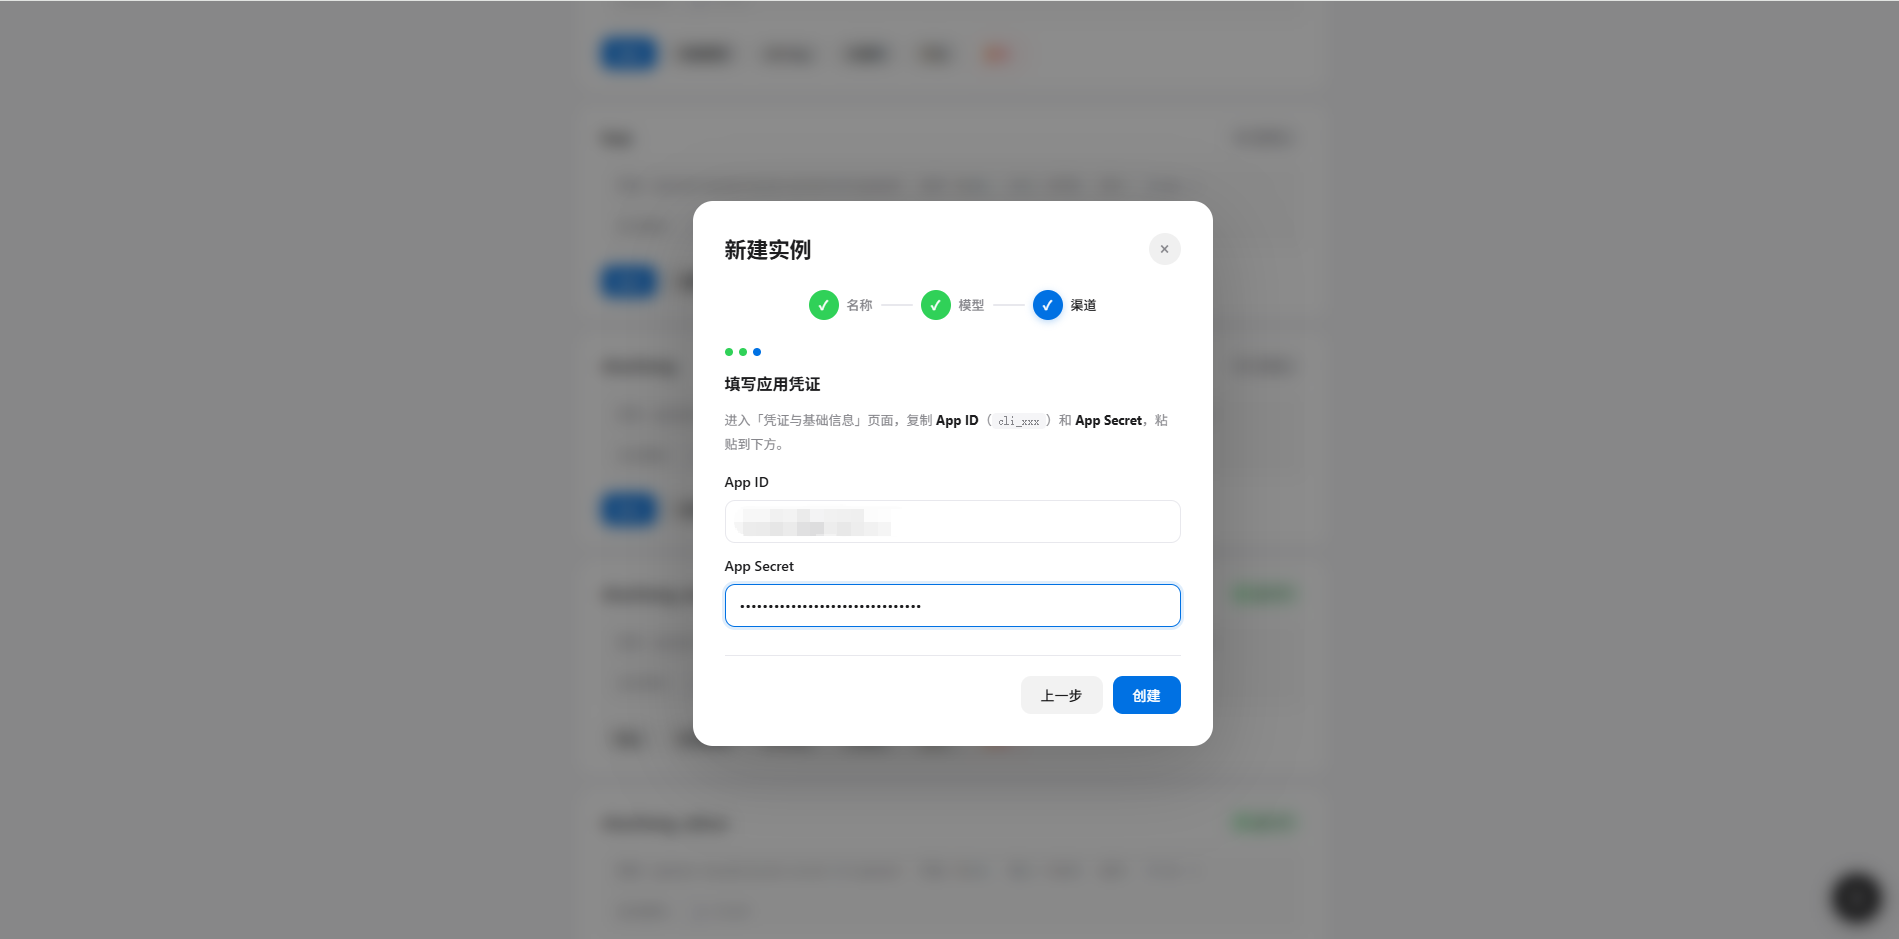 *Fill in Feishu App ID and App Secret*
8. Click **Create** to complete instance creation
## Step 5: Configure Event Subscription
After creating the instance, you still need to configure event subscription on the Feishu Open Platform:
1. Return to the Feishu Open Platform, enter the app details
2. Click **Events & Callbacks** in the left menu
3. Set **Subscription Method** to "**Long Connection**"
*Fill in Feishu App ID and App Secret*
8. Click **Create** to complete instance creation
## Step 5: Configure Event Subscription
After creating the instance, you still need to configure event subscription on the Feishu Open Platform:
1. Return to the Feishu Open Platform, enter the app details
2. Click **Events & Callbacks** in the left menu
3. Set **Subscription Method** to "**Long Connection**"
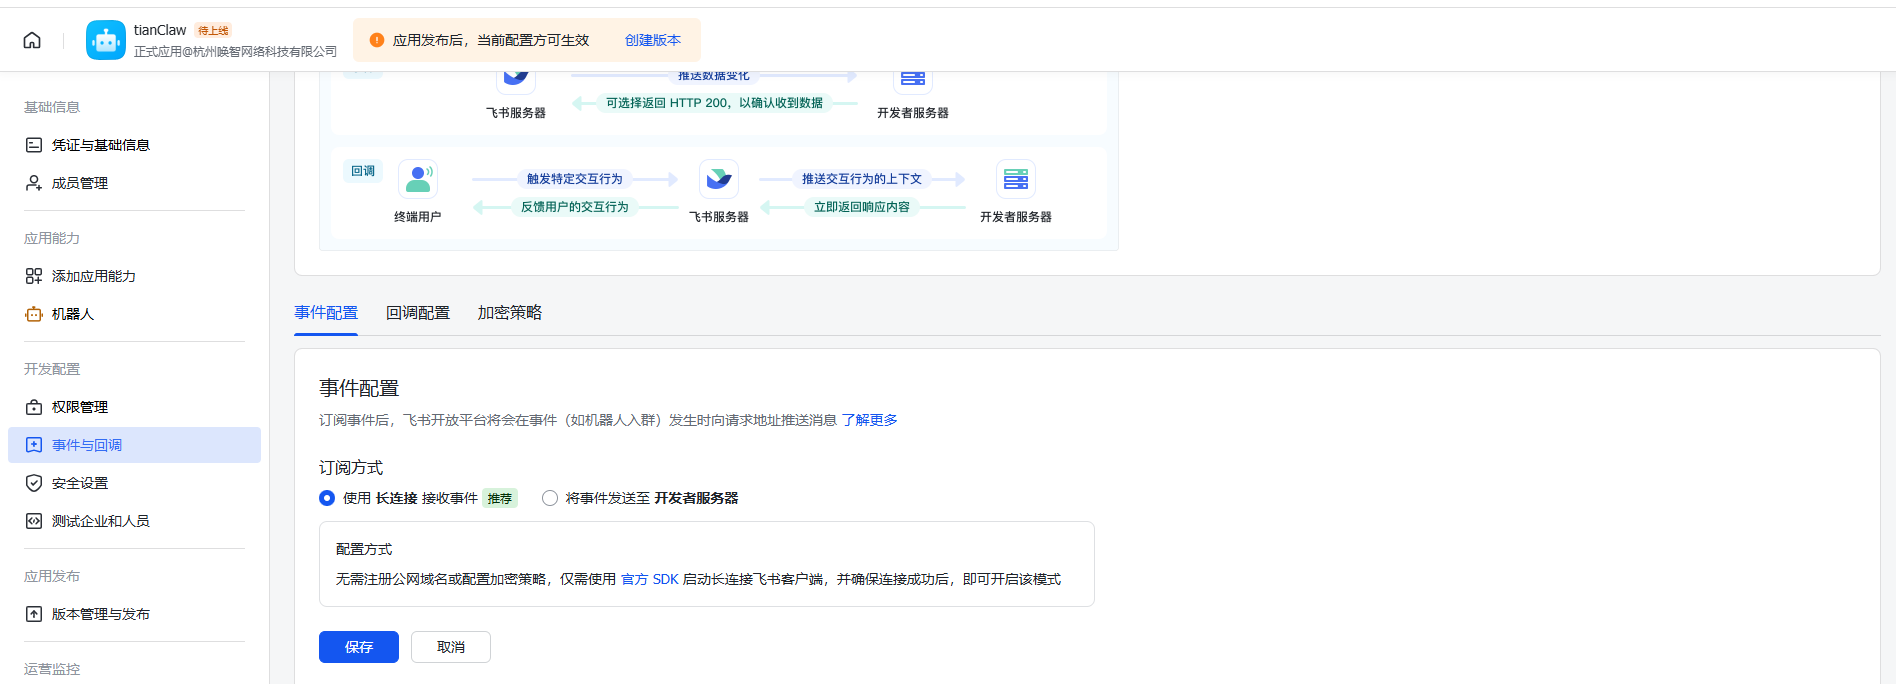 *Select Long Connection subscription method*
4. Click **Add Event**, search and add `im.message.receive_v1` (Receive messages)
*Select Long Connection subscription method*
4. Click **Add Event**, search and add `im.message.receive_v1` (Receive messages)
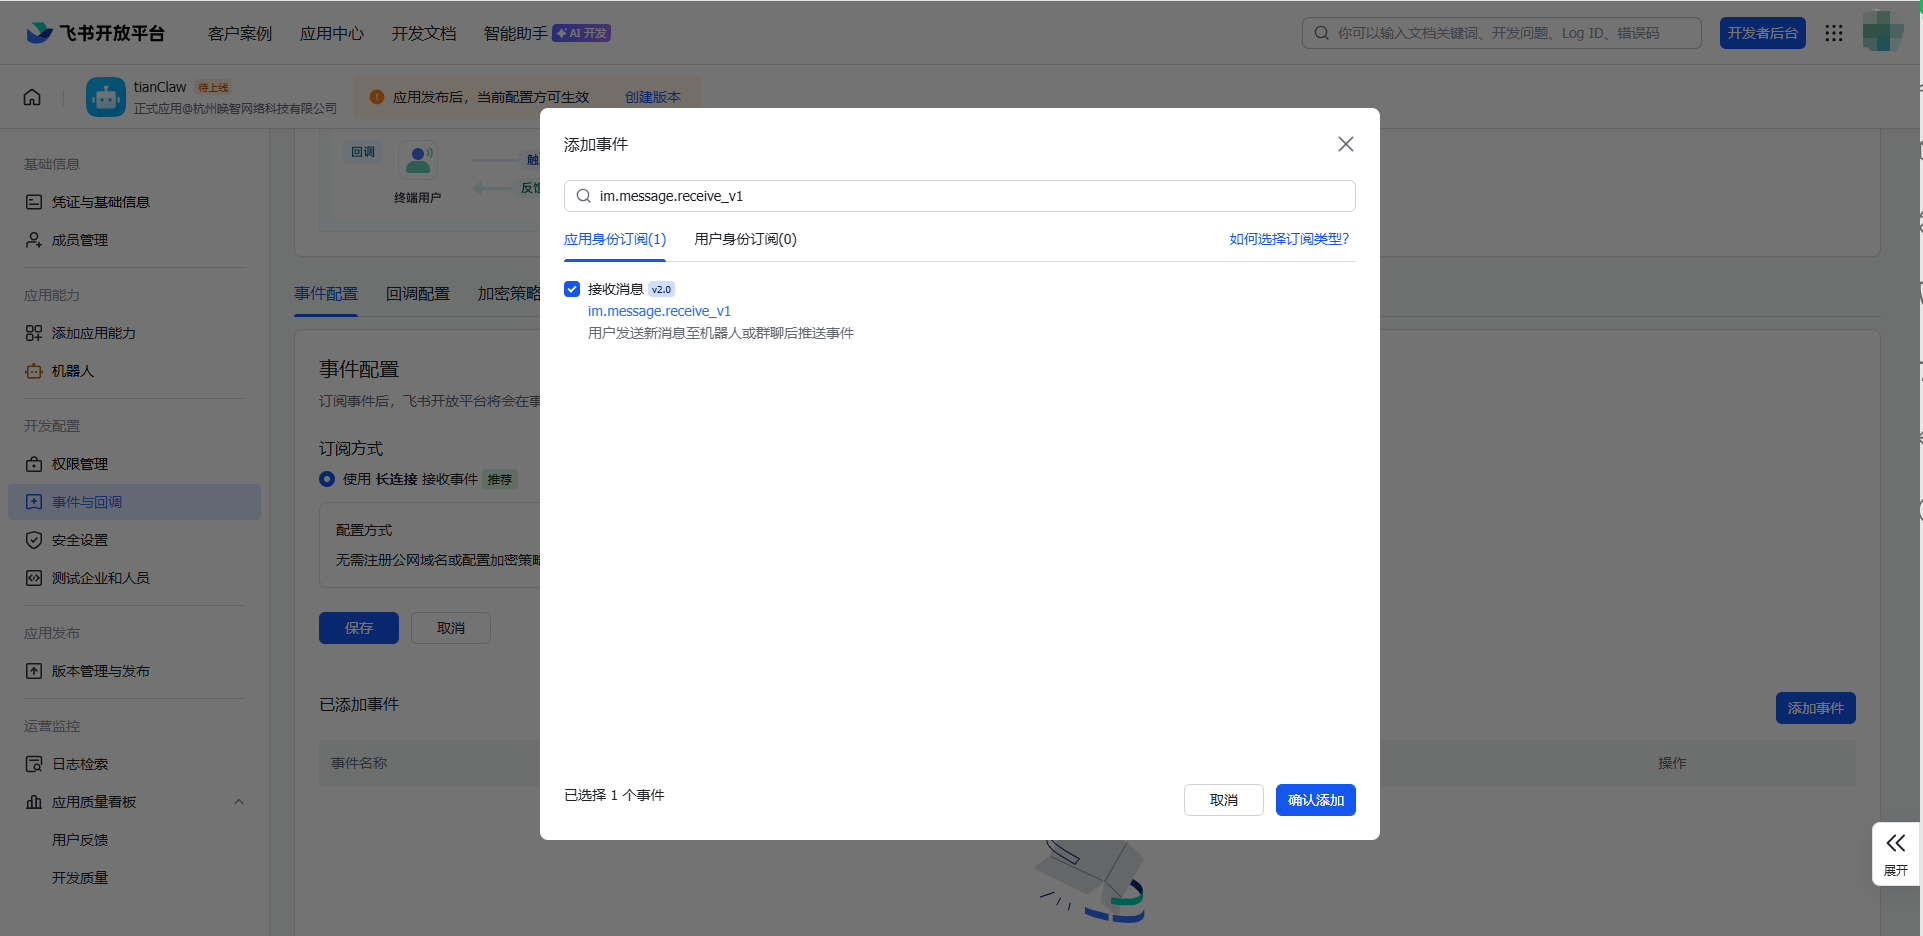 *Add the receive message event*
## Step 6: Create Version and Publish
1. Click **Version Management & Release** in the left menu
2. Click **Create Version**
3. Fill in the version number and update notes
4. Submit for review and wait for admin approval
*Add the receive message event*
## Step 6: Create Version and Publish
1. Click **Version Management & Release** in the left menu
2. Click **Create Version**
3. Fill in the version number and update notes
4. Submit for review and wait for admin approval
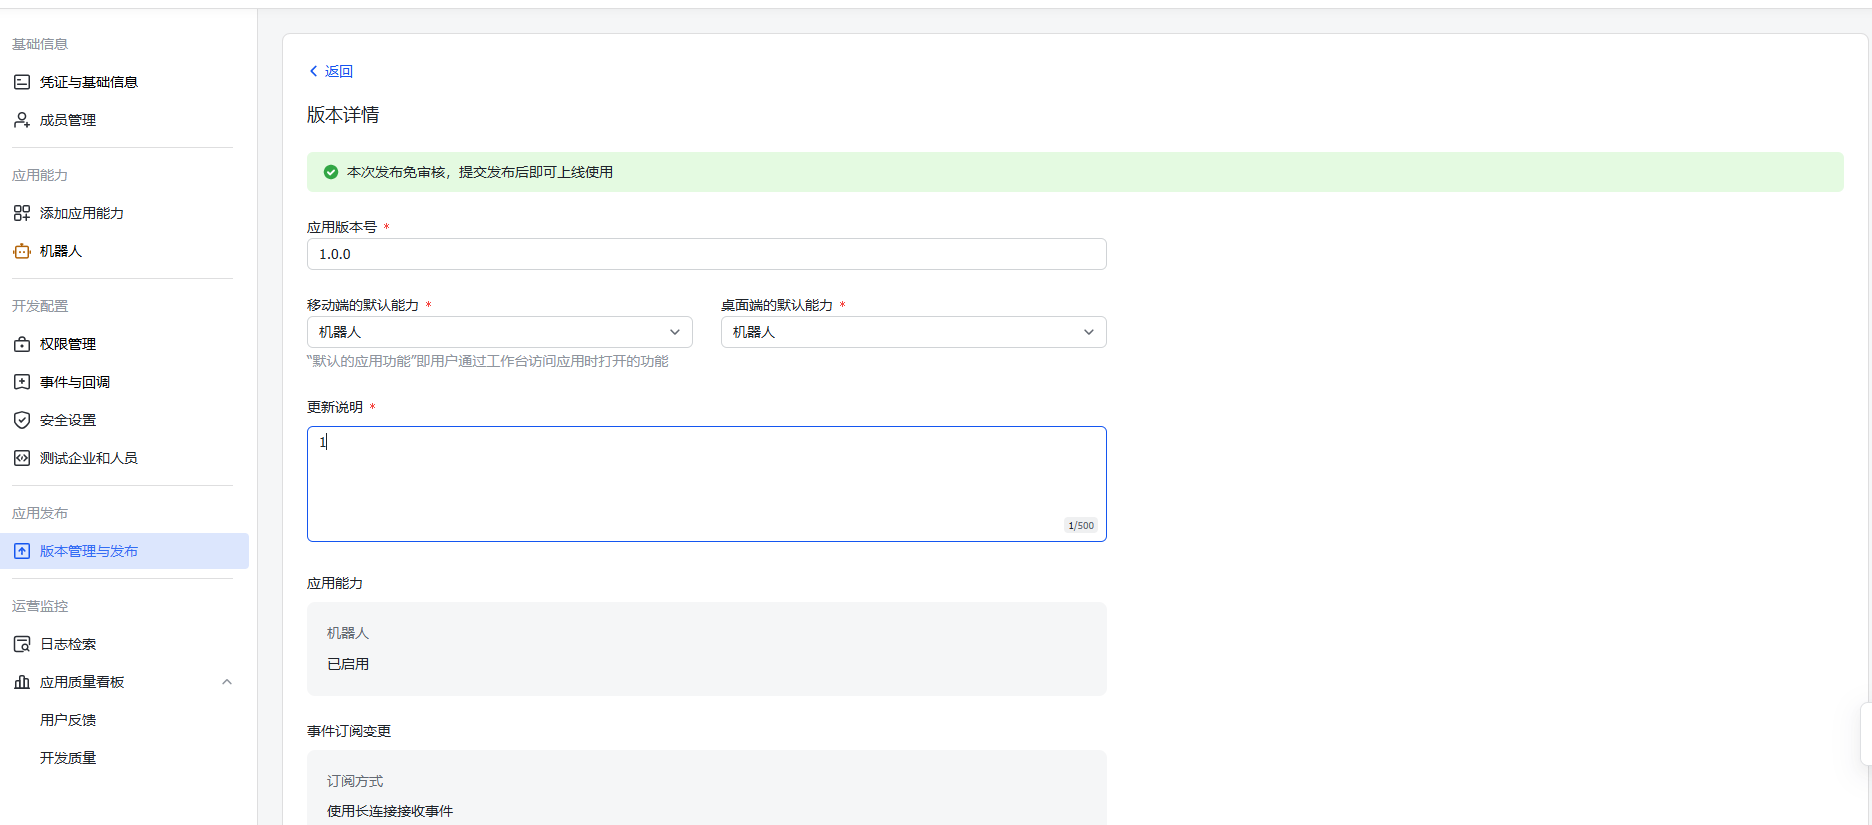 *Create version and submit for publication*
**Important:** After every permission or event subscription change, you must create a new version and republish for changes to take effect.
## Step 7: Pairing Code Binding
After the app is approved and published:
1. Search for your bot name in Feishu
2. Send any message (e.g. "Hello")
3. The bot will reply with an **8-digit pairing code** (e.g. `DFE62DTD`)
*Create version and submit for publication*
**Important:** After every permission or event subscription change, you must create a new version and republish for changes to take effect.
## Step 7: Pairing Code Binding
After the app is approved and published:
1. Search for your bot name in Feishu
2. Send any message (e.g. "Hello")
3. The bot will reply with an **8-digit pairing code** (e.g. `DFE62DTD`)
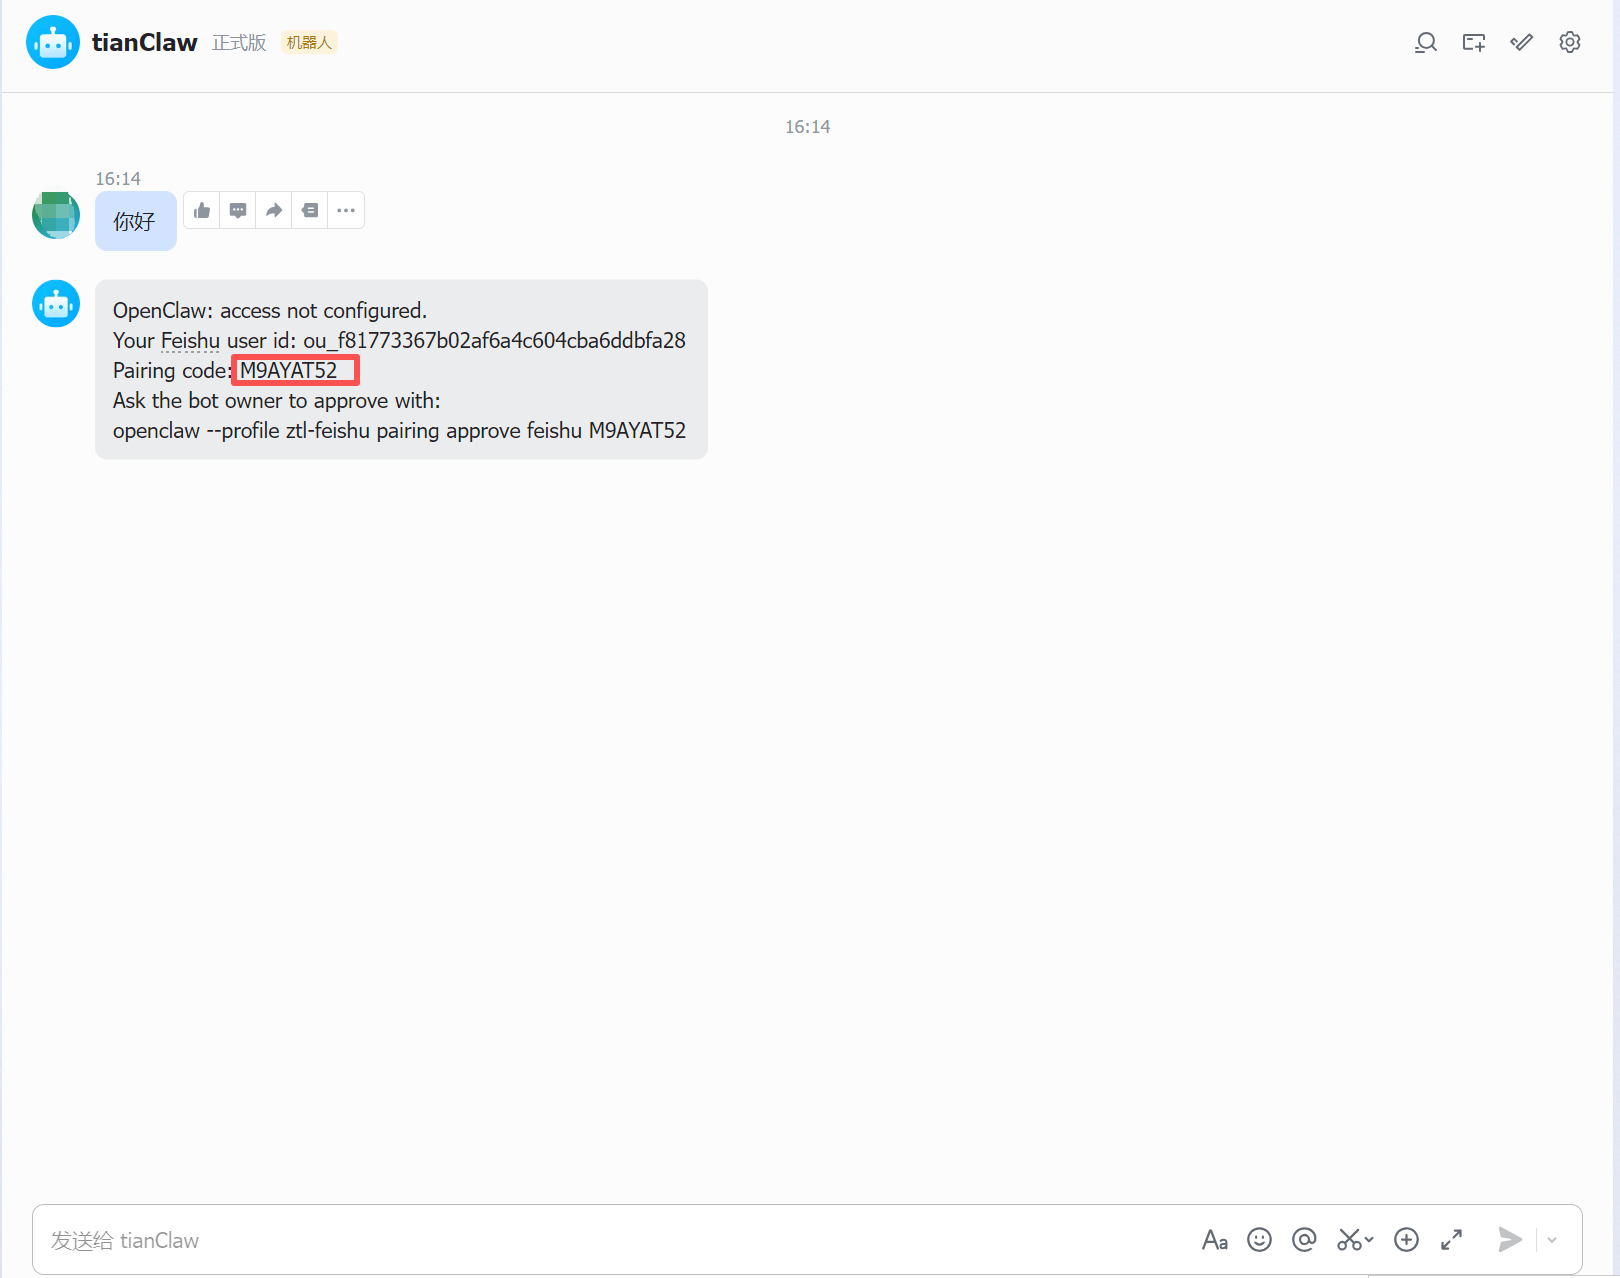 *Pairing code returned by the bot*
4. Return to the Manager's new instance wizard, enter the pairing code in the "**Enter Pairing Code**" step and click "**Approve**"
*Pairing code returned by the bot*
4. Return to the Manager's new instance wizard, enter the pairing code in the "**Enter Pairing Code**" step and click "**Approve**"
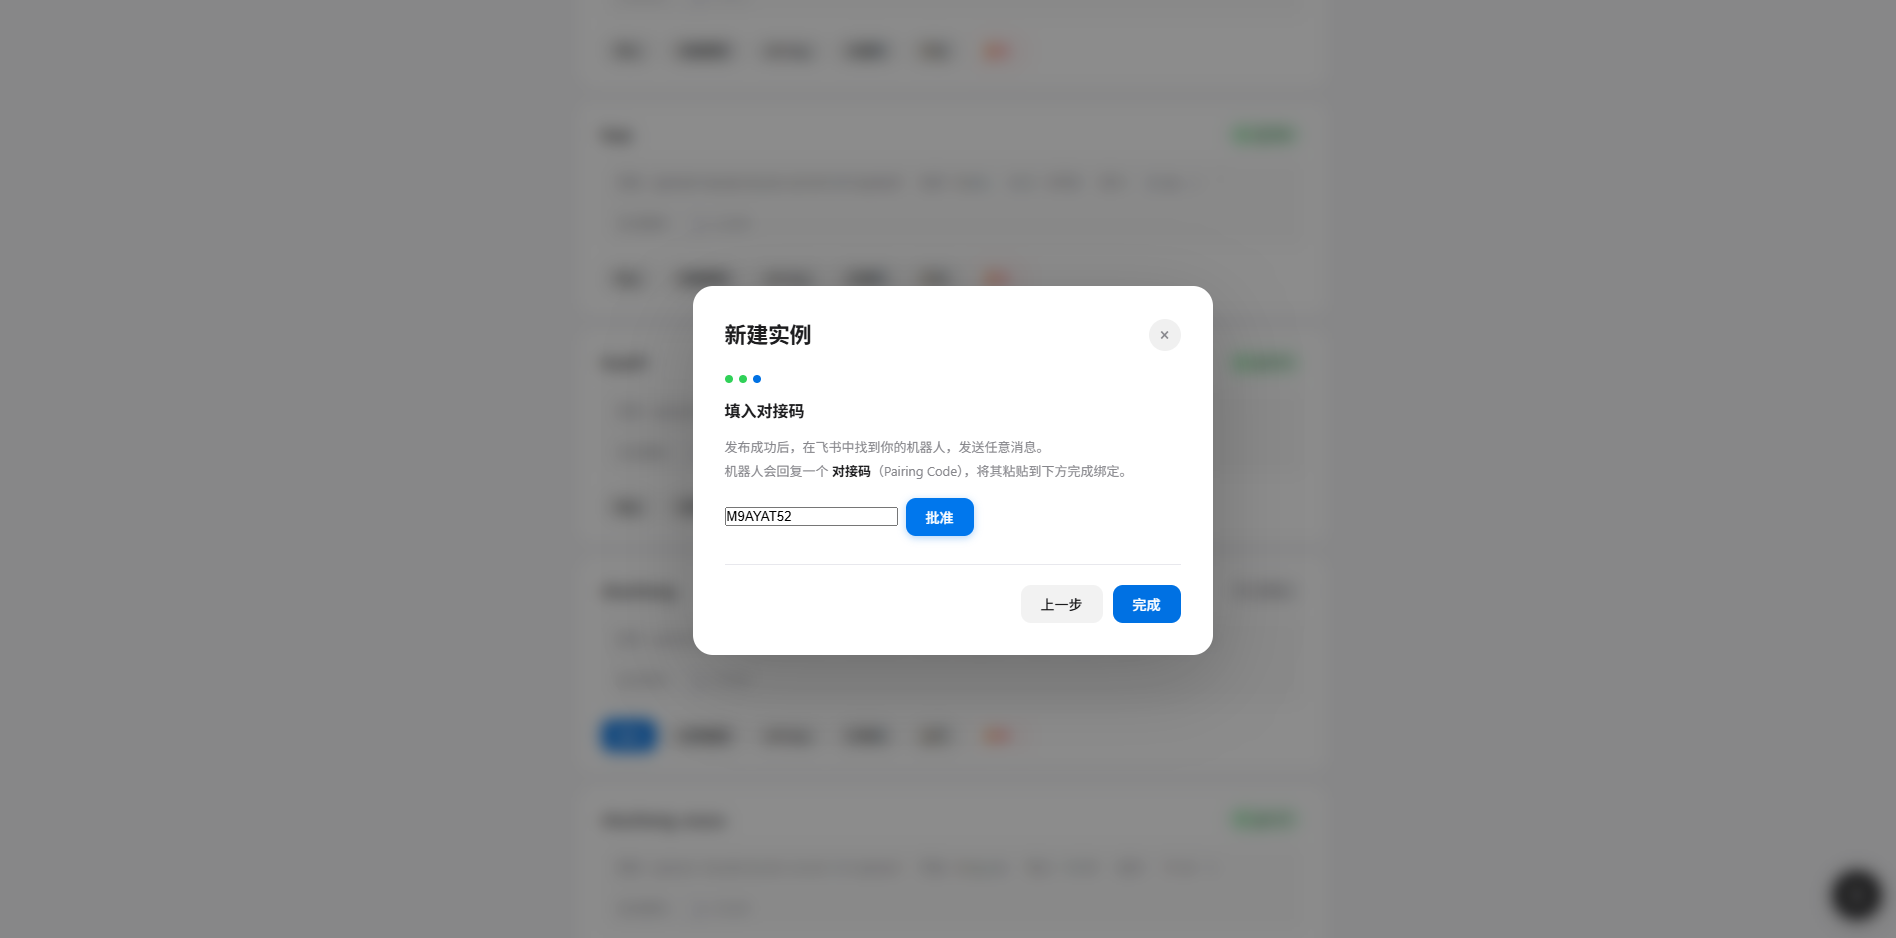 *Enter pairing code and approve in the wizard*
5. After the code is approved, click "**Done**"
*Enter pairing code and approve in the wizard*
5. After the code is approved, click "**Done**"
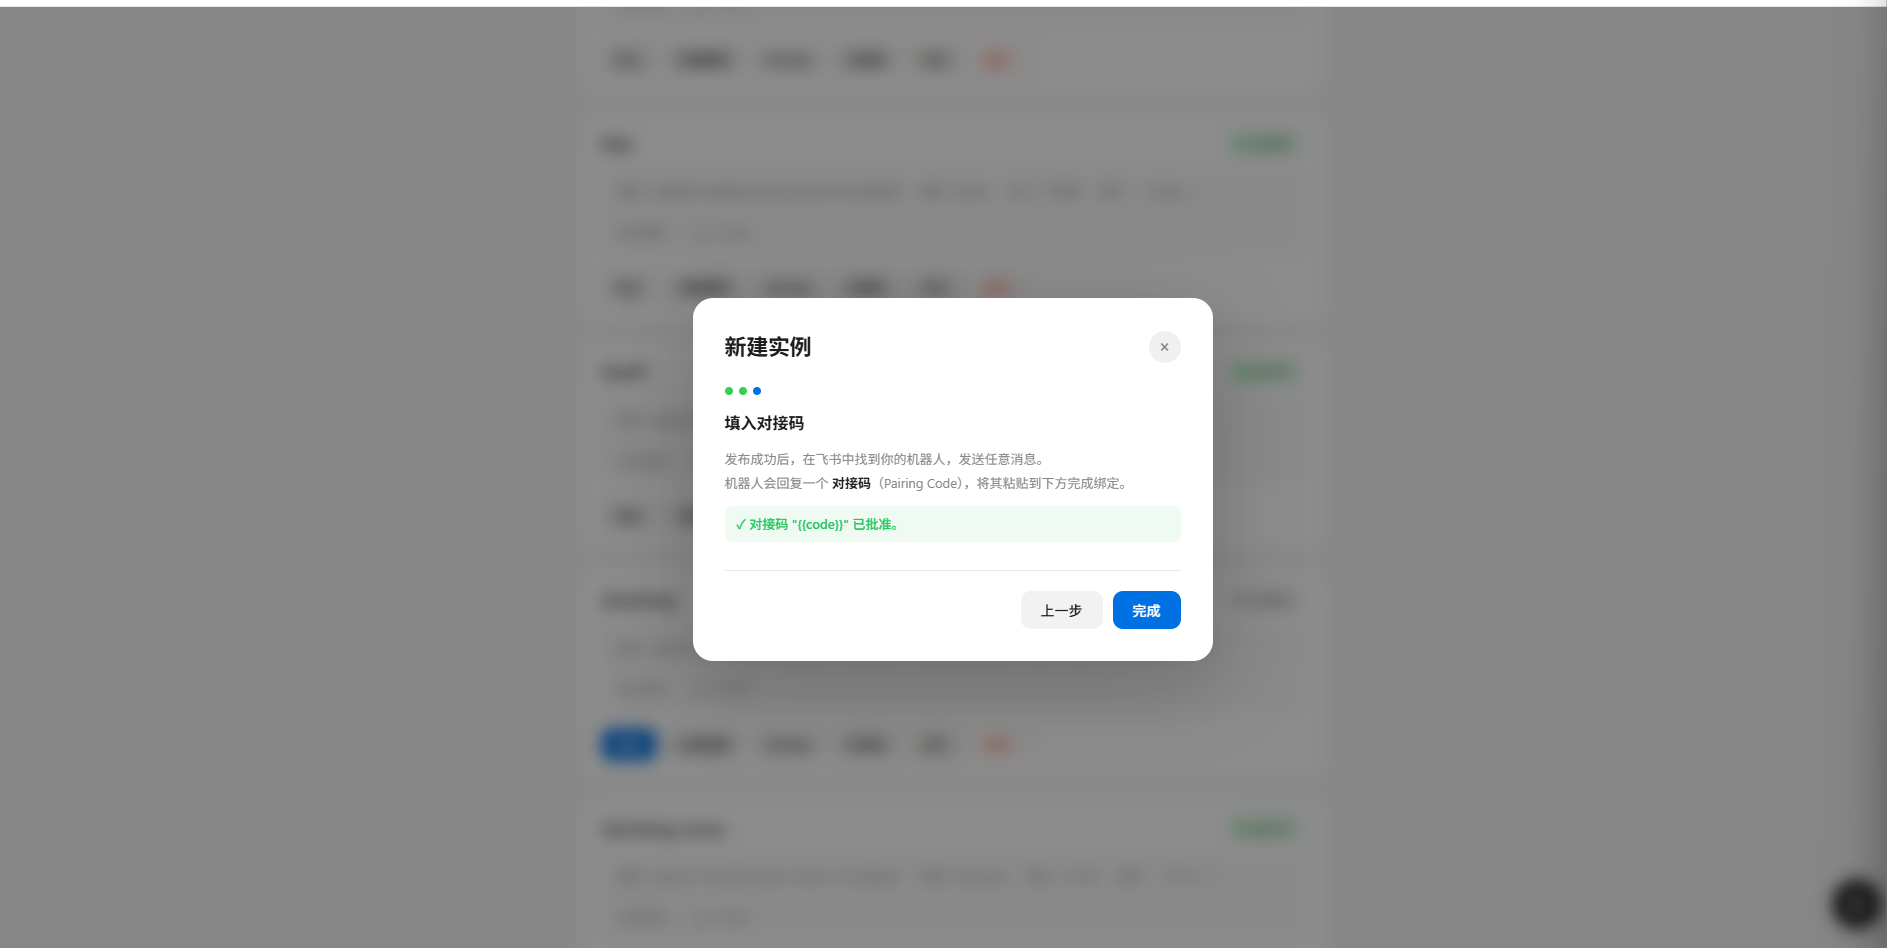 *Pairing code approved, click Done*
6. Return to Feishu, send another message, and the bot will respond with AI-generated content
*Pairing code approved, click Done*
6. Return to Feishu, send another message, and the bot will respond with AI-generated content
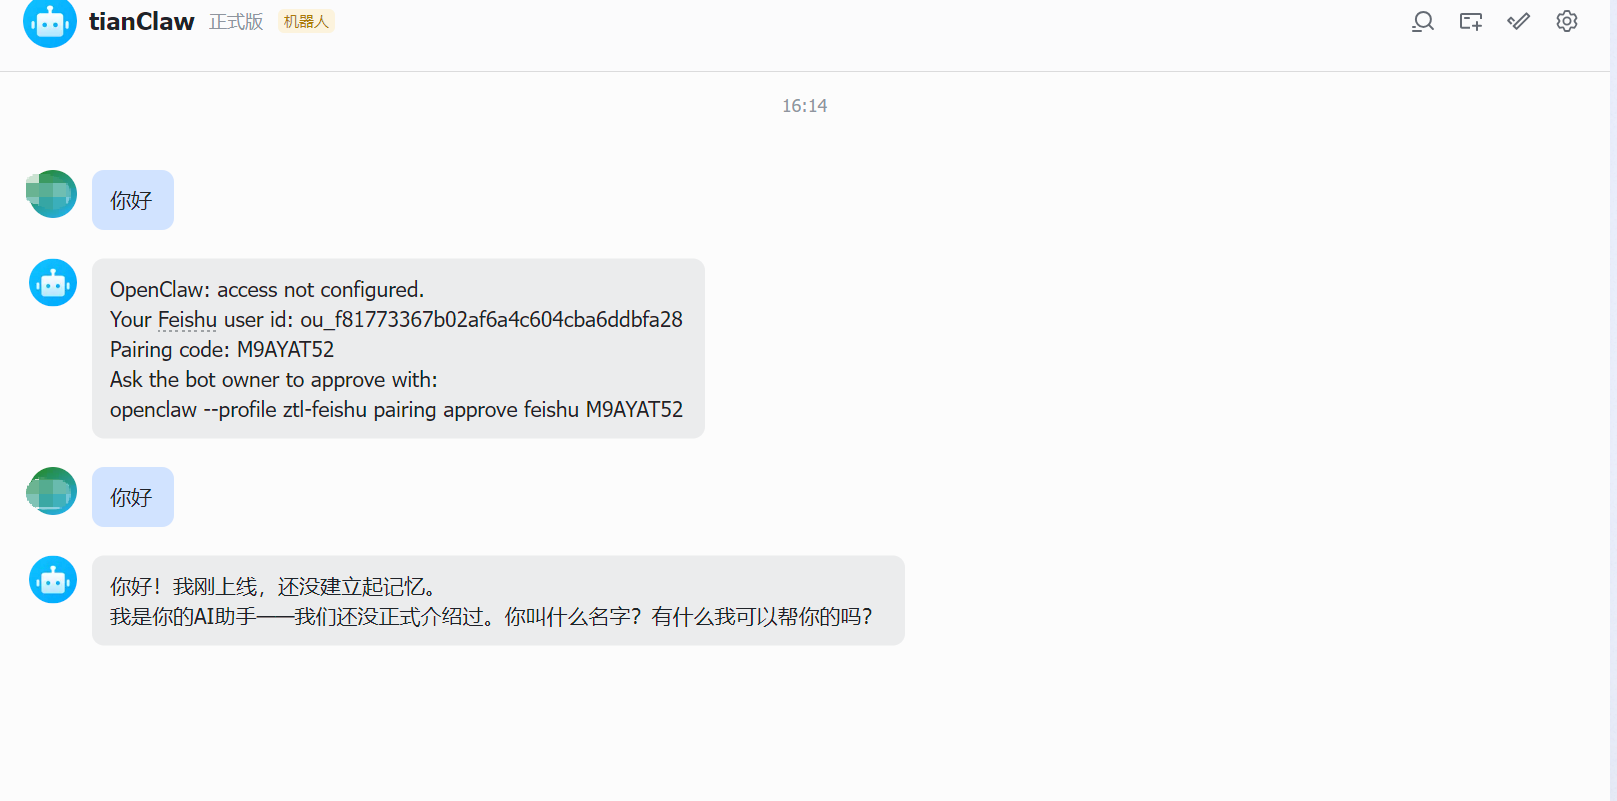 *Chat with the AI bot after successful binding*
## FAQ
### Q1: Bot not responding to messages?
**Solutions:**
1. Confirm event subscription has added `im.message.receive_v1`
2. Confirm subscription method is "**Long Connection**" (not Webhook)
3. Confirm a new version has been created and published, and approval has passed
4. Confirm the instance status is "**Running**" in Manager
### Q2: Insufficient permissions error?
**Solutions:**
1. Check that all permissions are enabled (see Step 2)
2. After modifying permissions, you must create a new version and republish
3. Wait for admin approval
### Q3: Pairing code approval failed?
**Solutions:**
* Confirm Gateway is running
* Pairing codes are case-sensitive, double check carefully
* Codes expire after Gateway restart, have the user send a new message
***
View the complete guide for Manager installation, deployment and instance management
*Chat with the AI bot after successful binding*
## FAQ
### Q1: Bot not responding to messages?
**Solutions:**
1. Confirm event subscription has added `im.message.receive_v1`
2. Confirm subscription method is "**Long Connection**" (not Webhook)
3. Confirm a new version has been created and published, and approval has passed
4. Confirm the instance status is "**Running**" in Manager
### Q2: Insufficient permissions error?
**Solutions:**
1. Check that all permissions are enabled (see Step 2)
2. After modifying permissions, you must create a new version and republish
3. Wait for admin approval
### Q3: Pairing code approval failed?
**Solutions:**
* Confirm Gateway is running
* Pairing codes are case-sensitive, double check carefully
* Codes expire after Gateway restart, have the user send a new message
***
View the complete guide for Manager installation, deployment and instance management