> ## Documentation Index
> Fetch the complete documentation index at: https://docs.elkapi.com/llms.txt
> Use this file to discover all available pages before exploring further.
# OpenClaw Manager — 飞书渠道配置
> 详细指导如何在 OpenClaw Manager 中创建和配置飞书机器人,包括创建企业自建应用、权限配置、事件订阅、对接码绑定等完整流程。
## 简介
本教程将指导您在 OpenClaw Manager 中完成飞书机器人的创建和配置。完成后,您的飞书 Bot 将接入 ElkAPI 的 AI 模型,可以在飞书中与用户进行智能对话。
**前置条件:** 请确保您已完成 [OpenClaw Manager 部署](/cn/integrations/platform/openclaw-manager),Manager 正在运行且可以访问管理界面。
## 第一步:创建飞书企业自建应用
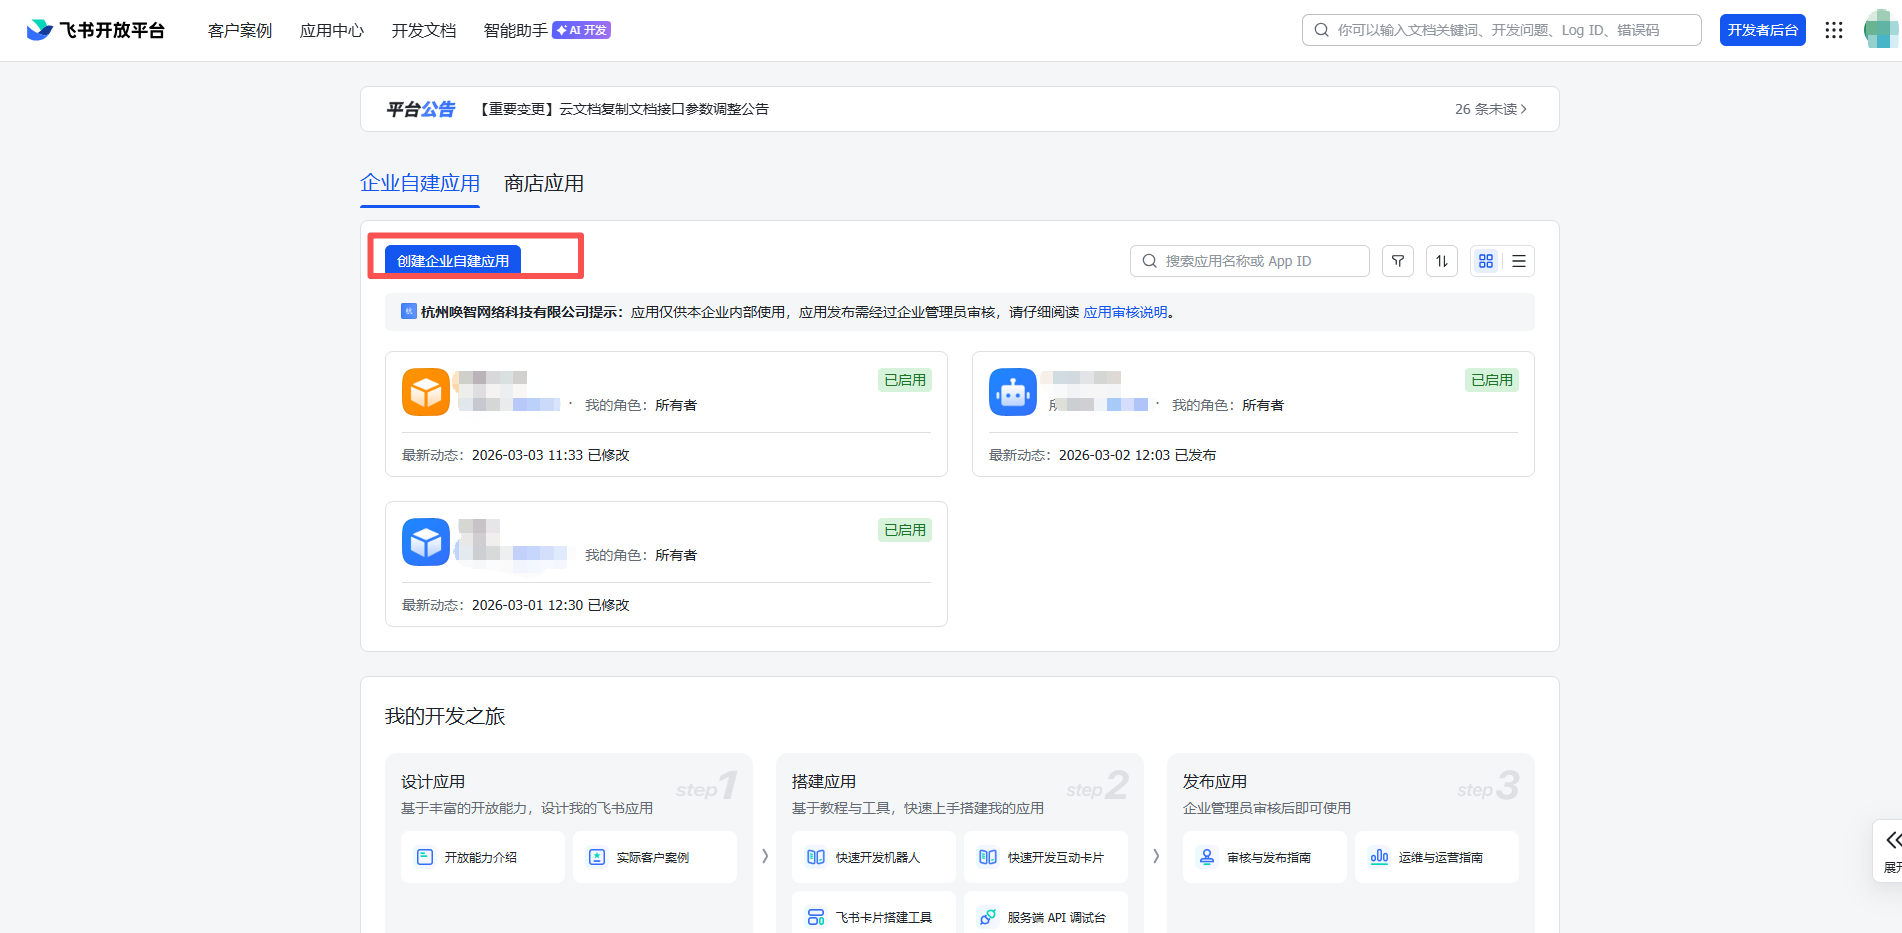
1. 前往 [飞书开放平台](https://open.feishu.cn/app),登录后点击 **创建企业自建应用**
 2. 填写应用名称和描述,上传应用图标
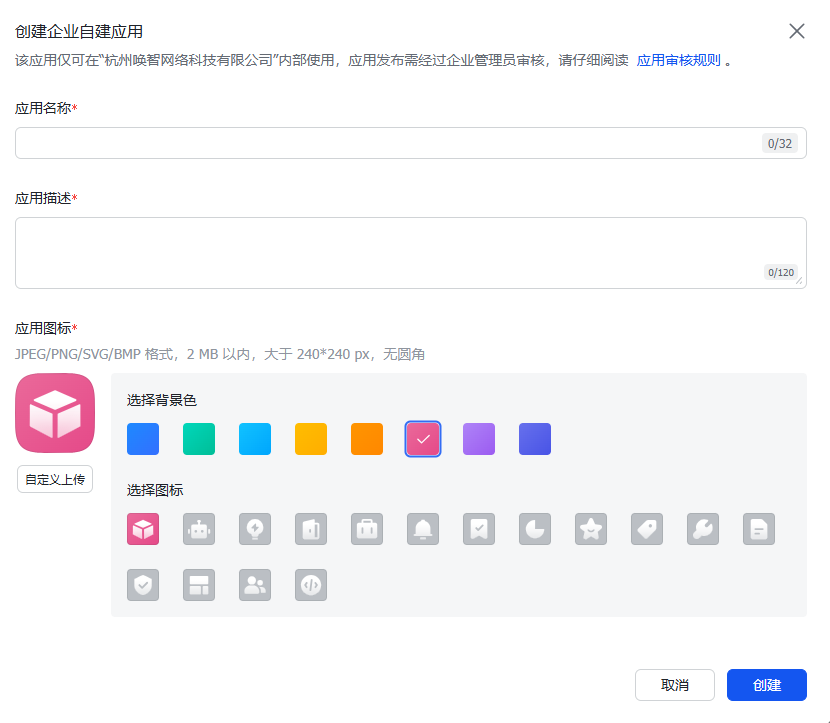 *填写应用名称和描述*
## 第二步:配置应用权限
1. 进入应用详情页,点击左侧菜单的 **权限管理**
2. 点击 **批量开通**,粘贴以下 JSON 配置:
```json theme={null} theme={null}
{
"scopes": {
"tenant": [
"contact:contact.base:readonly",
"contact:user.email:readonly",
"im:chat.members:bot_access",
"im:message",
"im:message.group_at_msg:readonly",
"im:message.p2p_msg:readonly",
"im:message:readonly",
"im:message:send_as_bot",
"cardkit:card:write"
]
}
}
```
*填写应用名称和描述*
## 第二步:配置应用权限
1. 进入应用详情页,点击左侧菜单的 **权限管理**
2. 点击 **批量开通**,粘贴以下 JSON 配置:
```json theme={null} theme={null}
{
"scopes": {
"tenant": [
"contact:contact.base:readonly",
"contact:user.email:readonly",
"im:chat.members:bot_access",
"im:message",
"im:message.group_at_msg:readonly",
"im:message.p2p_msg:readonly",
"im:message:readonly",
"im:message:send_as_bot",
"cardkit:card:write"
]
}
}
```
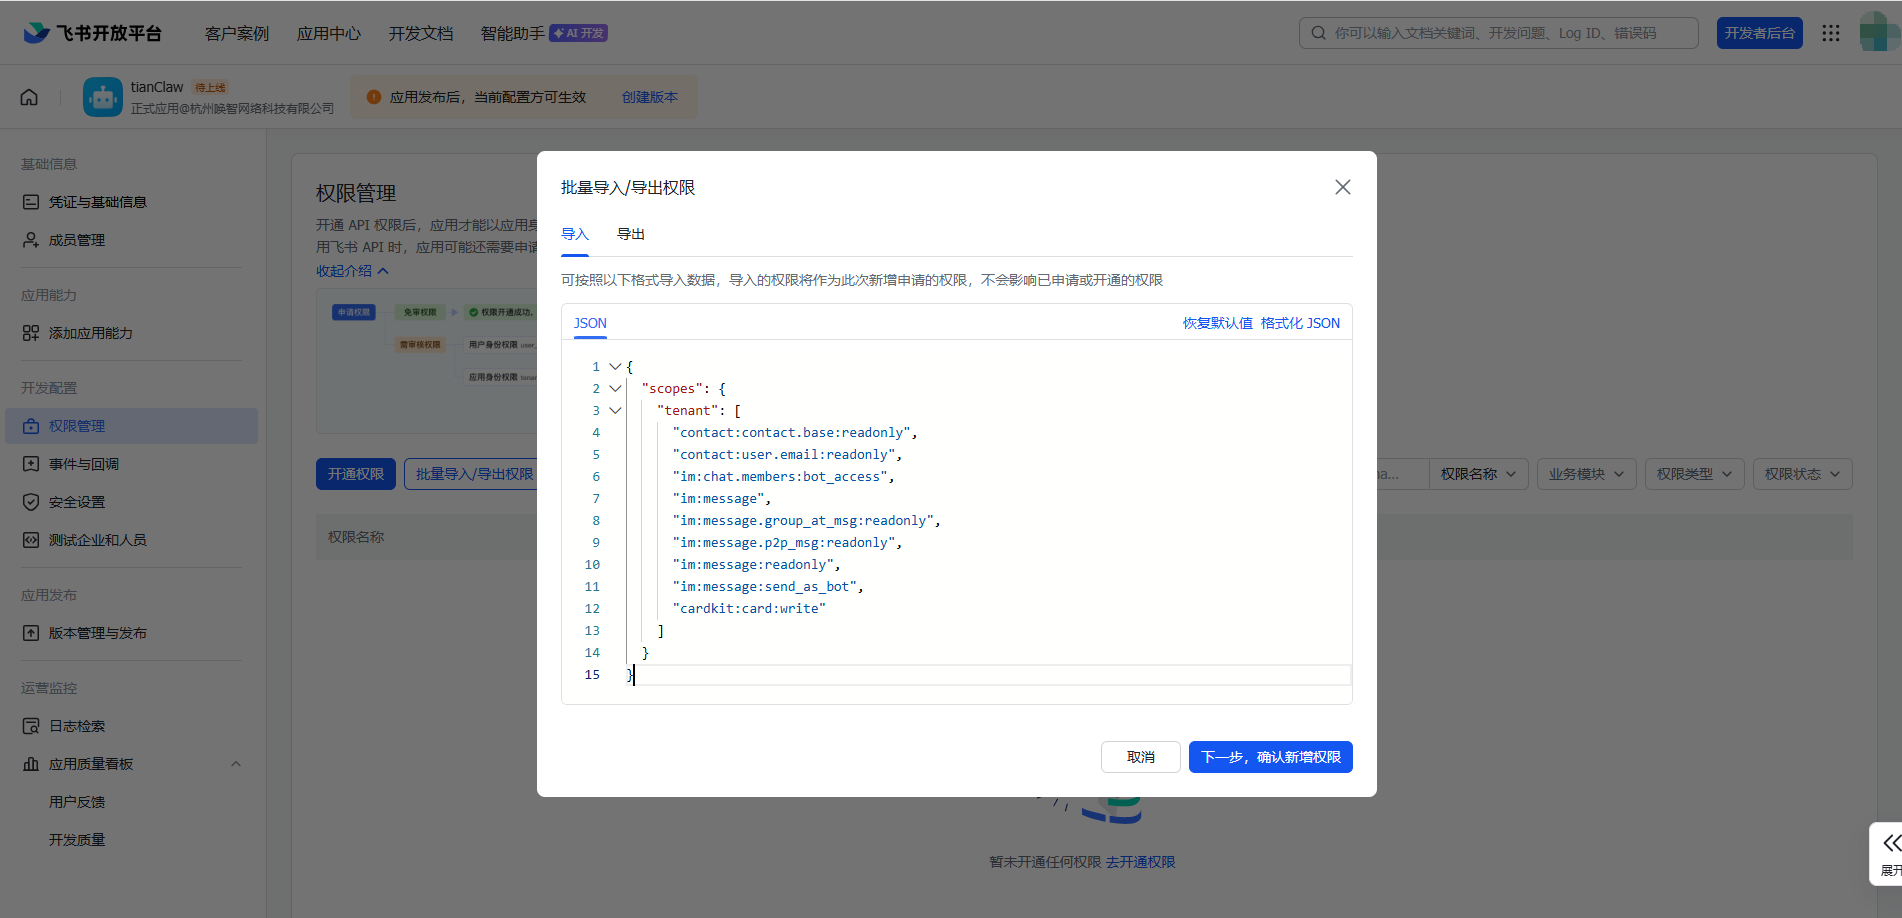 *批量开通所需权限*
3. 点击确认开通
## 第三步:获取凭证
1. 在左侧菜单中点击 **凭证与基础信息**
2. 复制 **App ID**(格式:`cli_xxxxxxxxxx`)和 **App Secret**
*批量开通所需权限*
3. 点击确认开通
## 第三步:获取凭证
1. 在左侧菜单中点击 **凭证与基础信息**
2. 复制 **App ID**(格式:`cli_xxxxxxxxxx`)和 **App Secret**
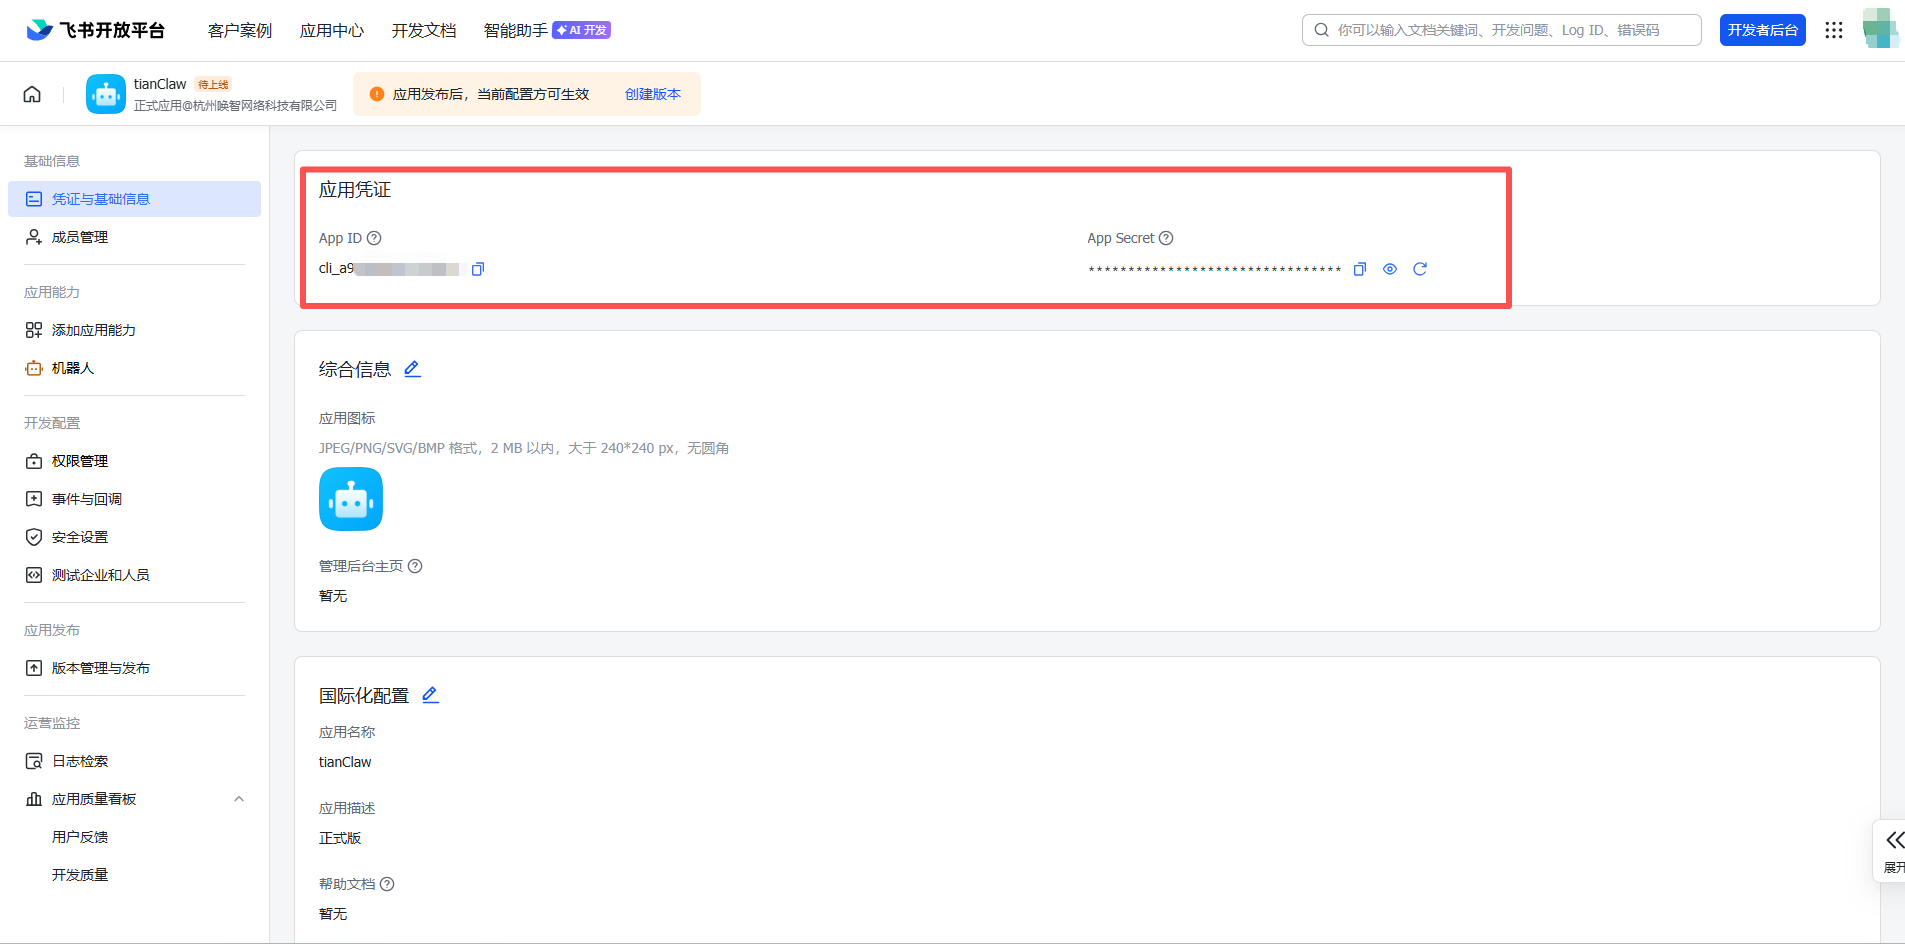 *复制 App ID 和 App Secret*
**请妥善保管 App Secret**,不要泄露给他人。
## 第四步:在 Manager 中创建实例
1. 打开 OpenClaw Manager 管理界面(`http://127.0.0.1:51942`)
2. 点击 **+ 新建实例**
3. **输入实例名称** — 如 `my-feishu-bot`
*复制 App ID 和 App Secret*
**请妥善保管 App Secret**,不要泄露给他人。
## 第四步:在 Manager 中创建实例
1. 打开 OpenClaw Manager 管理界面(`http://127.0.0.1:51942`)
2. 点击 **+ 新建实例**
3. **输入实例名称** — 如 `my-feishu-bot`
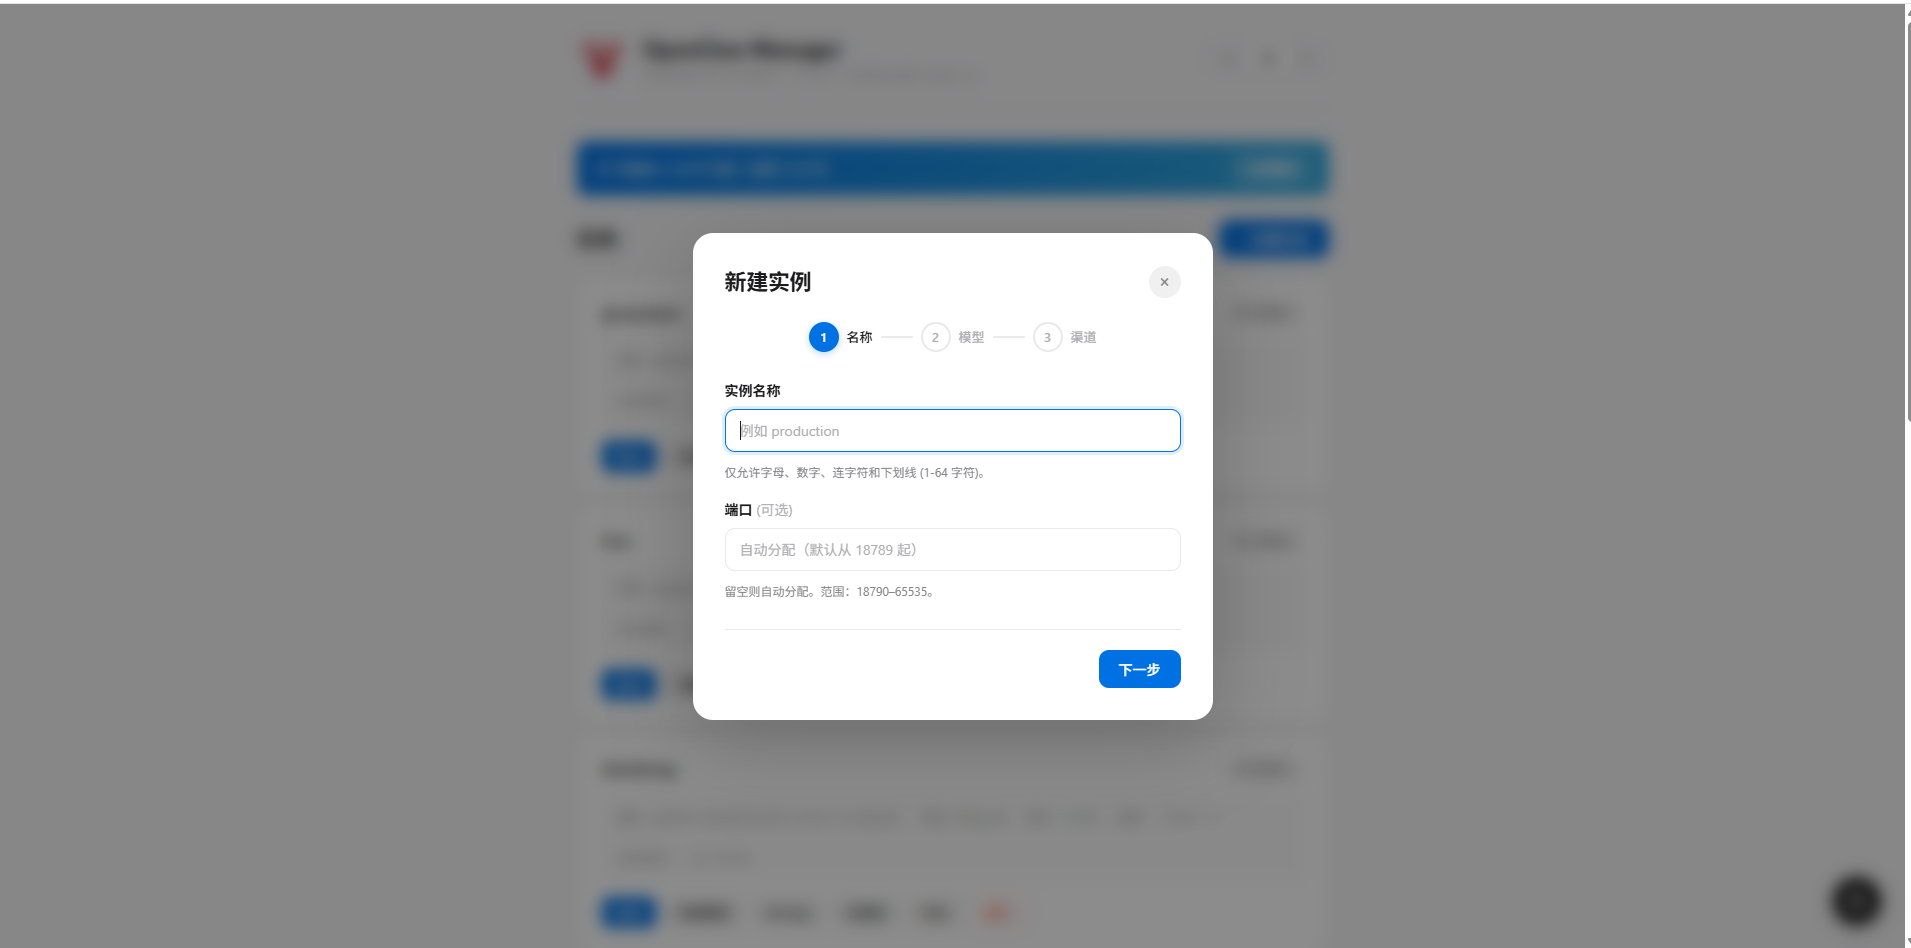 4. **选择 AI 模型** — 选择您要使用的模型
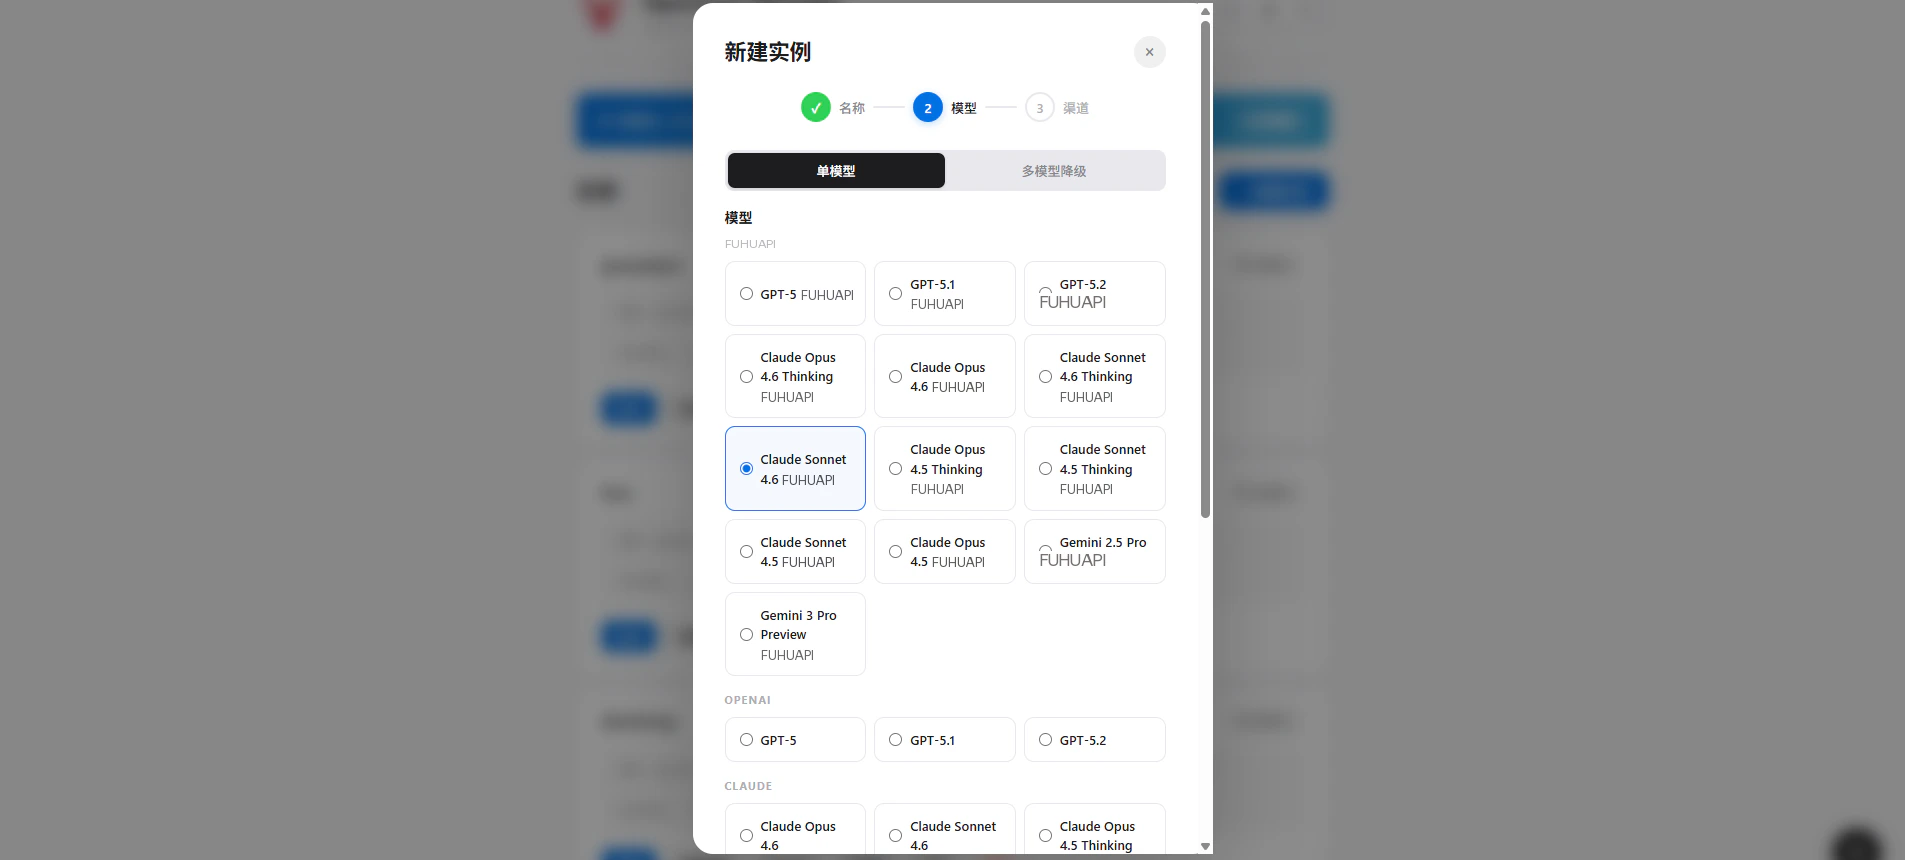 5. **输入 ElkAPI API Key** — 输入以 `sk-` 开头的 API 密钥
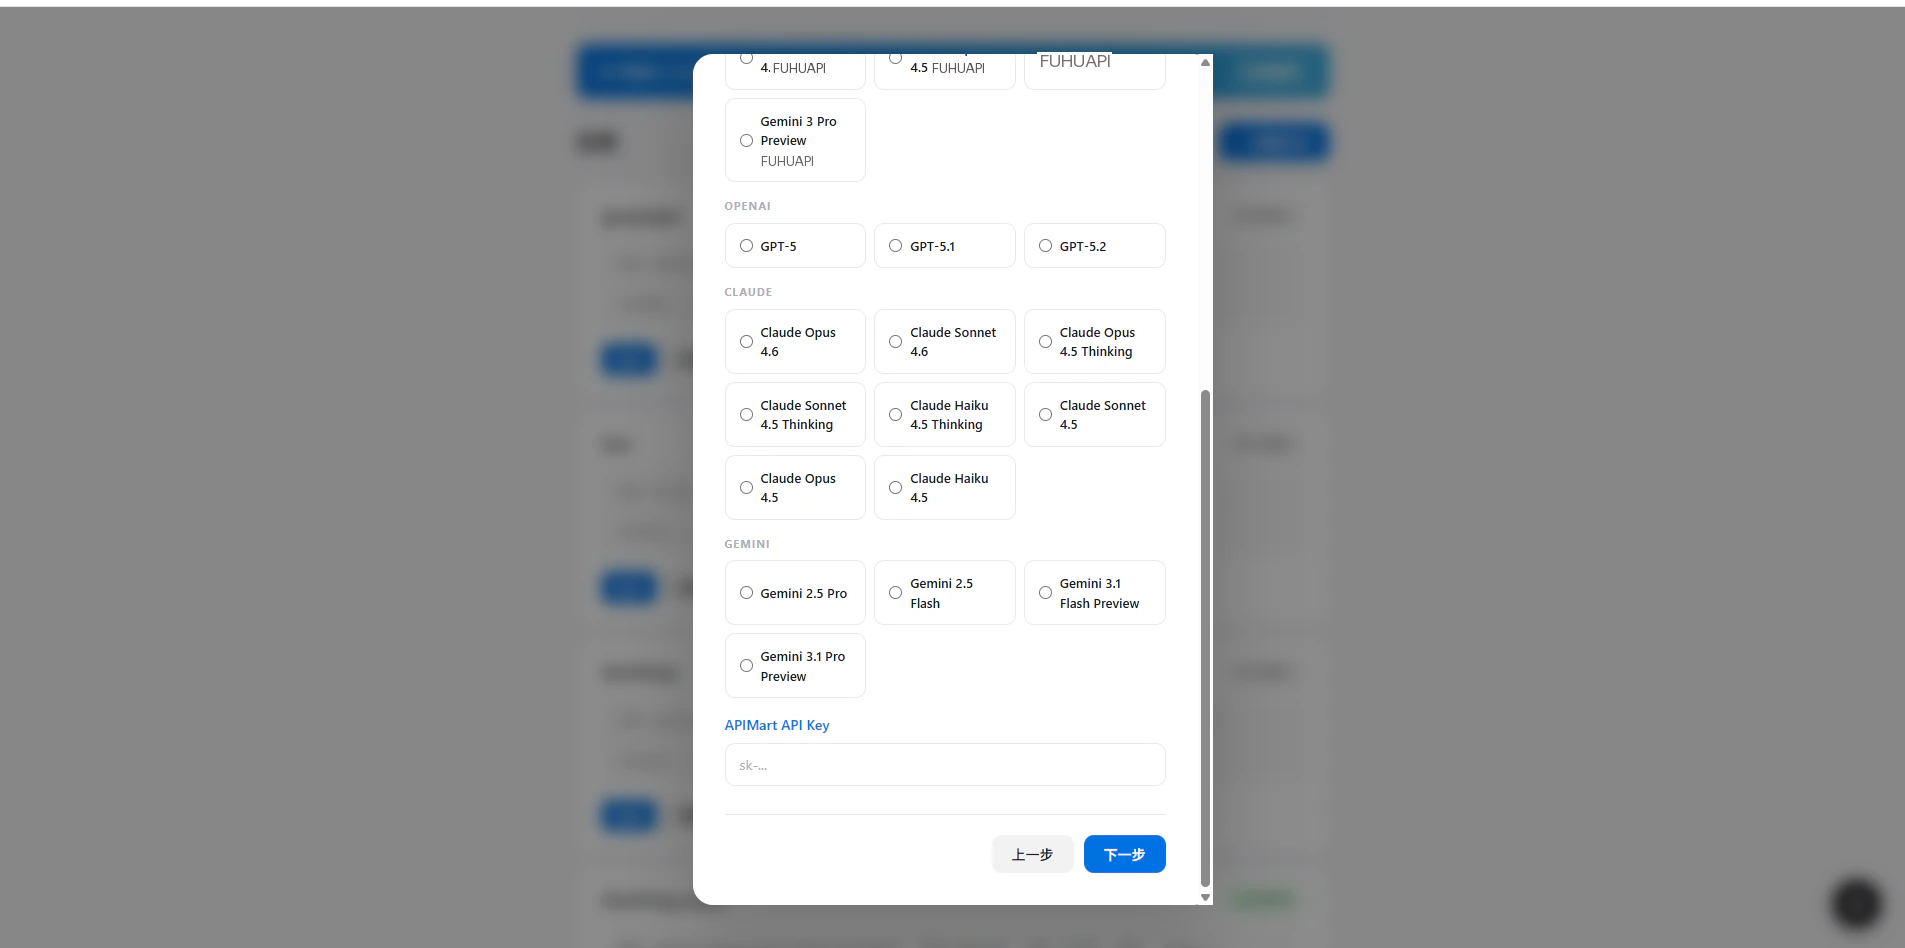 6. **选择渠道** — 选择 **飞书**
7. **填写凭证** — 将 App ID 和 App Secret 粘贴到对应输入框中
6. **选择渠道** — 选择 **飞书**
7. **填写凭证** — 将 App ID 和 App Secret 粘贴到对应输入框中
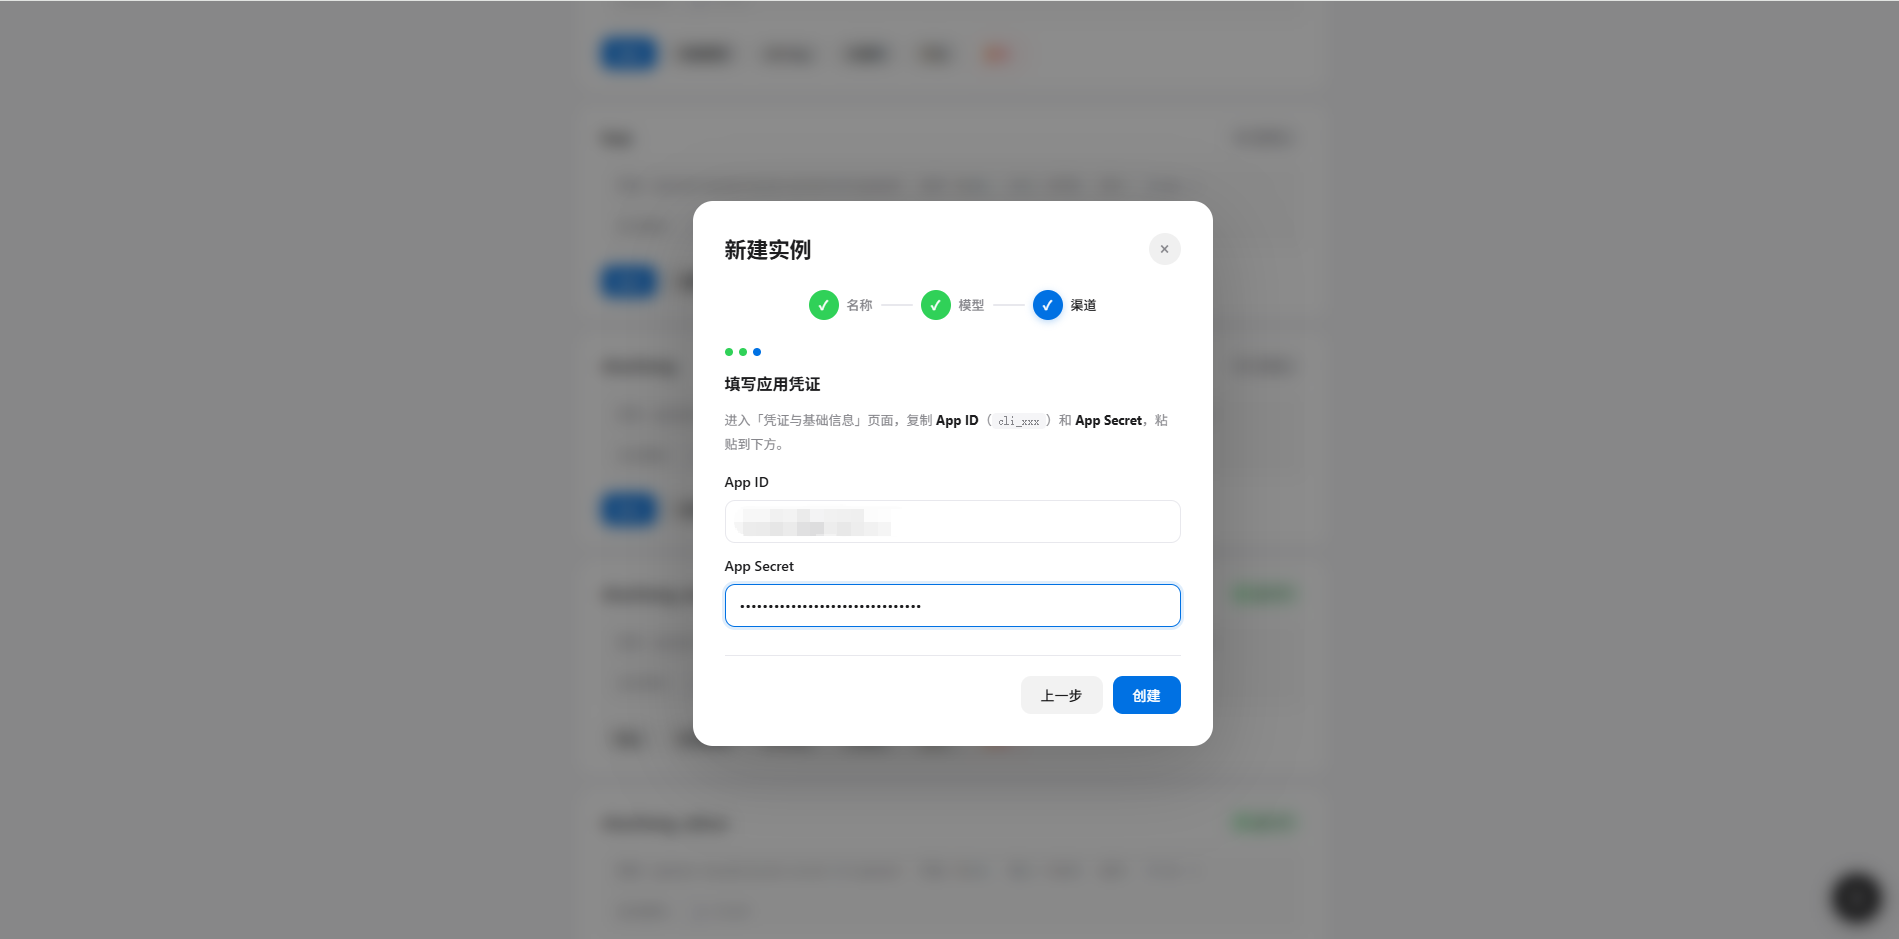 *填写飞书 App ID 和 App Secret*
8. 点击 **创建** 完成实例创建
## 第五步:配置事件订阅
实例创建后,还需要在飞书开放平台配置事件订阅:
1. 回到飞书开放平台,进入应用详情
2. 点击左侧菜单的 **事件与回调**
3. **订阅方式** 选择「**长连接**」
*填写飞书 App ID 和 App Secret*
8. 点击 **创建** 完成实例创建
## 第五步:配置事件订阅
实例创建后,还需要在飞书开放平台配置事件订阅:
1. 回到飞书开放平台,进入应用详情
2. 点击左侧菜单的 **事件与回调**
3. **订阅方式** 选择「**长连接**」
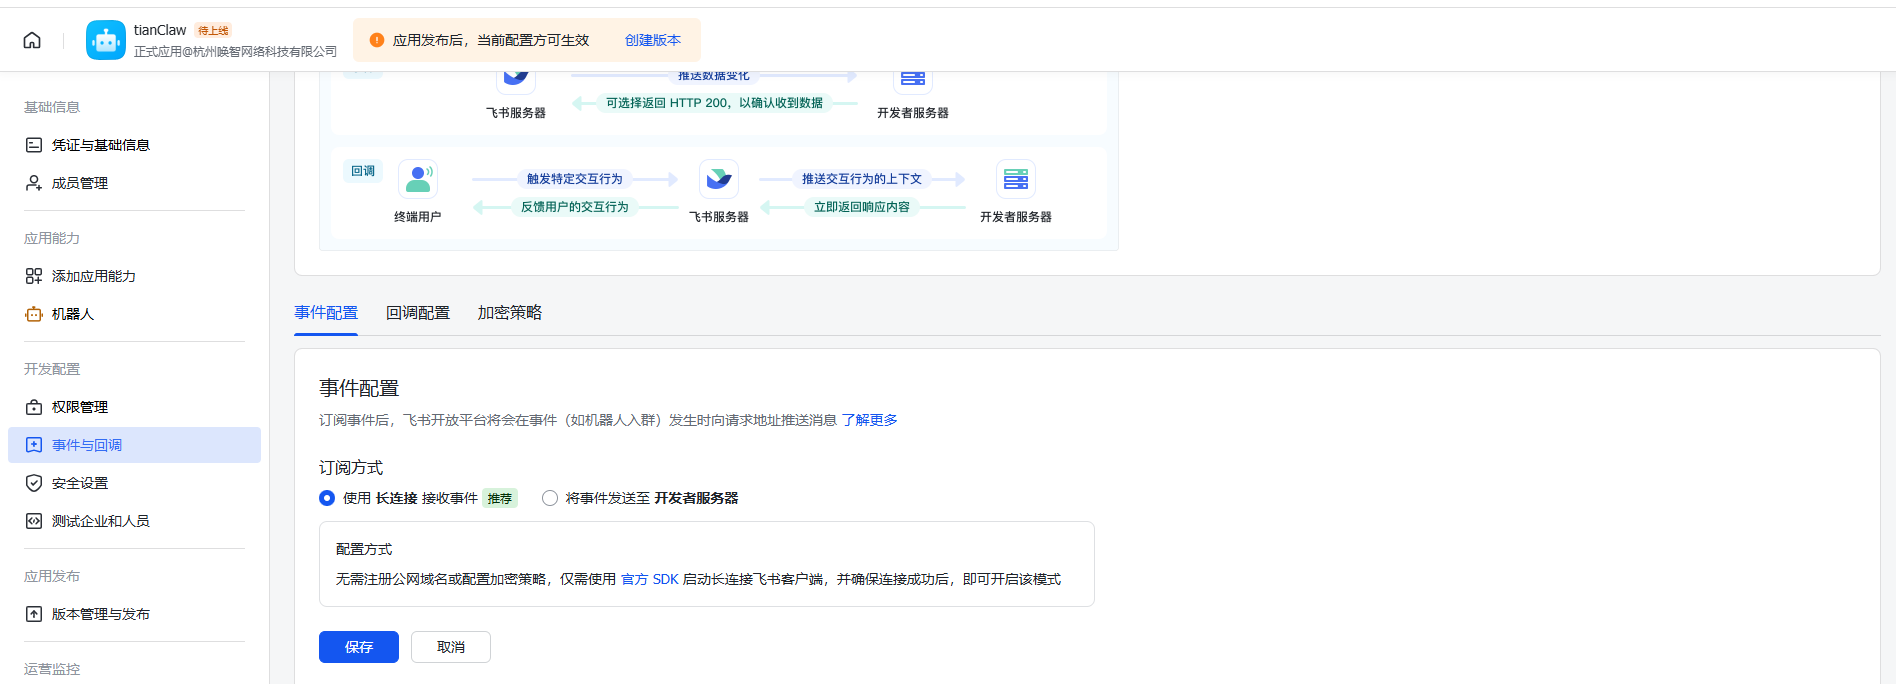 *选择长连接订阅方式*
4. 点击 **添加事件**,搜索并添加 `im.message.receive_v1`(接收消息)
*选择长连接订阅方式*
4. 点击 **添加事件**,搜索并添加 `im.message.receive_v1`(接收消息)
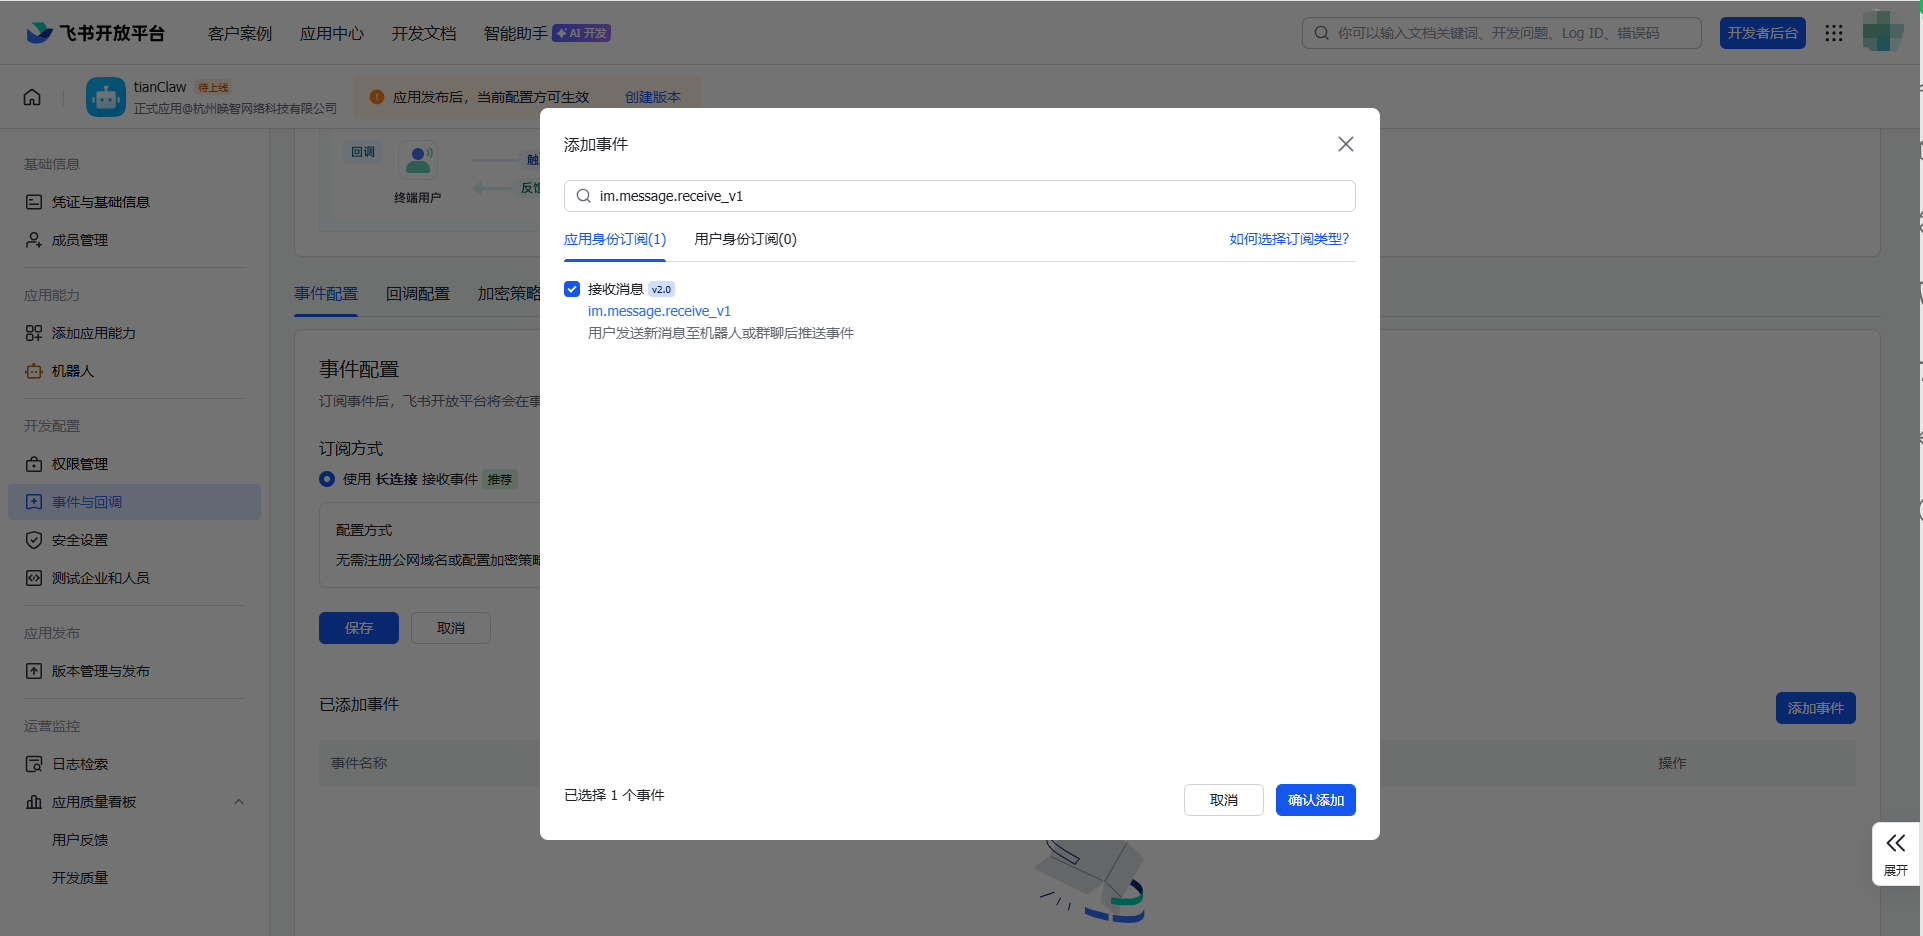 *添加接收消息事件*
## 第六步:创建版本并发布
1. 点击左侧菜单的 **版本管理与发布**
2. 点击 **创建版本**
3. 填写版本号和更新说明
4. 提交审核,等待管理员审批
*添加接收消息事件*
## 第六步:创建版本并发布
1. 点击左侧菜单的 **版本管理与发布**
2. 点击 **创建版本**
3. 填写版本号和更新说明
4. 提交审核,等待管理员审批
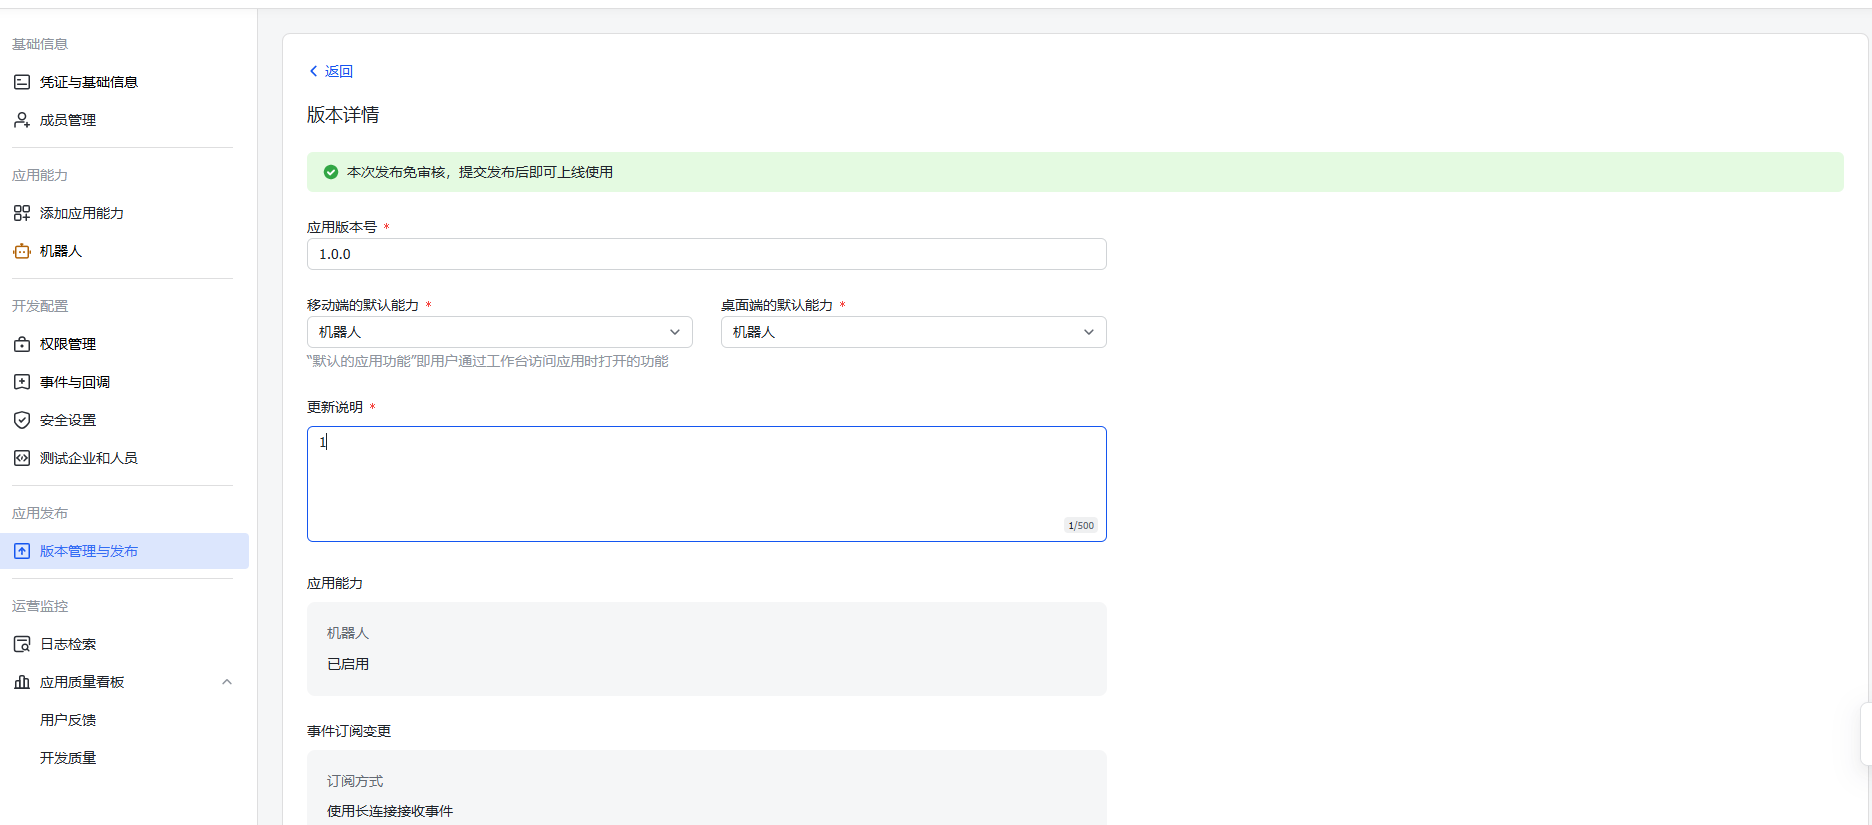 *创建版本并提交发布*
**重要:** 每次修改权限或事件订阅后,都必须创建新版本并重新发布才能生效。
## 第七步:对接码绑定
应用发布审批通过后:
1. 在飞书中搜索您的机器人名称
2. 发送任意消息(如「你好」)
3. 机器人会回复一个 **8 位对接码**(如 `DFE62DTD`)
*创建版本并提交发布*
**重要:** 每次修改权限或事件订阅后,都必须创建新版本并重新发布才能生效。
## 第七步:对接码绑定
应用发布审批通过后:
1. 在飞书中搜索您的机器人名称
2. 发送任意消息(如「你好」)
3. 机器人会回复一个 **8 位对接码**(如 `DFE62DTD`)
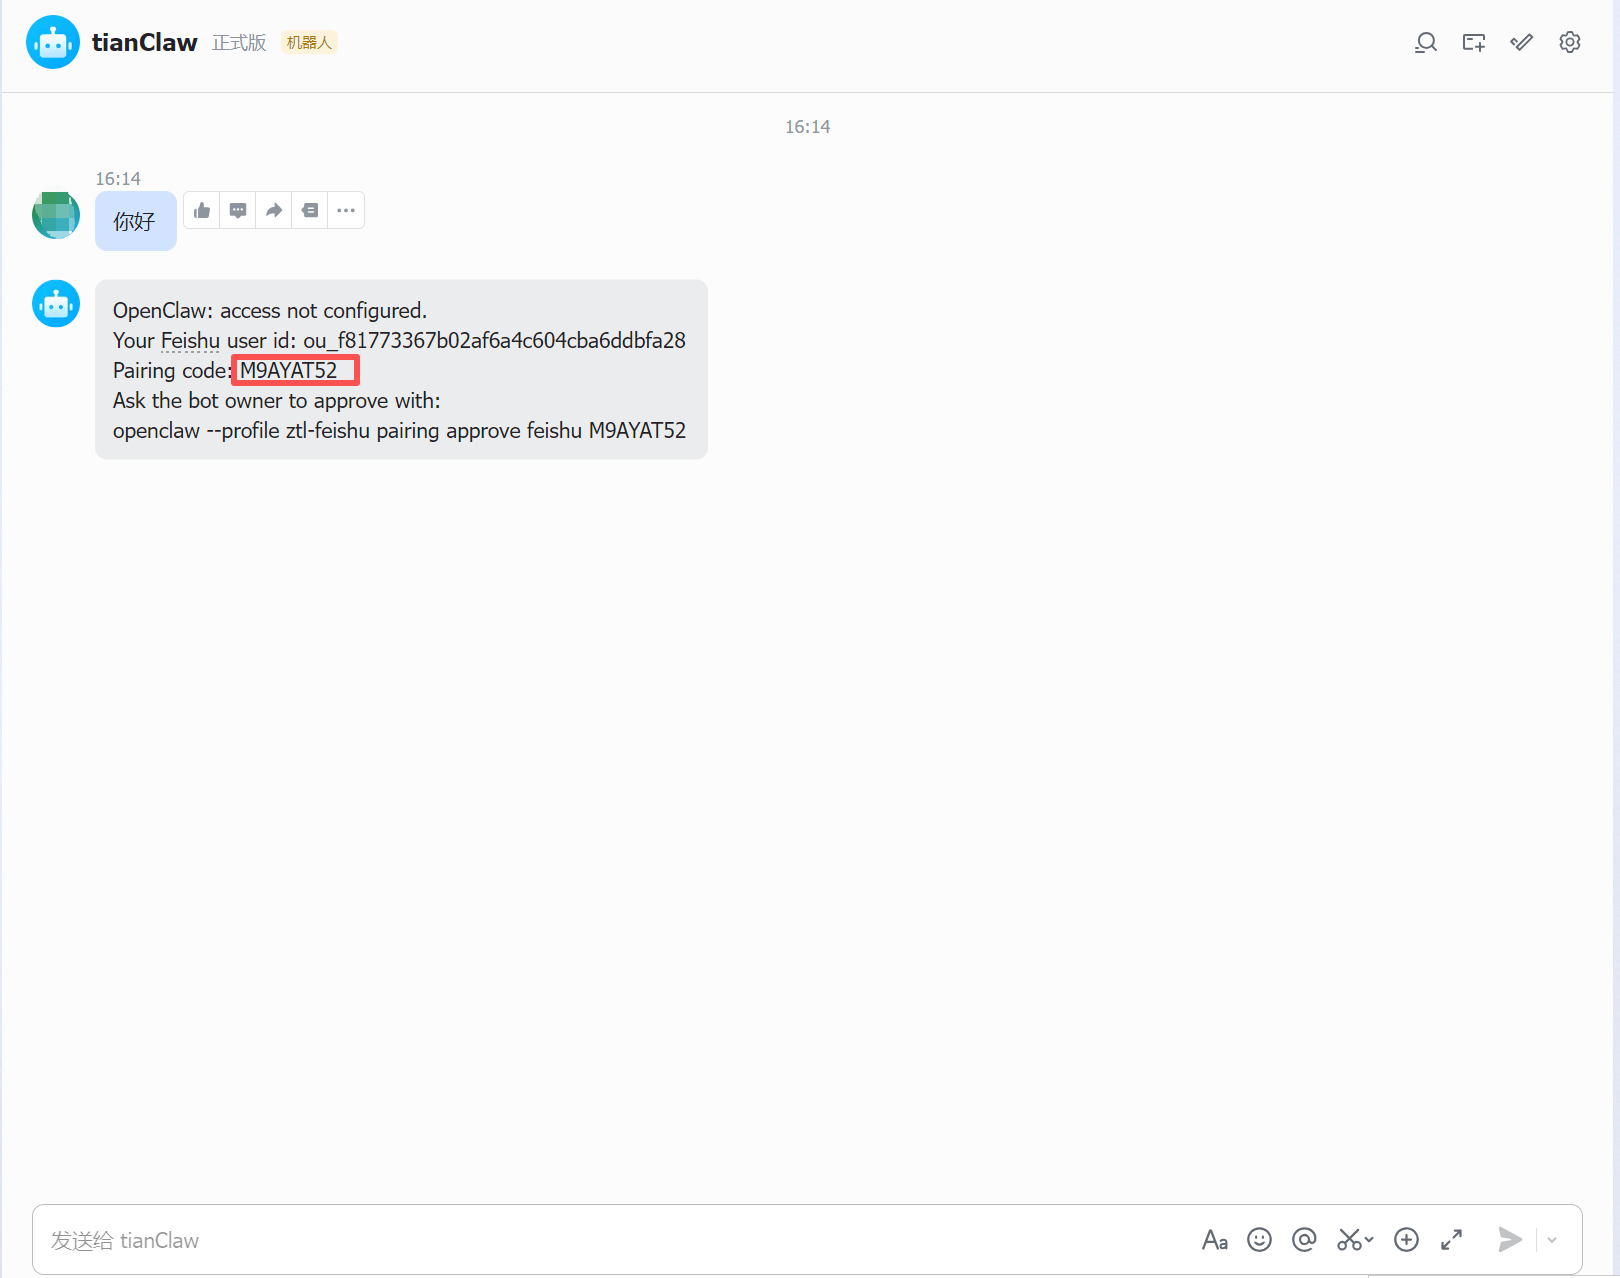 *机器人回复的对接码*
4. 回到 Manager 的新建实例向导,在「**填入对接码**」步骤中输入对接码,点击「**批准**」
*机器人回复的对接码*
4. 回到 Manager 的新建实例向导,在「**填入对接码**」步骤中输入对接码,点击「**批准**」
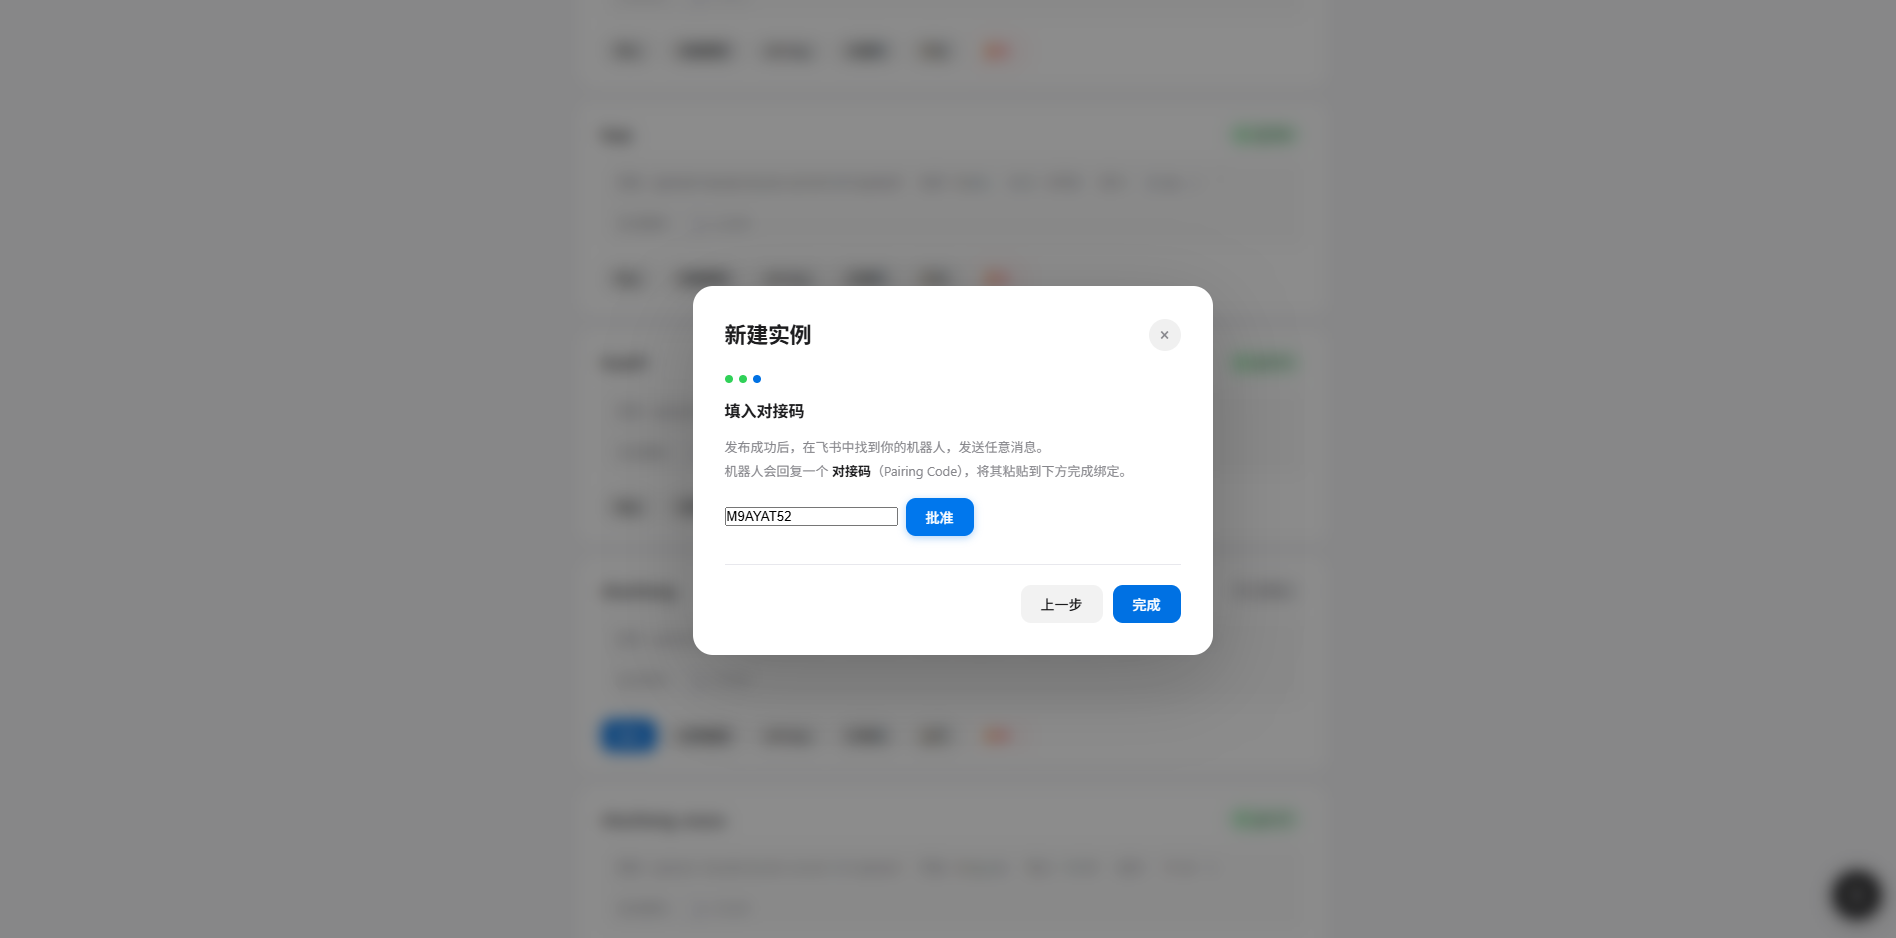 *在新建实例向导中输入对接码并批准*
5. 显示对接码已批准后,点击「**完成**」
*在新建实例向导中输入对接码并批准*
5. 显示对接码已批准后,点击「**完成**」
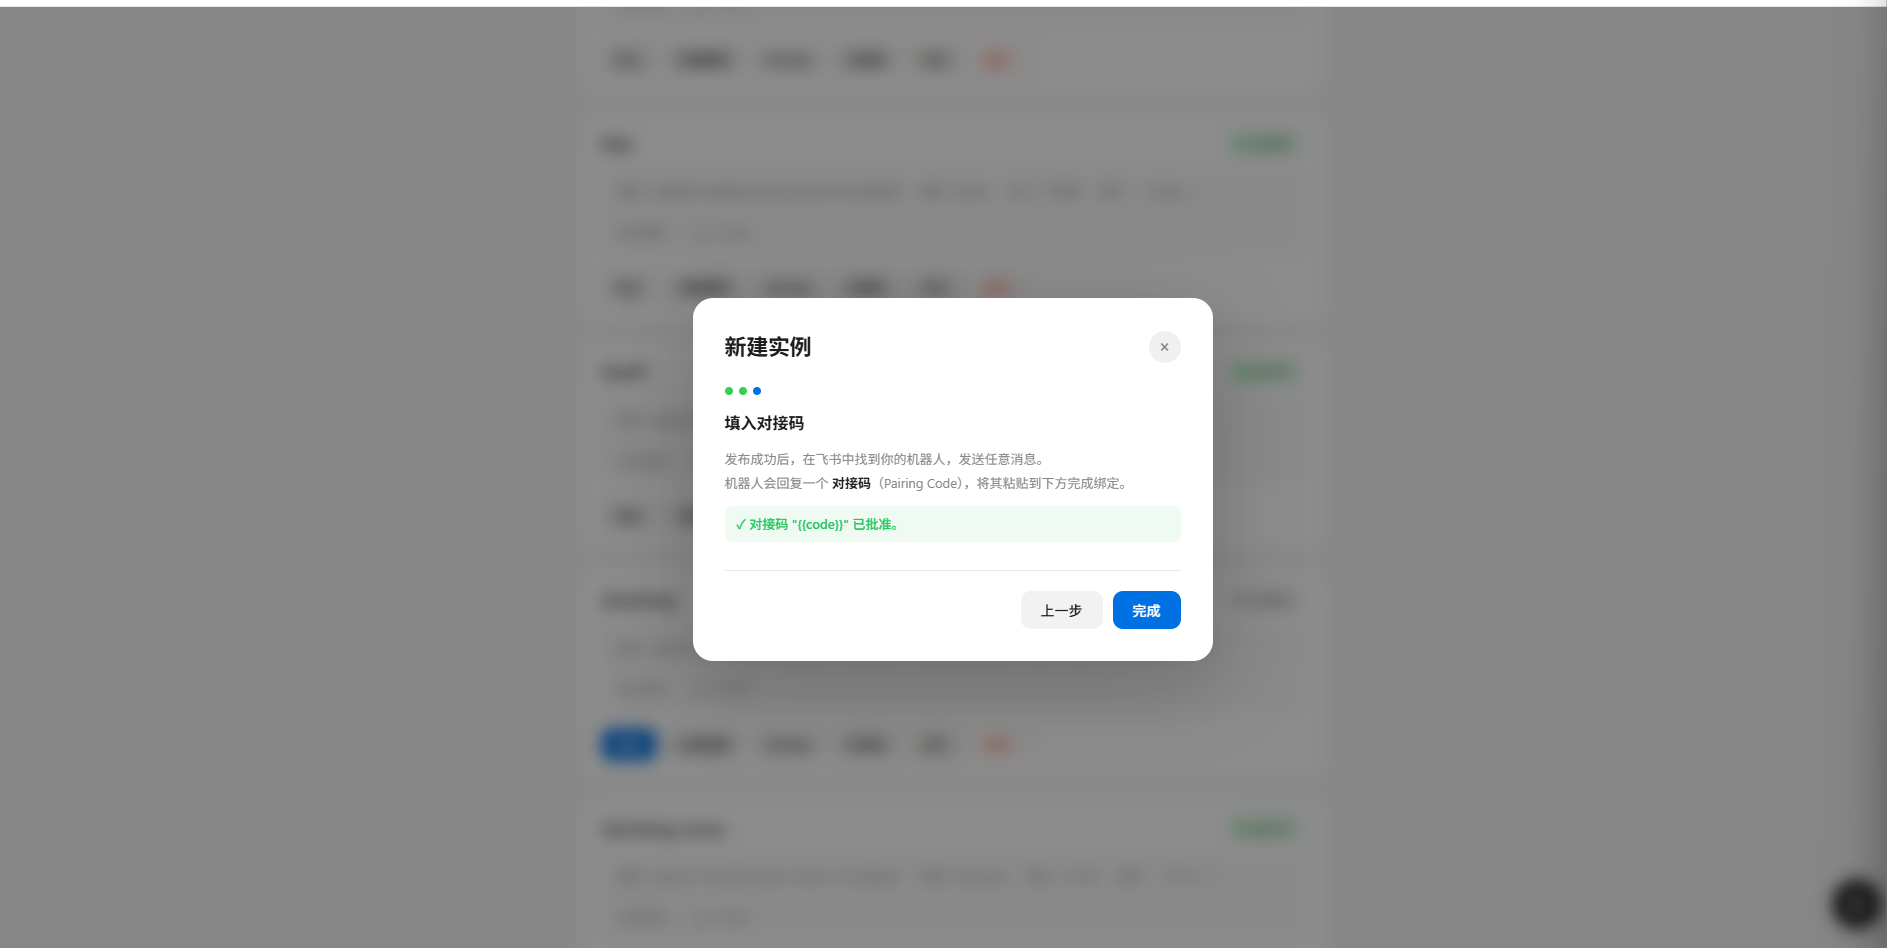 *对接码审批成功,点击完成*
6. 返回飞书,再次发送消息,机器人将正常回复 AI 生成的内容
*对接码审批成功,点击完成*
6. 返回飞书,再次发送消息,机器人将正常回复 AI 生成的内容
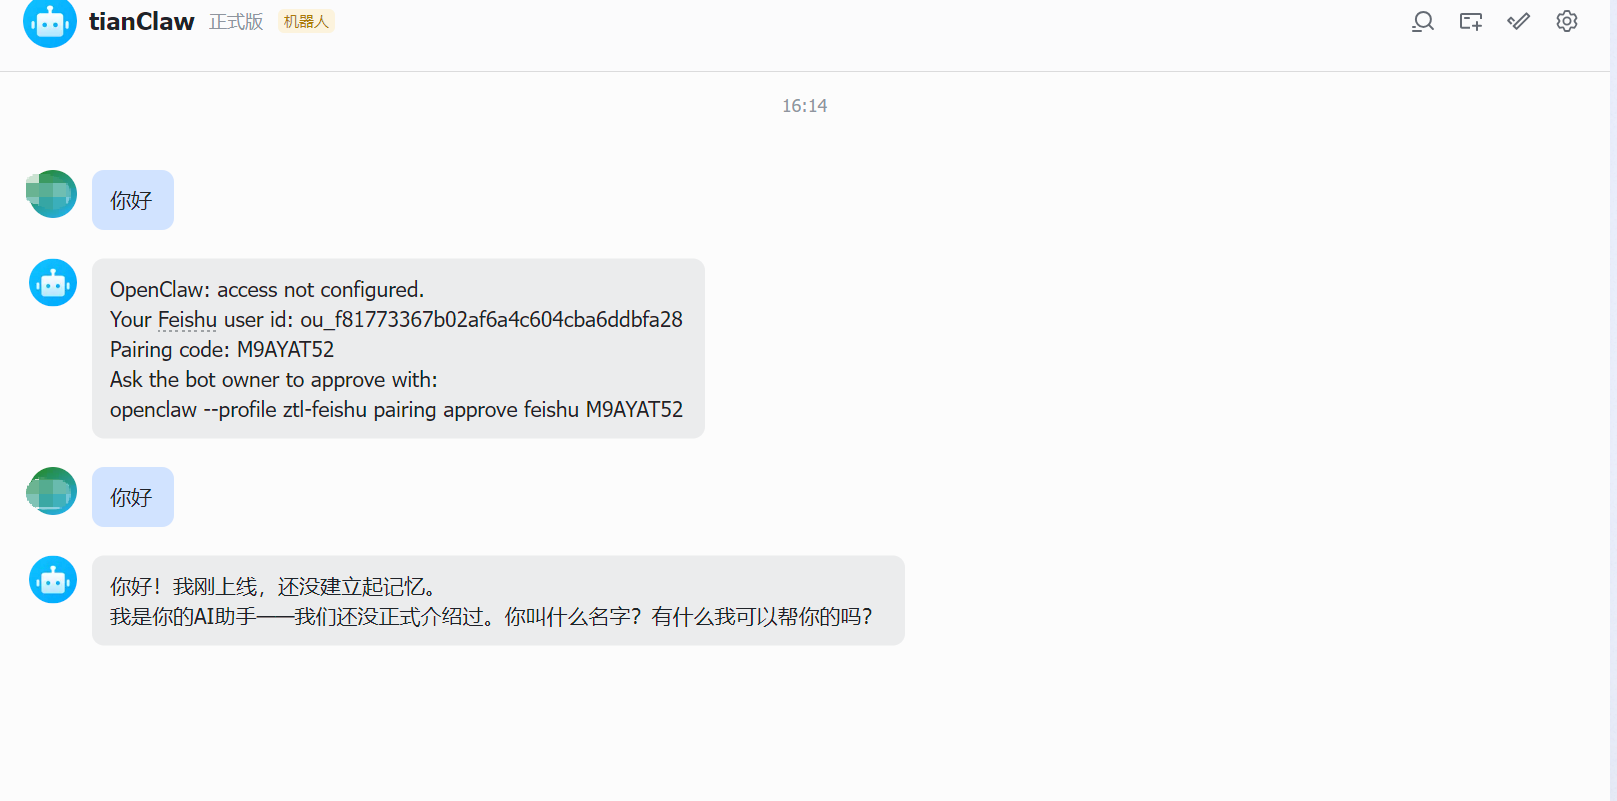 *绑定成功后与 AI 机器人正常对话*
## 常见问题
### Q1: 机器人不回复消息?
**解决方案:**
1. 确认事件订阅已添加 `im.message.receive_v1`
2. 确认订阅方式为「**长连接**」(不是 Webhook)
3. 确认已创建新版本并发布,且审批已通过
4. 确认 Manager 中该实例状态为「**运行中**」
### Q2: 提示权限不足?
**解决方案:**
1. 检查所有权限是否已开通(参见第二步)
2. 修改权限后,必须创建新版本并重新发布
3. 等待管理员审批通过
### Q3: 对接码审批失败?
**解决方案:**
* 确认 Gateway 正在运行
* 对接码区分大小写,请仔细核对
* 对接码在 Gateway 重启后失效,让用户重新发消息获取新码
***
查看 Manager 安装部署和实例管理的完整指南
*绑定成功后与 AI 机器人正常对话*
## 常见问题
### Q1: 机器人不回复消息?
**解决方案:**
1. 确认事件订阅已添加 `im.message.receive_v1`
2. 确认订阅方式为「**长连接**」(不是 Webhook)
3. 确认已创建新版本并发布,且审批已通过
4. 确认 Manager 中该实例状态为「**运行中**」
### Q2: 提示权限不足?
**解决方案:**
1. 检查所有权限是否已开通(参见第二步)
2. 修改权限后,必须创建新版本并重新发布
3. 等待管理员审批通过
### Q3: 对接码审批失败?
**解决方案:**
* 确认 Gateway 正在运行
* 对接码区分大小写,请仔细核对
* 对接码在 Gateway 重启后失效,让用户重新发消息获取新码
***
查看 Manager 安装部署和实例管理的完整指南